Register Entities allows you to register custom components i.e. custom parsers, data sources and processors to be used in the pipelines.
There are three types of entities:
|
Entity |
Description |
|
Register Component |
Upload a customized jar to create a customized component that can be used in data pipelines. |
|
Functions |
A rich library of pre-defined functions and user defined functions. |
|
Variables |
Use variables in your pipelines at runtime as per the scope. |
|
Models |
Register Spark ML/H2O/Scikit models of supported model types that can be used in data pipeline. |
|
Calendar |
Create multiple holiday calendar which can be then used in Workflow. |
Each entity is explained below.
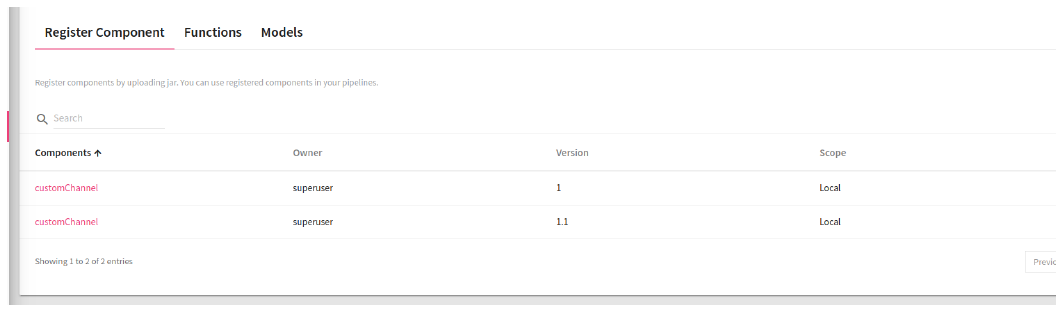
Use Register Component to register a custom component (Channel and Processor) by uploading a customized jar. Those custom components can be used in data pipelines.
Register Components tab comes under Register Entities side bar option.
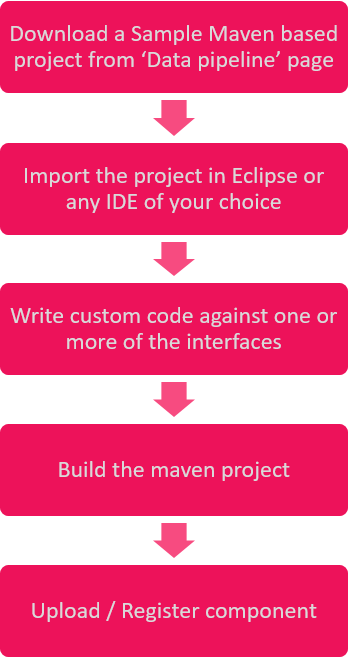
Download a sample jar from Data Pipelines page, customize it as per your requirement, and upload the same on Register Components page.
StreamAnalytix allows you implement your custom code in the platform to extend functionalities for:
Channel: To read from any source.
Processor: To perform any operation on data-in-motion.
Custom code implementation allows importing custom components and versioning.
You can download a Maven based project that contains all the necessary StreamAnalytix dependencies for writing custom code and sample code for reference.
Pre-requisites for custom code development
1. JDK 1.7 or higher
2. Apache Maven 3.x
3. Eclipse or any other IDE
Steps for Custom Code Implementation
Build Custom Code
Provide all the dependencies required for the custom components in pom.xml available in the project.
• Build project using mvn clean install.
• Use jar-with-dependencies.jar for component registration.
Register custom code
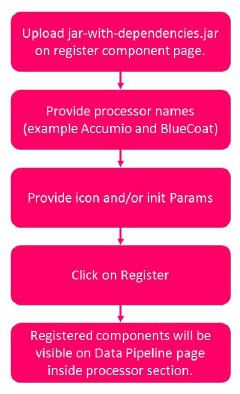
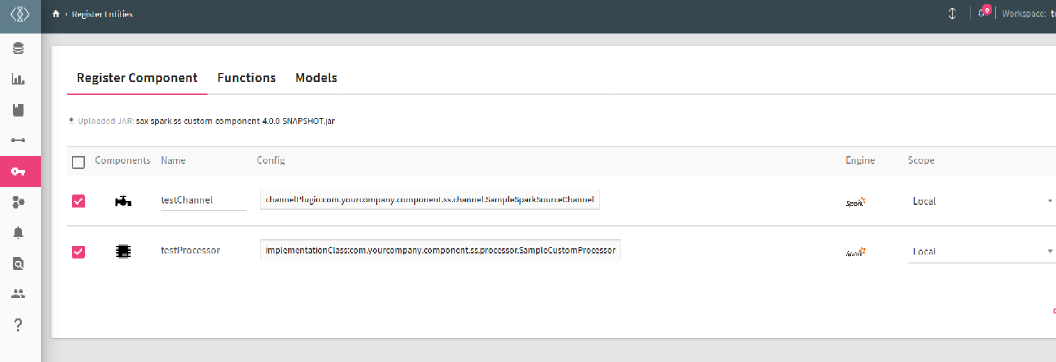
The list of custom components is displayed on the page shown below and the properties are described below:
|
Field |
Description |
|---|---|
|
Components |
The icon of the component is displayed in this column, which symbolizes a Data Source or a Processor. |
|
Name |
Name of Custom Component. |
|
Config |
Config link of the component. You can add configuration to a custom component or upload a jar. |
|
Engine |
The supported engine which is Spark. |
|
Scope |
The component can be used for a Local environment or a Global. |
|
Actions |
Add Config (+)
Upload Jar
Delete
|
|
Owner |
If the custom component was created by a Superuser or workspace user. |
|
Version |
The version number of the custom component |
Perform following operation on uploaded custom components.
l Change scope of custom components (i.e. Global/Local)
l Change icon of custom components.
l Add extra configuration properties.
l Update or delete registered custom components.
Version Support (Versioning) in component registration
Register multiple versions of a registered component and use any version in your pipeline.
NOTE: If you have used any registered component in the pipeline, make sure that all the registered components (ones registered with single jar) should be of the same version. If you have registered a component with a fully qualified name, then that component cannot be registered with another jar in the same workspace.
Same FQN and same jar will create new version of that component.
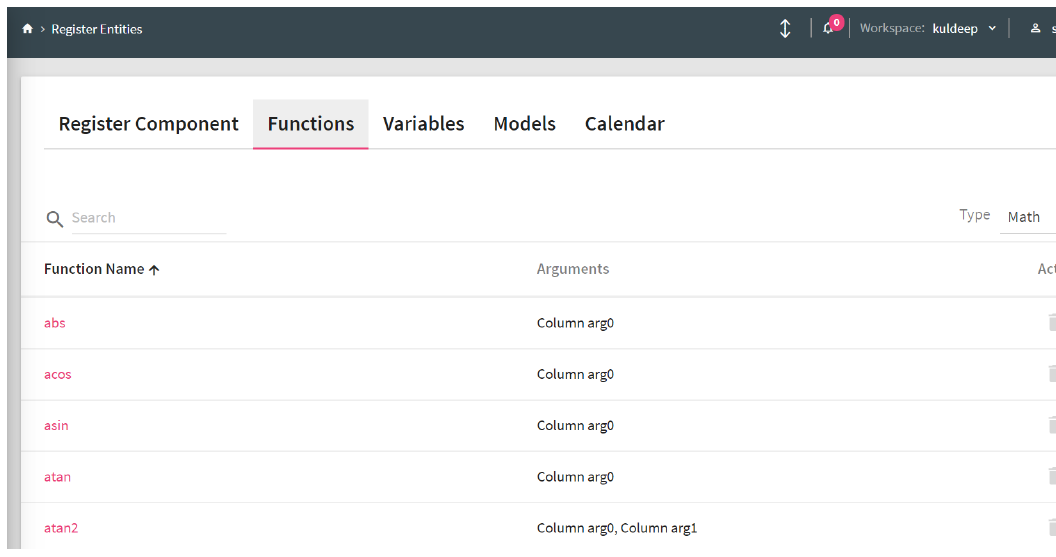
Functions enables you to enrich an incoming message with additional data that is not provided by the source.
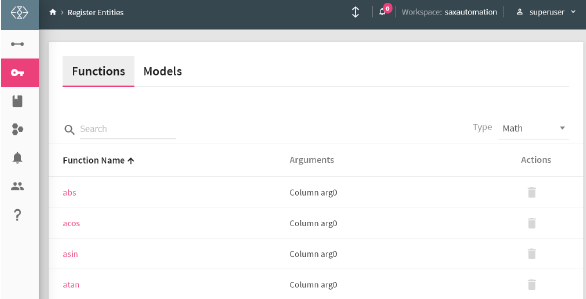
StreamAnalytix provides a rich library of system-defined functions as explained in the Functions Guide.
Allows you to use variables in your pipelines at runtime as per the scope.
To add a variable, click on Add New Variable and provide details as explained below.
Variables.PNG
|
Field |
Description |
|---|---|
|
Name |
Provide a name to the variable |
|
Value |
Value of assigned to the variable (it can be an expression) |
|
Data Type |
Select the Data Type of the variable. The options are: • Number • Decimal • String |
|
Scope |
Select the Scope of the variable. Following are the types of scope: Global: The scope of this variable is global throughout the application. Workspace: The scope of the variable will be within all the topologies of the workspace. Pipeline: The scope of the variable is within the pipeline. If you select the option as pipeline, a drop-down is listed with all the pipelines of the same workspace. |
For example, if you create the following variables: Name, Salary and Average.
Then by calling the following code, you will get all the variables in the varMap in its implementation class.
Map<String, ScopeVariable> varMap = (Map<String, ScopeVariable>) configMap.get(svMap);
If you want to use the Name variable that you have created by calling the following code you will get all the details of the scope variables.
The variable object has all the details of the variable Name, Value, Datatype and Scope.
ScopeVariable variable = varMap.get(Name);
String value = variable.getValue();
You can now add Scope Variable so that you can use these variables to reuse and update them as and when needed on pipeline and pipeline components.
Scope Variable Support is added for below components with their respective location where the scope variable will be populated with the help of @.
Cobol (Data Source) --> copybookPath --> dataPath
Native/Advance HDFS (Data Source) --> file path
HIVE (Data Source) --> Query
JDBC (Data Source) -- > Query
File Reader/Native (Data Source)--> File Path
File Writer (Emitter)--> File Path
Formats supported are:
@{Pipeline.filepath} = /user/hdfs
@{Workspace.filepath} = /user/hdfs
@{Global.filepath}/JSON/demo.json = /user/hdfs/JSON/demo.json
@{Pipeline.filepath + '/JSON/demo.json'} = /user/hdfs/JSON/demo.json
@{Workspace.filepath + “/JSON/demo.json”} = /user/hdfs/JSON/demo.json
@{Global.lastdecimal + 4} // will add number = 14.0
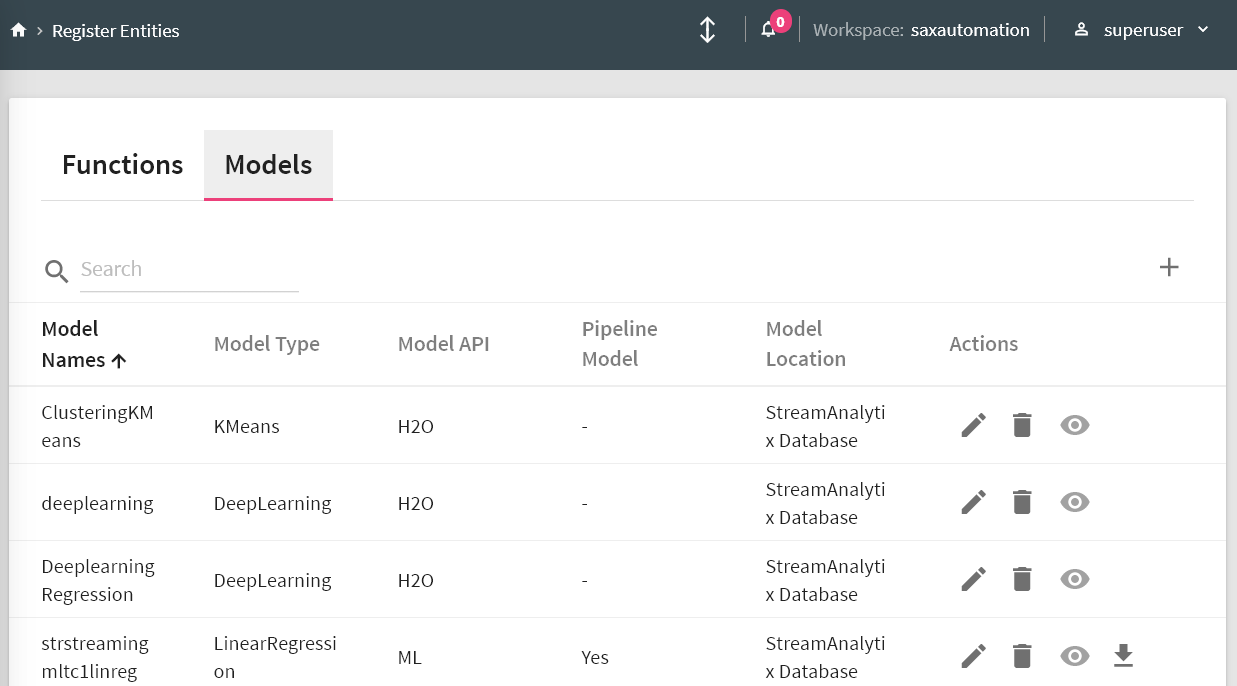
The home page of a Register Models is shown below:
|
Field |
Description |
|---|---|
|
Model Name |
Name of the registered model. |
|
Model API |
The chosen Machine Learning API i.e. Spark ML/H20/Scikit. |
|
Model Type |
Shows the type of the model. |
|
Pipeline Model |
Shows if you have trained the model using Spark ML Pipeline API or not. |
|
Model Location |
Location of the registered model, which could be StreamAnalytix DB or HDFS. |
|
Actions |
Delete: To delete a Model. Edit: It allows you to edit Model Details/Model Definition. Download: You can download the ML Model. Only those models which are registered in SAX dB, will be reflected for download. |
NOTE: If you use a registered model in your data pipeline, make sure that the Spark and H20 version must be same.
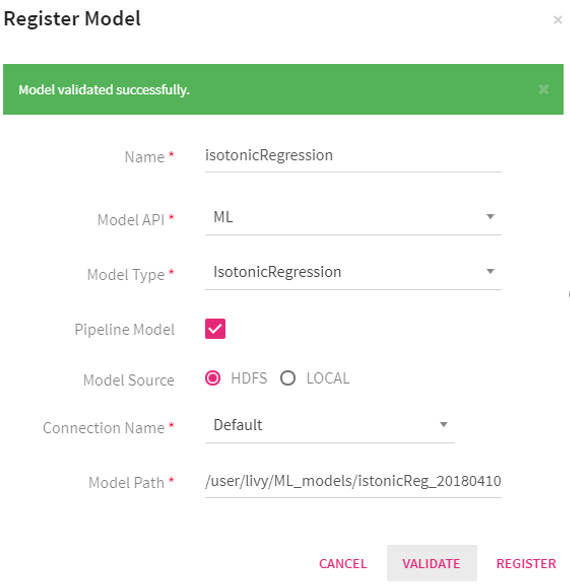
Steps to register a Decision Tree Model built on Spark Pipeline API for a classification use -case.
Step 1: Train the model on sample dataset and save it at any location on HDFS or local file system.
Step 2: Click on Register Model tab and provide a model name.
Step 3: Provide model API that is ML in our case.
Step 4: Provide the model type i.e. Decision Tree.
Step 5: Mention if the model to be registered should be a Spark Pipeline model or not.
Step 6: Mention model algorithm i.e. Classification
Step 7: Select model source. If model is stored on locally, then select Local and if model is stored on HDFS then select HDFS.
Below explained is a table to show you the process flow with HDFS and Local.
|
Local |
HDFS |
|
Step 8: When you select Local, browse to the zip file of the model. Once the model is successfully uploaded, you will see a tick mark in green. Step 9: Click on Validate to validate the model. Step 10: Once validation is successful, a new tab will be shown: Save Model On. Choose HDFS or StreamAnalytix Database. If you choose HDFS, then provide the HDFS Connection Name and Model Path where the model will be saved. Step 11: Register the saved model on the Model Path by clicking on Register.
|
Step 8: When you select HDFS, provide the HDFS connection name. Step 9: Provide the Model Path where the model is located. Step 10: Validate the model Step 11: Register the model. |
|
Field |
Description |
|---|---|
|
Name |
Provide a valid name of the model. |
|
Model API |
Spark API on which the model is built. |
|
Feature List |
The Feature list field enlists the features that are used to train the model. You can specify the feature names either by entering them manually or by uploading a .csv file. Here, the header row of the file will be used for feature names. |
|
Model Type |
Types of models supported for the chosen Spark API. |
|
Pipeline Model |
If you have trained the model using Spark ML Pipeline API then select pipeline model otherwise un-check this option and register. |
|
Model Algorithm |
Available for ML Models only. Algorithm for the selected Model Type. (only available for Decision Tree, Random Forest, and Gradient Boosted Tree, where they will populate Classification and Regression algorithm type.) |
|
Model Source |
If model lies on local file system then select Local, otherwise if model lies on HDFS then select HDFS. |
|
HDFS |
Select this option if model is saved on HDFS. |
|
Upload |
Select this option if model is saved on a local file system. |
|
Validate |
Validates the model located at the given location. Once Validated, you will able to save the model. |
|
Save Model On |
If you want to save the model on local file system then select Local otherwise select HDFS. |
|
Connection Name |
Choose the HDFS connection name. |
|
Model Path |
Provide the path where the model is located on HDFS. |
When the model is successfully registered with the application, you can avail it in your data pipelines.
StreamAnalytix provides its users with the option to register H2O POJO (Plain Old Java Objects) and MOJO (Model Object Optimization) models that are trained outside of StreamAnalytix. After the successful registration, the user can use the model for doing predictions.
In the left navigation pane, click Register Entities. Click the Models tab.
To register a new model, click the + icon on the right side of the screen.
|
Field |
Description |
|---|---|
|
Name |
Name of the Model. |
|
Model API |
Choose H20 as API. |
|
Model Format |
Select model format MOJO (Model Object Optimized) or POJO (Plain Old Java Object) |
|
Model Type |
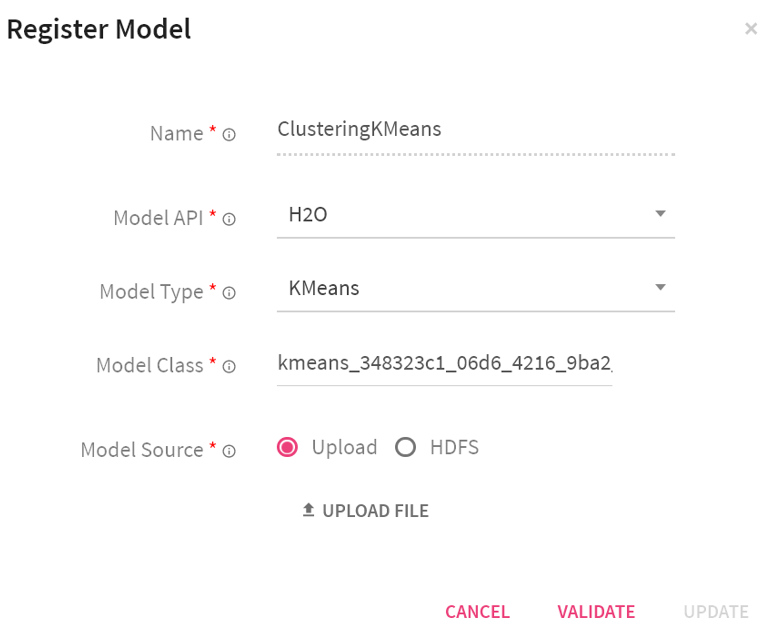
The MOJO or POJO models can be registered with the below mentioned Spark ML algorithms. Choose the one that fits your use case. 1. Distributed Random Forest 2. Gradient Boosting Machine 3. Generalized Linear Modeling 4. Isolation Forest NOTE: You will get different model types if you selects 'POJO' i.e. - KMeans, NaiveBayes, Deep Learning, Distributed Random Forest, Gradient Boosting Machine, Generalized Linear Modeling |
|
POJO Model Type: Model Class |
This field is Mention the POJO Class name. |
|
Model Source |
'Register the H2O model either by uploading the zip file of MOJO models or the Java files of POJO models. If the files are placed on HDFS, mention the HDFS connection and location. |
In the Register Model window, mention the following properties:
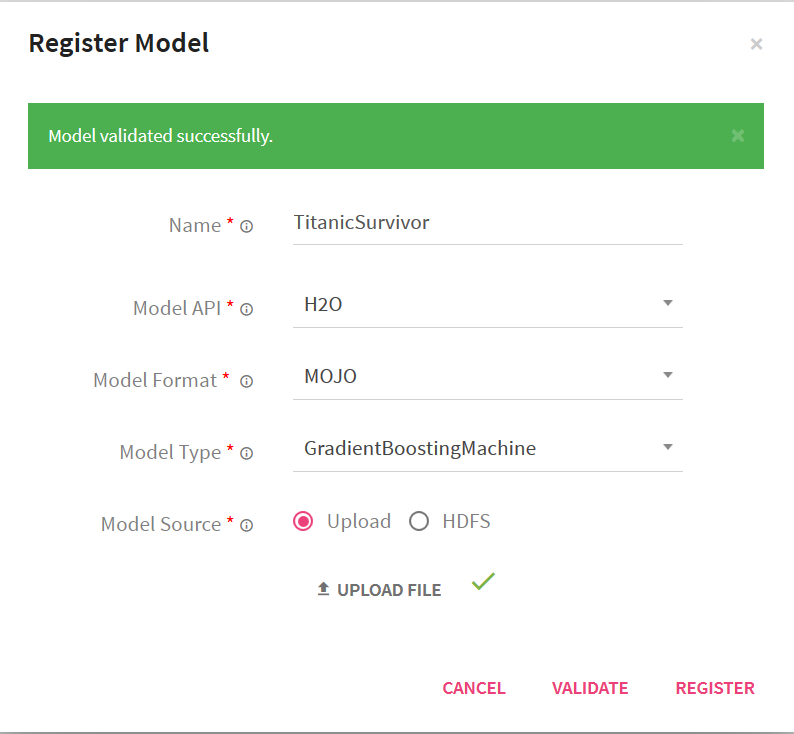
Click the Validate button.
Once, the model is validated successfully, the Register button next to Validate will be enabled.
Click Register. After the model is registered successfully, you can view the model in the models page.

Once the model is registered it can be utilized for scoring over H2O processor in pipelines over StreamAnalytix.
StreamAnalytix provides its users with the option to register Scikit model that is trained outside of StreamAnalytix. After the successful registration, the user can use the model for making predictions.
In the left navigation pane, click Register Entities. Click the Models tab to register a model.
On the right side of the screen, click the + icon to register a new model.
In the Register Model window, mention the name of the model, specify the model API. Here, we choose Scikit as API.
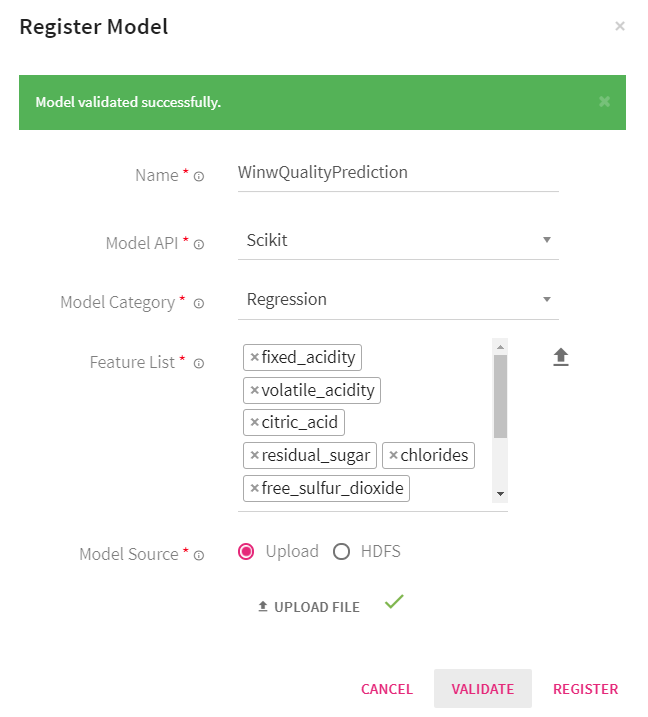
Select one of the below model categories:
• Classification
• Clustering
• Pipeline
• Regression
The Feature list field enlists the features that are used to train the model. You can specify the feature names either by entering them manually or by uploading a .csv file. Here, the header row of the file will be used for feature names.
You can provide the model source either by uploading the scikit model or by providing the HDFS file path.
Note: If you choose HDFS as the model source, provide the connection name and model path.
Click the Validate button. Once, the model is validated successfully, the Register button next to Validate will be enabled. Click Register. After the model is registered successfully, you can view the model in the models page. Now you can use the registered model in the data pipeline for making predictions.

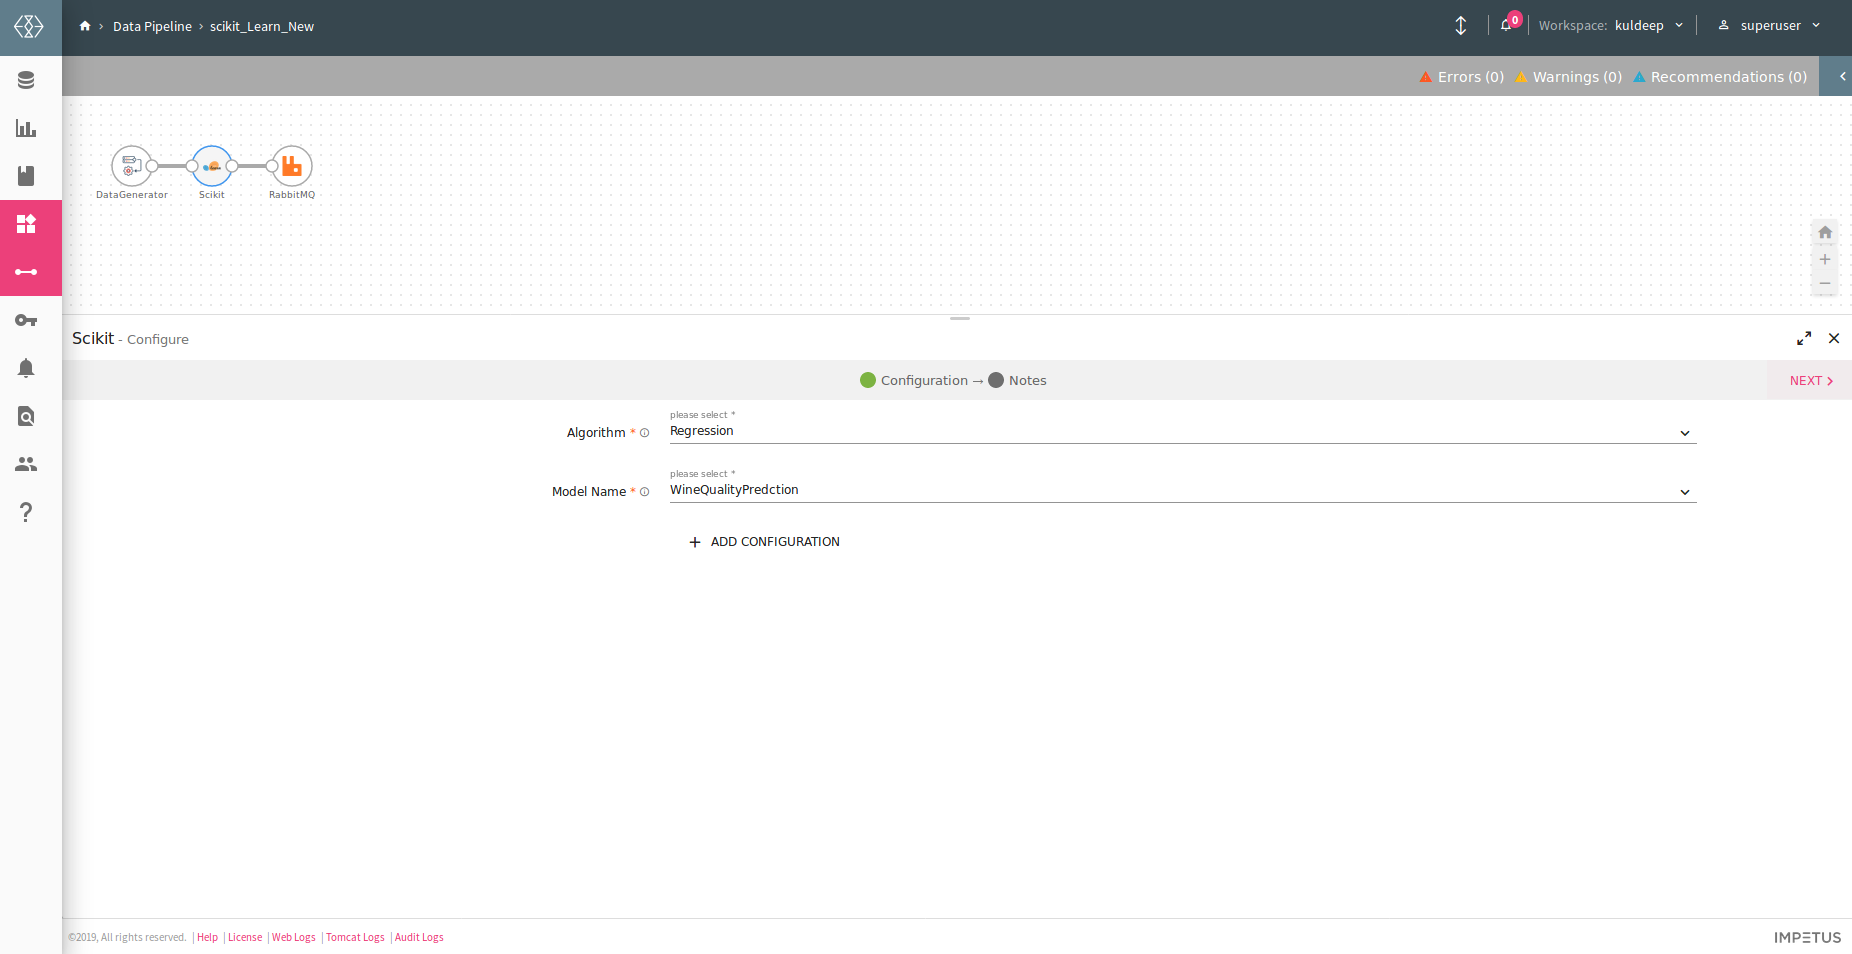
Now, you can use the registered scikit model for doing predictions by selecting the scikit processor to create a Data Pipeline. Refer to the image below:
You can create holiday calendars from Register Entities < Calendar< Calendar listing page. There will be a + icon to create the calendar.
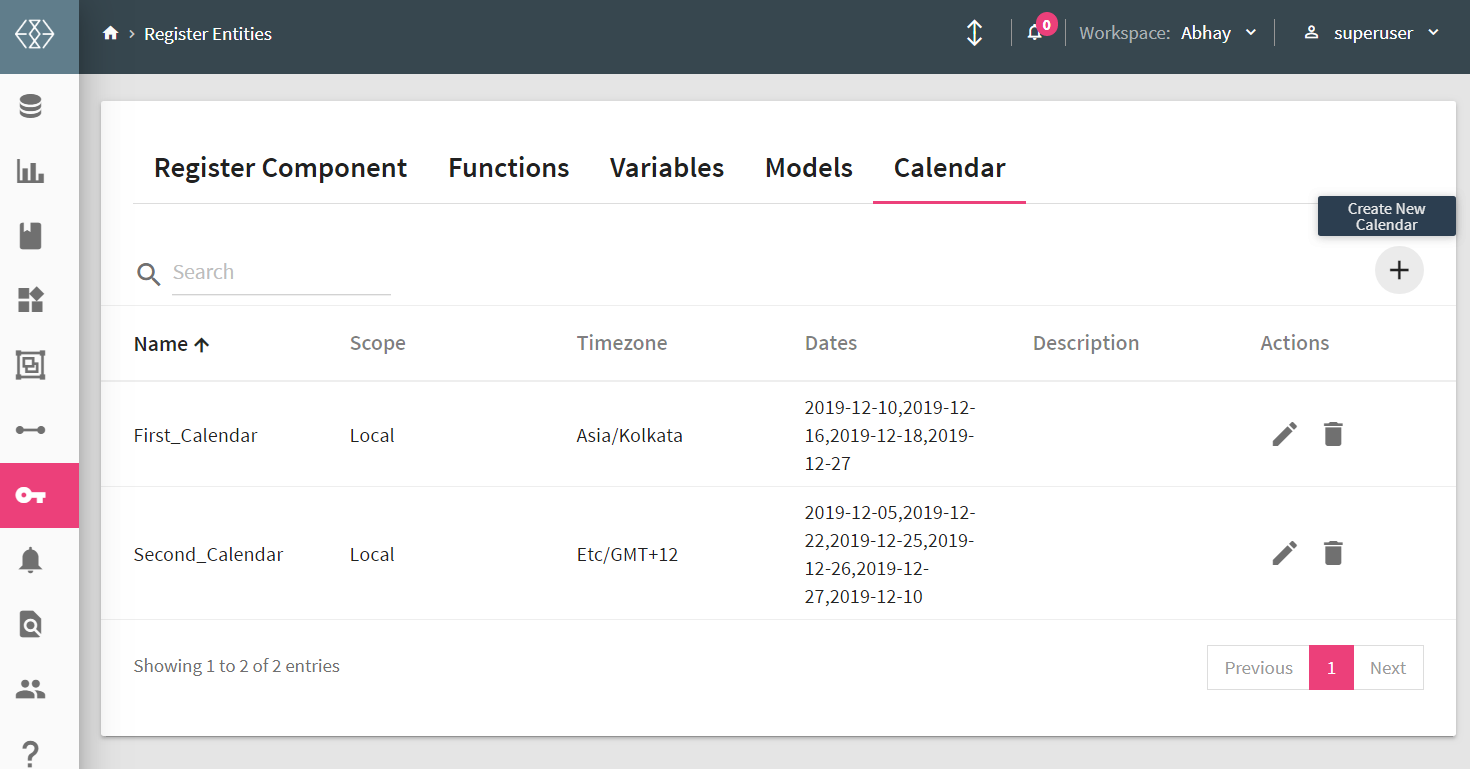
On the calendar configuration page you will be asked to select the holiday dates to create calendar.
You can either select multiple dates from the complete year of multiple year calendar or upload the holiday dates for one or multiple calendar years.
These calender can be used in the Workflow.
Following is the configuration page, their properties and descriptions:
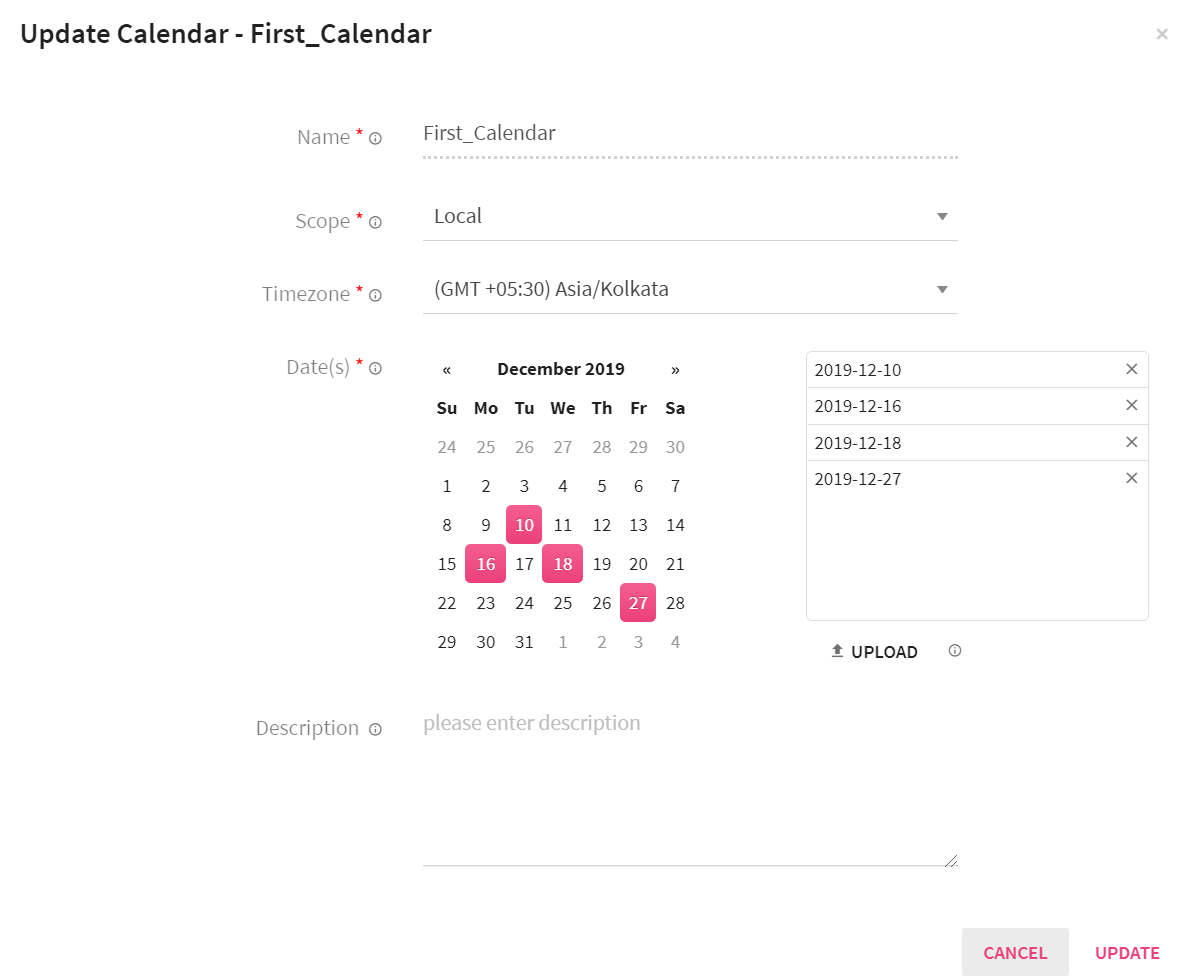
|
Entity |
Description |
|
Name |
Name of the calendar. |
|
Scope |
Select Global or Local, which defines the scope of the calendar. |
|
Timezone |
Select the timezone for your calendar. |
|
Date(s) |
Select the date(s) for your calender to be marked as holiday. |
|
Description |
You can add a description about the calendar. |
|
Upload |
Upload a text file (.txt) that contains date(s) in the format of MM-DD-YYYY. In case the file has multiple dates, each entry should be in a new line. |