Emitters define the destination stage of a pipeline which could be a NoSQL store, Indexer, relational database, or third party BI tool.
Advance Kafka Emitter stores data to Advance Kafka cluster. Data format supported are JSON and DELIMITED.
Configuring Advance Kafka Emitter for Spark Pipelines
To add a Advance Kafka Emitter into your pipeline, drag the Advance Kafka to the canvas, connect it to a Data Source or processor, and right click on it to configure.
Note: If the data source in pipeline has a streaming component, then the emitter will show four additional properties, Checkpoint Storage Location; Checkpoint Connections; Checkpoint Directory; and Time-Based checkpoint.
|
Field |
Description |
|---|---|
|
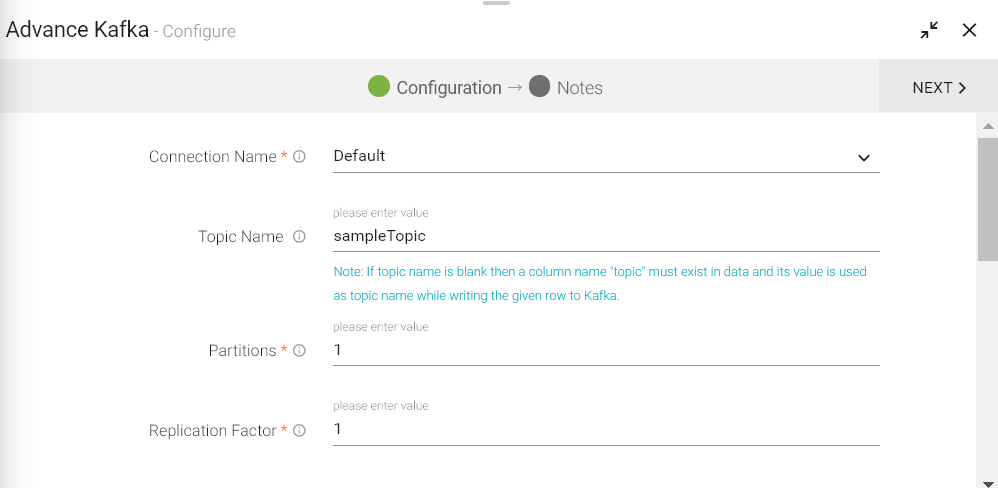
Connection Name |
All Kafka connections will be listed here. Select a connection for connecting to Advance Kafka. |
|
Topic Name |
Advance Kafka topic name where you want to emit data. |
|
Partitions |
Number of partitions to be created for a topic. Each partition is ordered, immutable sequence of messages that is continually appended to a commit log. |
|
Replication Factor |
For a topic with replication factor N, Advance Kafka will tolerate up to N-1 failures without losing any messages committed to the log. |
|
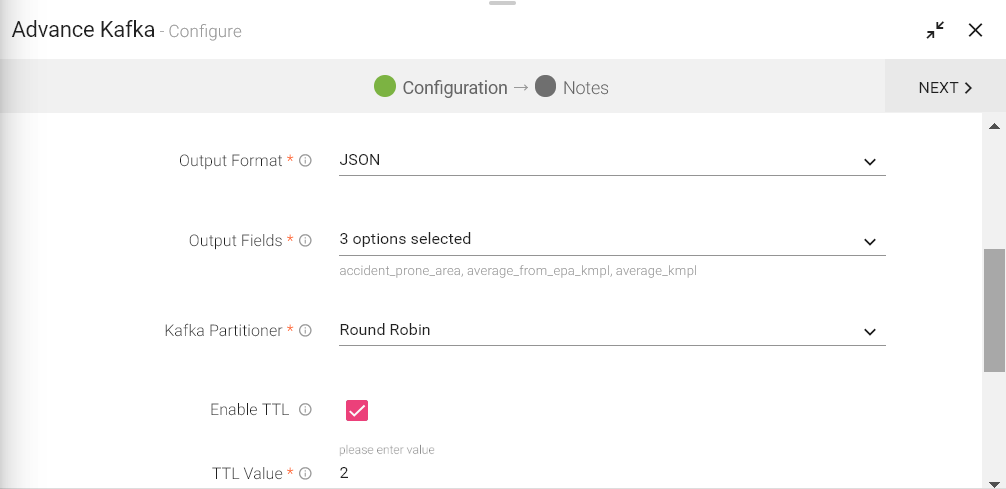
Output Format |
Data Type format of the output message. |
|
Output Fields |
Fields in the message that needs to be a part of the output data. |
|
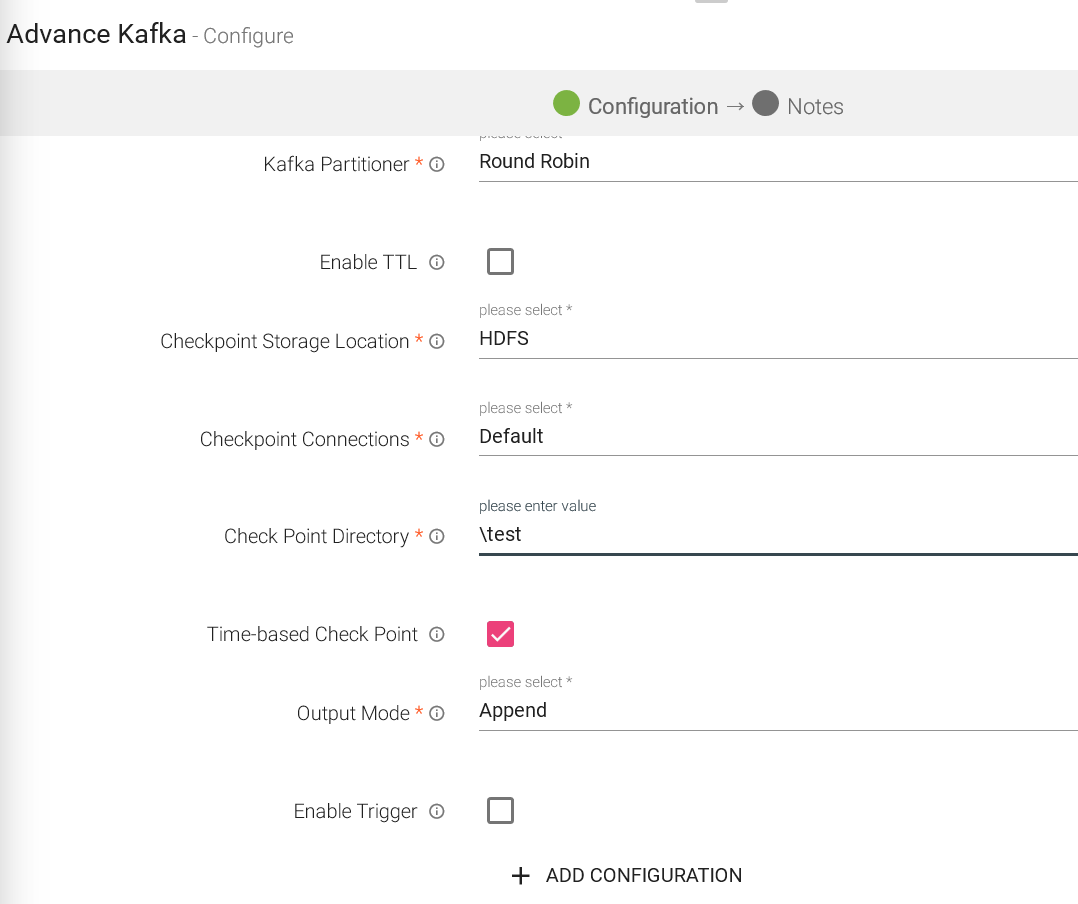
Advance Kafka Partitioner |
Round Robin(Default): Advance Kafka uses the default partition mechanism to distribute the data. Key Based: Advance Kafka partitioning is done on the basis of keys. Custom: Enables to write custom partition class by implementing the com.streamanalytix.framework.api.spark.partitioner.SAXAdvance Kafka Partitioner interface. The partition method contains logic to calculate the destination partition and returns the target partition number |
|
Enable TTL |
Select the checkbox to enable TTL(Time to Live) for records to persist for that time duration |
|
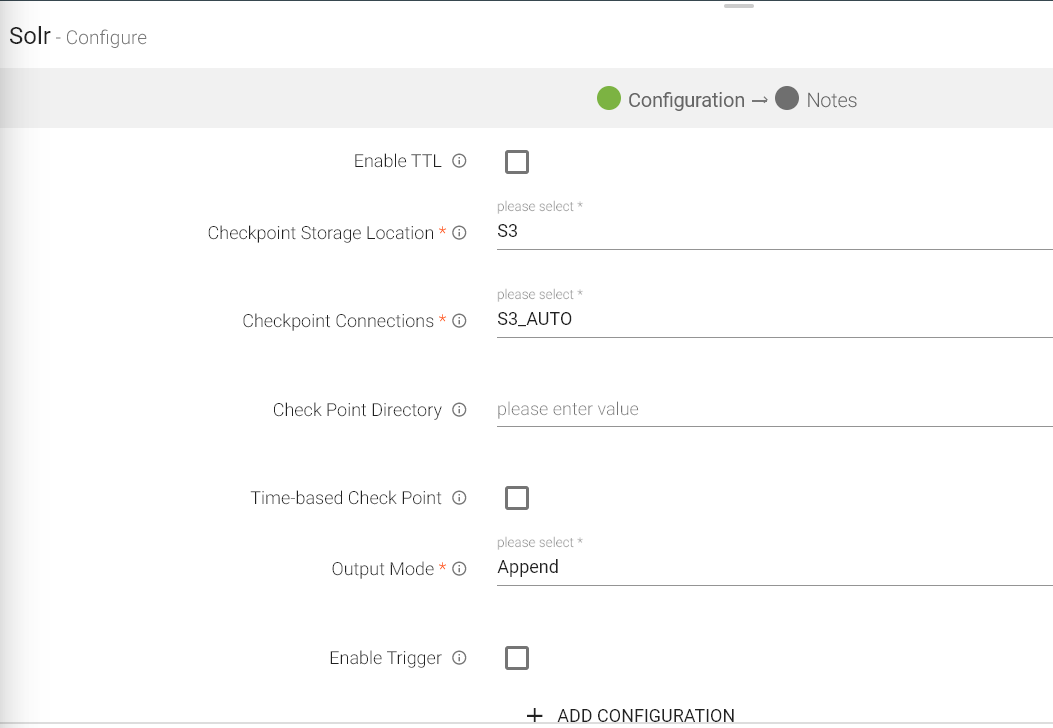
Checkpoint Storage Location |
Select the checkpointing storage location. Available options are HDFS, S3, and EFS. |
|
Checkpoint Connections |
Select the connection. Connections are listed corresponding to the selected storage location. |
|
Checkpoint Directory |
It is the path where Spark Application stores the checkpointing data.
For HDFS and EFS, enter the relative path like /user/hadoop/ , checkpointingDir system will add suitable prefix by itself. For S3, enter an absolute path like: S3://BucketName/checkpointingDir |
|
Time-Based checkpoint |
Select checkbox to enable timebased checkpoint on each pipeline run i.e. in each pipeline run above provided checkpoint location will be appended with current time in millis. |
|
Output Mode |
Output mode to be used while writing the data to Streaming emitter. Select the output mode from the given three options: Append: Output Mode in which only the new rows in the streaming data will be written to the sink Complete Mode: Output Mode in which all the rows in the streaming data will be written to the sink every time there are some updates. Update Mode: Output Mode in which only the rows that were updated in the streaming data will be written to the sink every time there are some updates. |
|
Enable Trigger |
Trigger defines how frequently a streaming query should be executed. |
|
Processing Time |
It will appear only when Enable Trigger checkbox is selected. Processing Time is the trigger time interval in minutes or seconds. |
Click on the Next button. Enter the notes in the space provided.
Click on the DONE button for saving the configuration.
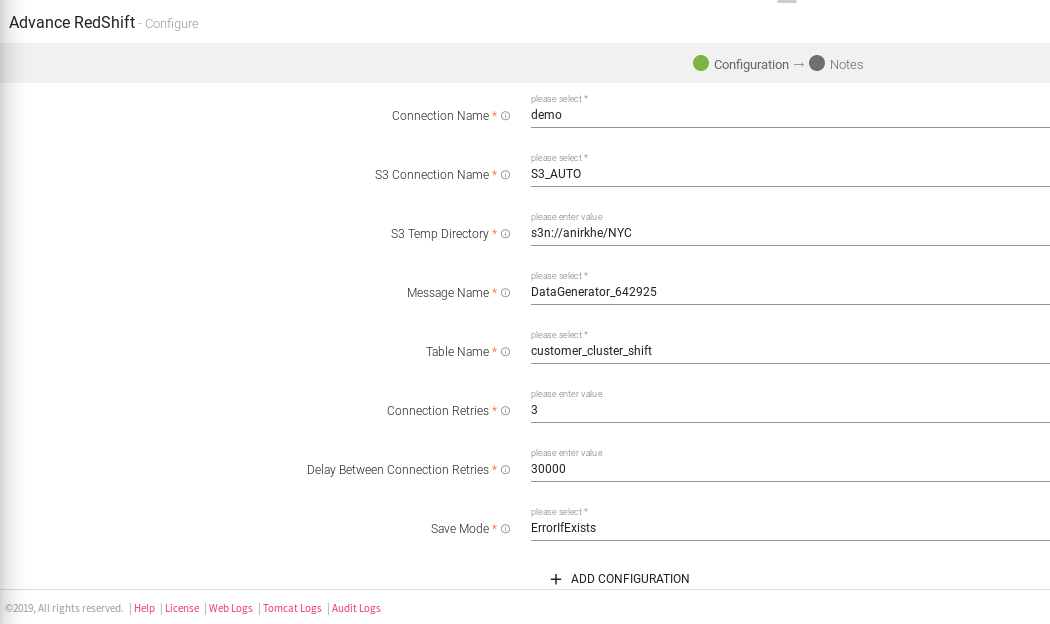
Advanced Redshift works for Batch Datasets, which also signifies that it will only with with a Batch Datasource. It uses S3 temp directory to unload data into Redshift database table.
Configuring Advanced Redshift Emitter for Spark Pipelines
To add a Advanced Redshift emitter into your pipeline, drag the emitter on the canvas and connect it to a Data Source or processor. Right click on the emitter to configure it as explained below:
Note: If the data source in pipeline has a streaming component, then the emitter will show four additional properties, Checkpoint Storage Location; Checkpoint Connections; Checkpoint Directory; and Time-Based checkpoint.
|
Field |
Description |
|---|---|
|
Connection Name |
All Redshift connections will be listed here. Select a connection for connecting to Redshift |
|
S3 Connection Name |
All S3 connections will be listed here.Select a connection for connection for S3 temp dir. |
|
S3 Temp Directory |
A writable location in Amazon S3, to be used for unloaded data when data to be loaded into Redshift when writing. Example:- s3n://anirkhe/NYC,where anirkhe is S3 bucket name |
|
Message Name |
Message used in the pipeline |
|
Table Name |
Existing database tablename whose schema is to be fetched. |
|
Connection Retries |
Number of retries for component connection |
|
Delay Between Connection Retries |
Defines the retry delay intervals for component connection in millis. |
|
Save Mode |
Save Mode is used to specify the expected behavior of saving data to a data sink. ErrorifExist: When persisting data, if the data already exists, an exception is expected to be thrown. Append: When persisting data, if data/table already exists, contents of the Schema are expected to be appended to existing data. Overwrite: When persisting data, if data/table already exists, existing data is expected to be overwritten by the contents of the Data. Ignore: When persisting data, if data/table already exists, the save operation is expected to not save the contents of the Data and to not change the existing data. This is similar to a CREATE TABLE IF NOT EXISTS in SQL. |
|
ADD CONFIGURATION |
Enables to configure additional custom properties. |
Click on the Next button. Enter the notes in the space provided.
Click on the DONE button for saving the configuration.
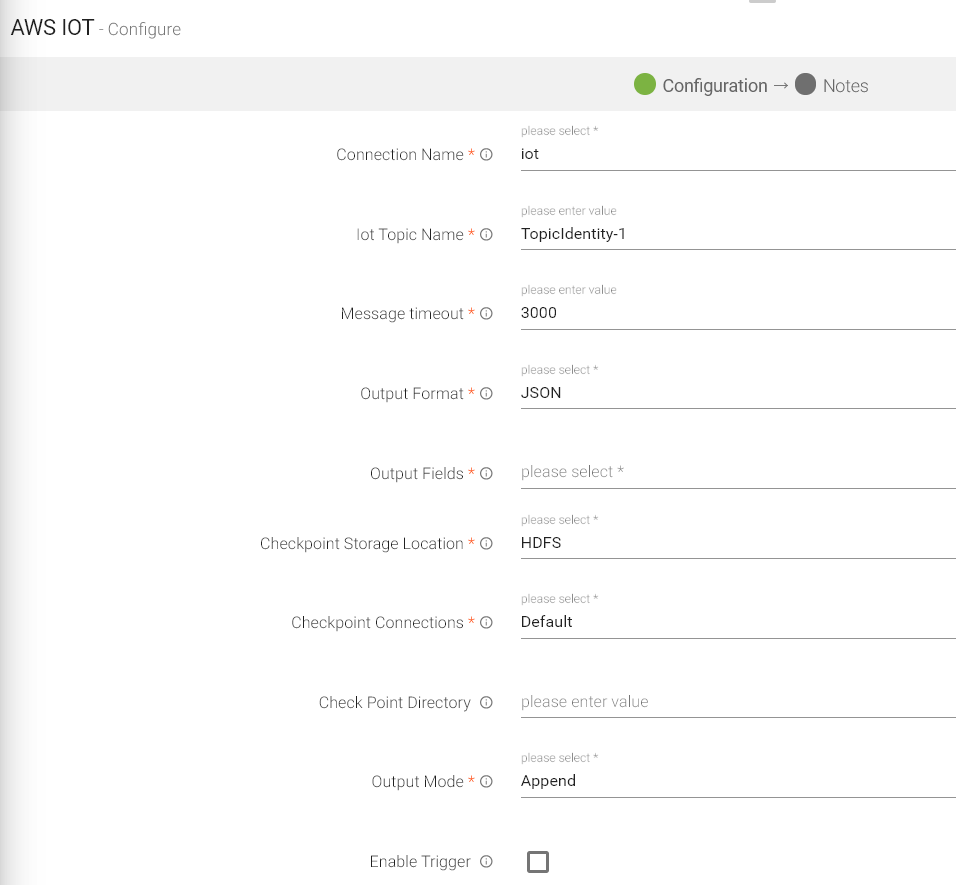
The AWS IOT emiter allows you to push data on AWS IOT Topics on MQTT client.
Configuring AWS IOT emitter for Spark pipelines
To add an AWS IOT emitter into your pipeline, drag the emitter to the canvas and connect it to a Data Source or processor:
Note: If the data source in pipeline has a streaming component, then the emitter will show four additional properties, Checkpoint Storage Location; Checkpoint Connections; Checkpoint Directory; and Time-Based checkpoint.
|
Field |
Description |
|---|---|
|
Connection Name |
All connections will be listed here. Select a connection for connecting to AWS IOT. |
|
IOT Topic Name |
Name of the IOT Topic where data will be published. |
|
Message Timeout |
The timeout duration for messages. |
|
Output Format |
Datatype format of the output. |
|
Output Fields |
Fields in the message that needs to be a part of the output data. |
|
Checkpoint Storage Location |
Select the checkpointing storage location. Available options are HDFS, S3, and EFS. |
|
Checkpoint Connections |
Select the connection. Connections are listed corresponding to the selected storage location. |
|
Checkpoint Directory |
It is the path where Spark Application stores the checkpointing data.
For HDFS and EFS, enter the relative path like /user/hadoop/ , checkpointingDir system will add suitable prefix by itself. For S3, enter an absolute path like: S3://BucketName/checkpointingDir |
|
Output Mode |
Output mode to be used while writing the data to Streaming emitter. Select the output mode from the given three options: Append: Output Mode in which only the new rows in the streaming data will be written to the sink Complete Mode: Output Mode in which all the rows in the streaming data will be written to the sink every time there are some updates Update Mode: Output Mode in which only the rows that were updated in the streaming data will be written to the sink every time there are some updates. |
|
Enable Trigger |
Trigger defines how frequently a streaming query should be executed. |
|
Processing Time |
It will appear only when Enable Trigger checkbox is selected. Processing Time is the trigger time interval in minutes or seconds. |
|
Add Configuration |
Enables to configure additional properties. |
Click on the Next button. Enter the notes in the space provided.
Click on the DONE button for saving the configuration.
On a Blob Emitter you should be able to write data to different formats (json, csv, orc, parquet, and more) of data to blob containers by specifying directory path.
Configuring Azure Blob emitter for Spark pipelines
To add an Azure Blob emitter into your pipeline, drag the emitter to the canvas and connect it to a Data Source or processor.
Note: If the data source in pipeline has a streaming component, then the emitter will show four additional properties, Checkpoint Storage Location; Checkpoint Connections; Checkpoint Directory; and Time-Based checkpoint.
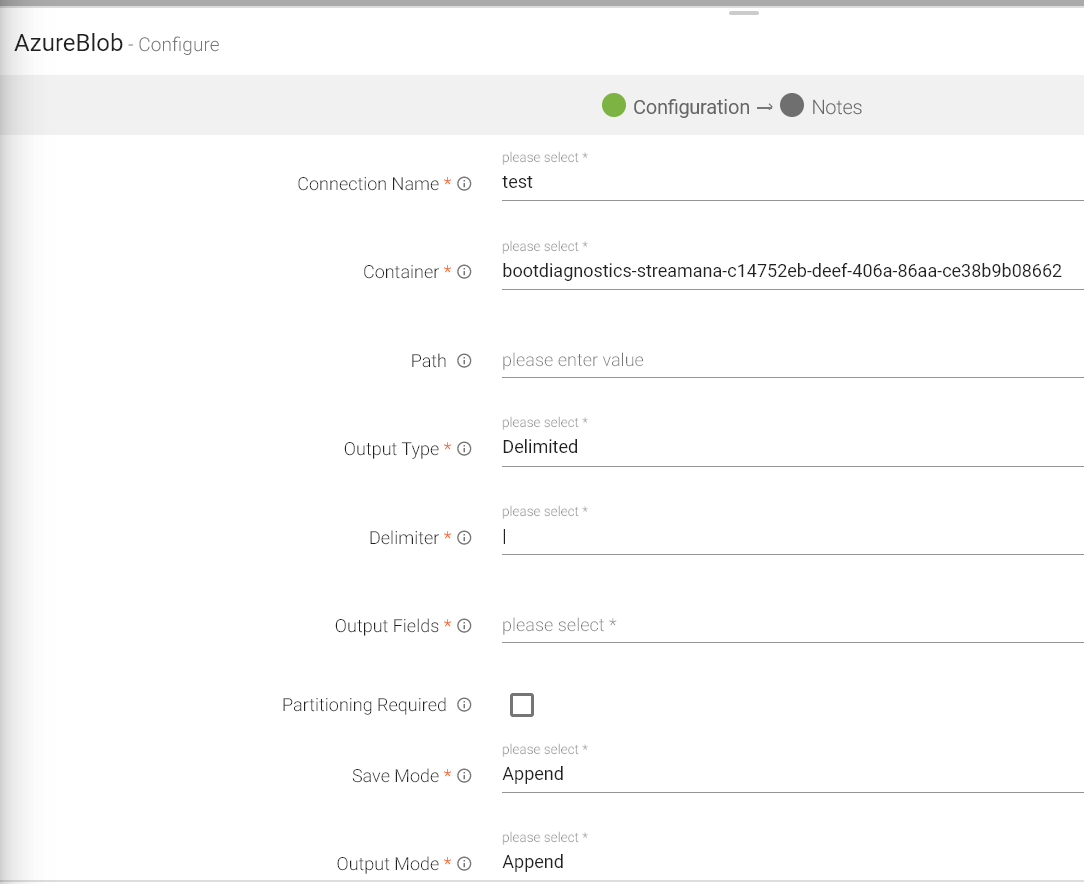
The configuration settings are as follows:
|
Field |
Description |
|---|---|
|
Connection Name |
All connections will be listed here. Select a connection for connecting to Azure Blob. |
|
Container |
Azure Blob Container Name. |
|
Path |
Sub-directories of the container mentioned above to which data is to be written. |
|
Output Type |
Output format in which result will be processed. |
|
Delimiter |
Message Field separator. |
|
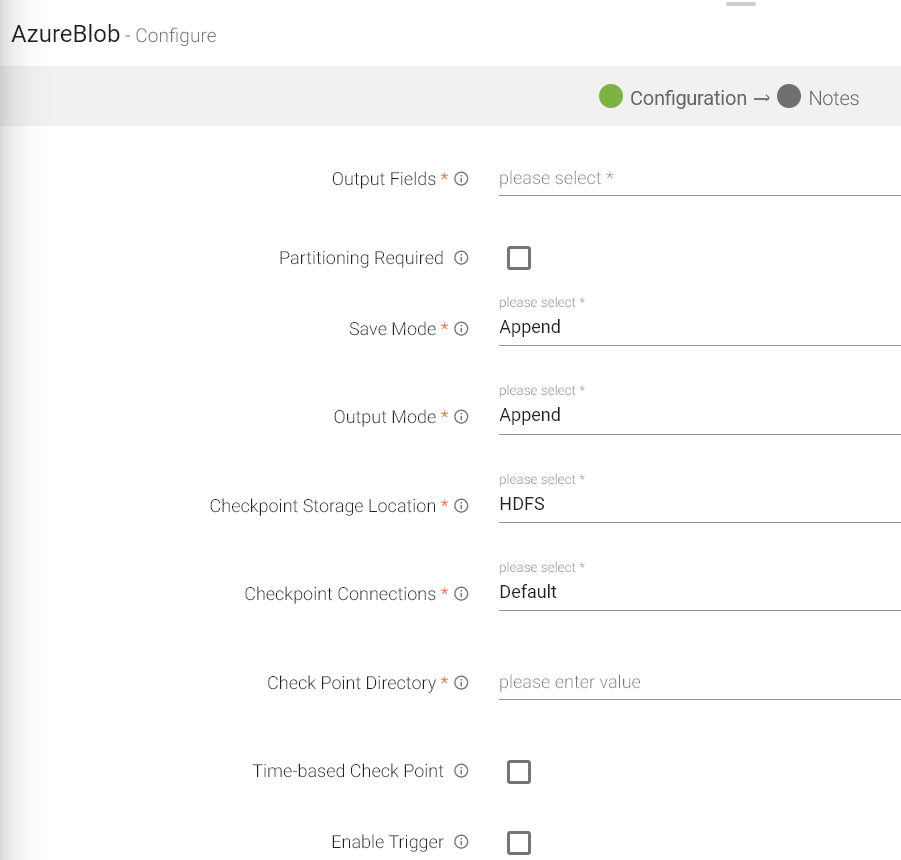
Output Fields |
Output messages fields. |
|
Partioning Required |
If checked, data will be partitioned. |
|
Save Mode |
Save mode specifies how to handle the existing data. |
|
Output Mode |
Output mode to be used while writing the data to Streaming emitter. Select the output mode from the given three options: Append: Output Mode in which only the new rows in the streaming data will be written to the sink Complete Mode: Output Mode in which all the rows in the streaming data will be written to the sink every time there are some updates Update Mode: Output Mode in which only the rows that were updated in the streaming data will be written to the sink every time there are some updates. |
|
Checkpoint Storage Location |
Select the checkpointing storage location. Available options are HDFS, S3, and EFS. |
|
Checkpoint Connections |
Select the connection. Connections are listed corresponding to the selected storage location. |
|
Checkpoint Directory |
It is the path where Spark Application stores the checkpointing data.
For HDFS and EFS, enter the relative path like /user/hadoop/ , checkpointingDir system will add suitable prefix by itself. For S3, enter an absolute path like: S3://BucketName/checkpointingDir |
|
Time-Based Check Point |
Select checkbox to enable timebased checkpoint on each pipeline run i.e. in each pipeline run above provided checkpoint location will be appended with current time in millis. |
|
Enable Trigger |
Trigger defines how frequently a streaming query should be executed. |
|
Processing Time |
It will appear only when Enable Trigger checkbox is selected. Processing Time is the trigger time interval in minutes or seconds. |
|
Add Configuration |
Enables to configure additional properties. |
Click on the Next button. Enter the notes in the space provided.
Click on the DONE button for saving the configuration.
Batch emitter allows you to write your own custom code for processing batch data as per the logic written in the custom emitter.
In case, you want to use any other emitter which is not provided by StreamAnalytix, you can make use of this emitter.
For example, if you want to store data to HDFS, you can write your own custom code and store the data.
Configuring Custom Emitter for Spark Pipelines
To add a custom emitter into your pipeline, drag the custom emitter to the canvas, connect it to a Data Source or processor, and right click on it to configure.
Note: If the data source in pipeline has a streaming component, then the emitter will show four additional properties, Checkpoint Storage Location; Checkpoint Connections; Checkpoint Directory; and Time-Based checkpoint.
|
Field |
Description |
|---|---|
|
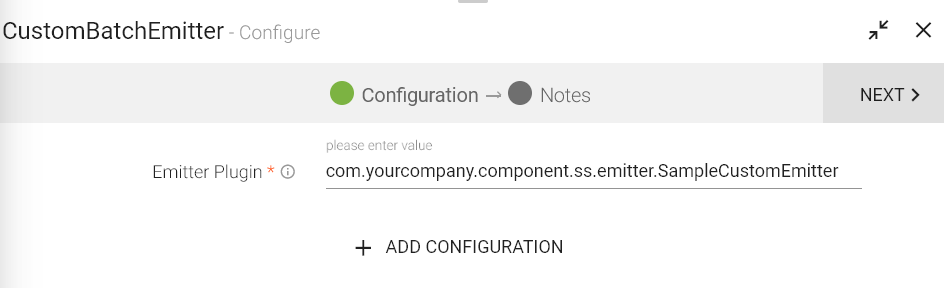
Emitter Plugin |
Provide fully qualified class name which implements StreamAnalytix CustomSSEmitter interface.
You can download sample project from StreamAnalytix UI (Data Pipeline page) and refer SampleCustomEmitter class. |
|
Checkpoint Storage Location |
Select the checkpointing storage location. Available options are HDFS, S3, and EFS. |
|
Checkpoint Connections |
Select the connection. Connections are listed corresponding to the selected storage location. |
|
Checkpoint Directory |
It is the path where Spark Application stores the checkpointing data.
For HDFS and EFS, enter the relative path like /user/hadoop/ , checkpointingDir system will add suitable prefix by itself. For S3, enter an absolute path like: S3://BucketName/checkpointingDir |
|
Time-based Check Point |
Select checkbox to enable timebased checkpoint on each pipeline run i.e. in each pipeline run above provided checkpoint location will be appended with current time in millis. |
|
Enable Trigger |
Trigger defines how frequently a streaming query should be executed. |
|
ADD CONFIGURATION |
Enables to configure additional properties. |
Here is a small snippet of sample code that is used for writing data to HDFS.
|
public class CustomSinkProvider implements StreamSinkProvider, DataSourceRegister {
public Sink createSink(SQLContext sqlContext, Map<String, String> options, Seq<String> partitionCols, OutputMode outputMode) {
public String shortName() { }
public class MySink implements Sink { String message; public MySink(String msg) { public void addBatch(long batchId, Dataset<Row> dataset) { } |
Click on the Next button. Enter the notes in the space provided.
Click on the DONE button for saving the configuration.
The Container Emitter is used to sink the data in Couchbase.
To add a Container Emitter into your pipeline, drag the Emitter to the canvas and right click on it to configure.
Note: If the data source in pipeline has a streaming component, then the emitter will show four additional properties, Checkpoint Storage Location; Checkpoint Connections; Checkpoint Directory; and Time-Based checkpoint.

|
Field |
Description |
|---|---|
|
Load From Template |
Select the template from the list. Only those templates will be visible in the drop down list that are created globally or within that workspace. |
|
Sync With Source Template |
When a template is saved and is edited, this tab is reflected. If any change is made in source template, corresponding changes will be reflected in Container’s configuration. |
|
Connection Name |
Name of the connection. |
|
Bucket Name |
It can also be called ‘Couchbase Bucket name’. Select the Couchbase bucket that gets generated with the Couchbase connection. Max Buckets per cluster is 10, by default. |
|
Memory Quota |
Memory Quota in megabytes per server node. Memory quota cannot be less than 100 MB. |
|
Replicate View Indexes |
By checking the Replicate view indexes checkbox, you ensure that views indexes, as well as data, are replicated. |
|
Flush |
When Flushed, all items in the bucket are removed as soon as possible, through some rest calls. |
|
Document Id |
Unique document key for Couchbase to persist the document in Couchbase. If document id is not unique then document with the same id gets overridden every time. |
|
Checkpoint Storage Location |
Select the checkpointing storage location. Available options are HDFS, S3, and EFS. |
|
Checkpoint Connections |
Select the connection. Connections are listed corresponding to the selected storage location. |
|
Checkpoint Directory |
It is the path where Spark Application stores the checkpointing data.
For HDFS and EFS, enter the relative path like /user/hadoop/ , checkpointingDir system will add suitable prefix by itself. For S3, enter an absolute path like: S3://BucketName/checkpointingDir |
|
Time-Based Check Point |
Select checkbox to enable timebased checkpoint on each pipeline run i.e. in each pipeline run above provided checkpoint location will be appended with current time in millis. |
|
Retention Enable |
When selected, each newly created item lives for the number of seconds specified by retention policy. After the expiration time is reached item will be deleted by Couchbase server. |
|
Retention Policy |
TTL for the document to be persisted in the Couchbase. |
|
Output Fields |
Fields in the message that needs to be a part of the output data. |
|
Output Mode |
Output mode to be used while writing the data to Streaming emitter. Select the output mode from the given three options: Append: Output Mode in which only the new rows in the streaming data will be written to the sink Complete Mode: Output Mode in which all the rows in the streaming data will be written to the sink every time there are some updates Update Mode: Output Mode in which only the rows that were updated in the streaming data will be written to the sink every time there are some updates. |
|
Enable Trigger |
Trigger defines how frequently a streaming query should be executed. |
|
Processing Time |
It will appear only when Enable Trigger checkbox is selected. Processing Time is the trigger time interval in minutes or seconds. |
Click on the NEXT button. An option to Save as Template will be available. Add notes in the space provided and click on Save as Template
Choose the scope of the Template (Global or Workspace) and Click Done for saving the Template and configuration details.
On a Cosmos Emitter you should be able to emit data into different containers of selected Cosmos database.
In case Streaming Cosmos Channel and Batch Cosmos channel, the cosmos emitter has different properties, explained below:
Configuring Cosmos for Spark Pipelines
To add a Cosmos Emitter into your pipeline, drag the Emitter; to the canvas, connect it to a Data Source or processor, and right click on it to configure. Shown below are: Batch Cosmos and Streaming Cosmos.
Note: If the data source in pipeline has a streaming component, then the emitter will show four additional properties, Checkpoint Storage Location; Checkpoint Connections; Checkpoint Directory; and Time-Based checkpoint.
Streaming Cosmos
|
Field |
Description |
|---|---|
|
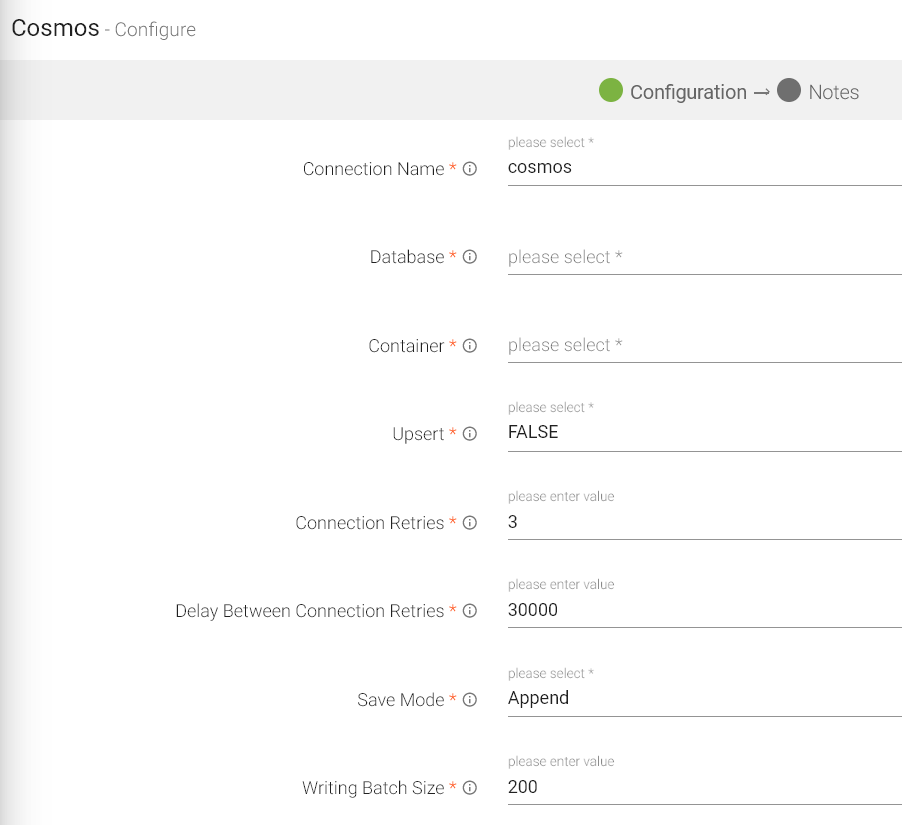
Connection Name |
Connection Name for creating connection. |
|
Database |
Cosmos Database. |
|
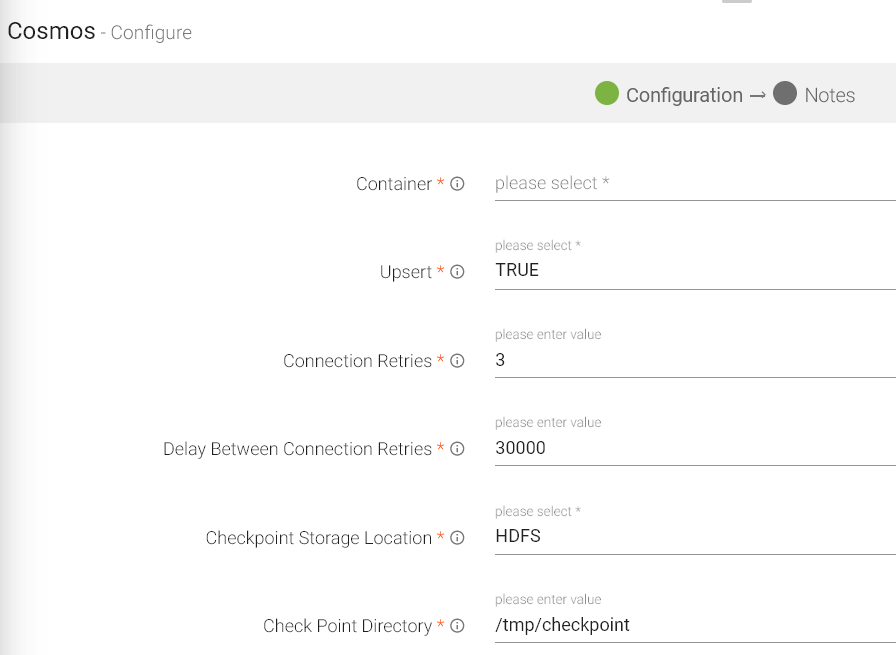
Container |
Cosmos Container Name. |
|
Upsert |
If set to True, the item with existing ids gets updated and if it does not exist, it gets created. |
|
Connection Retries |
Number of retries for component connection. |
|
Delay Between Connection Retries |
Defines the retry delay intervals for component connection in millis. |
|
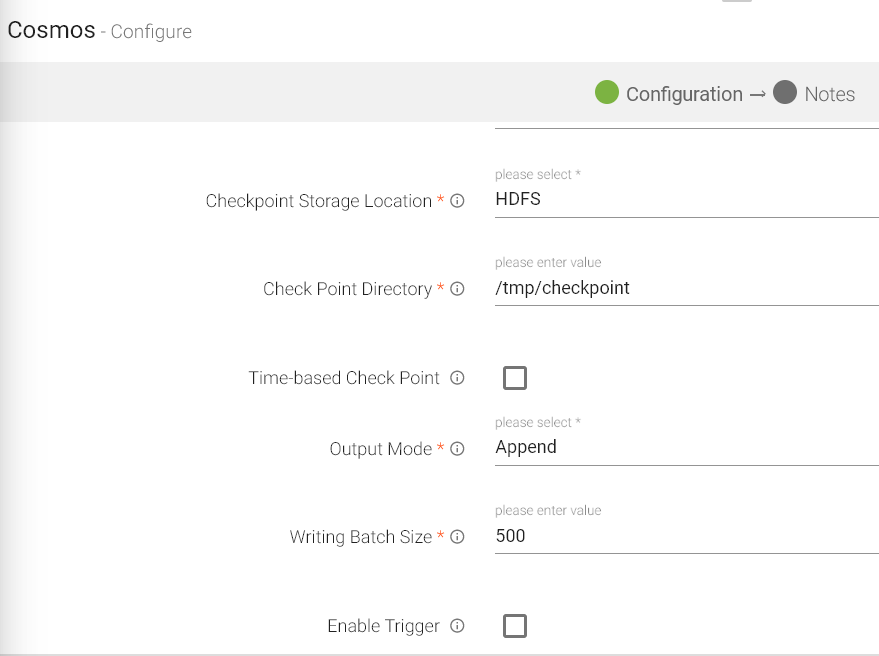
Checkpoint Storage Location |
Select the checkpointing storage location. Available options are HDFS, S3, and EFS. |
|
Checkpoint Connections |
Select the connection. Connections are listed corresponding to the selected storage location. |
|
Checkpoint Directory |
It is the path where Spark Application stores the checkpointing data.
For HDFS and EFS, enter the relative path like /user/hadoop/ , checkpointingDir system will add suitable prefix by itself. For S3, enter an absolute path like: S3://BucketName/checkpointingDir |
|
Time-Based Check Point |
Select checkbox to enable timebased checkpoint on each pipeline run i.e. in each pipeline run above provided checkpoint location will be appended with current time in millis. |
|
Output Mode |
Output mode to be used while writing the data to Streaming sink.
Select the output mode from the given three options: Append: Output Mode in which only the new rows in the streaming data will be written to the sink Complete Mode: Output Mode in which all the rows in the streaming data will be written to the sink every time there are some updates Update Mode: Output Mode in which only the rows that were updated in the streaming data will be written to the sink every time there are some updates. |
|
Save Mode |
Save Mode is used to specify the expected behavior of saving data to a data sink. ErrorifExist: When persisting data, if the data already exists, an exception is expected to be thrown. Append: When persisting data, if data/table already exists, contents of the Schema are expected to be appended to existing data. Overwrite: When persisting data, if data/table already exists, existing data is expected to be overwritten by the contents of the Data. Ignore: When persisting data, if data/table already exists, the save operation is expected to not save the contents of the Data and to not change the existing data. This is similar to a CREATE TABLE IF NOT EXISTS in SQL. |
|
Writing Batch Size |
Define the writing batch size for writing to cosmos. |
|
Enable Trigger |
Trigger defines how frequently a streaming query should be executed. |
|
Processing Time |
It will appear only when Enable Trigger checkbox is selected. Processing Time is the trigger time interval in minutes or seconds. |
|
ADD CONFIGURATION |
Additional properties can be added. |
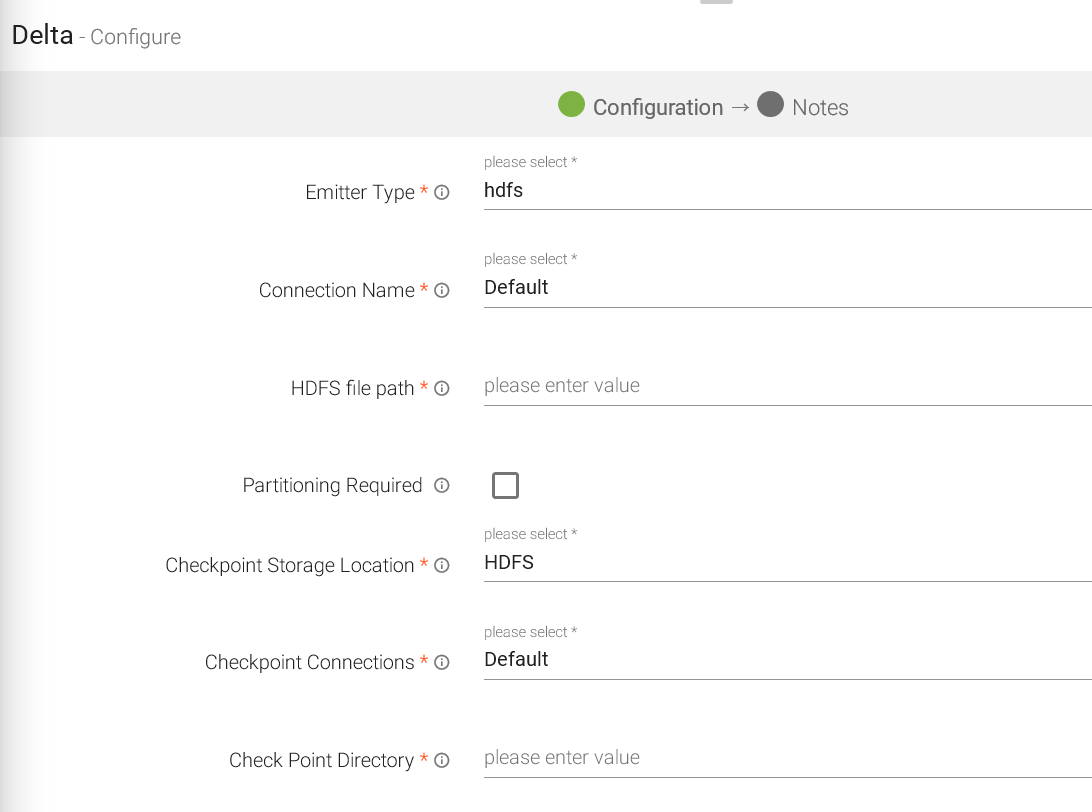
On a Delta Lake Emitter, you should be able to emit data on to HDFS or S3 or DBFS in delta lake.
All data in Delta Lake is stored in Apache Parquet format enabling Delta Lake to leverage the efficient compression and encoding schemes that are native to Parquet.
Delta Lake can handle petabyte-scale tables with billions of partitions and files at ease.
Configuring Delta for Spark Pipelines
To add a Delta Emitter into your pipeline, drag the Emitter; to the canvas, connect it to a Data Source or processor, and right click on it to configure:
Note: If the data source in pipeline has a streaming component, then the emitter will show four additional properties, Checkpoint Storage Location; Checkpoint Connections; Checkpoint Directory; and Time-Based checkpoint.
|
Field |
Description |
|---|---|
|
Emitter Type |
Data Lake to which the data is emitted. |
|
Connection Name |
Connection Name for creating connection. |
|
HDFS file path |
File path of HDFS file system. |
|
Partitioning Required |
If checked, data will be partitioned. |
|
Partition List |
This option is to select fields on which data will be partitioned. |
|
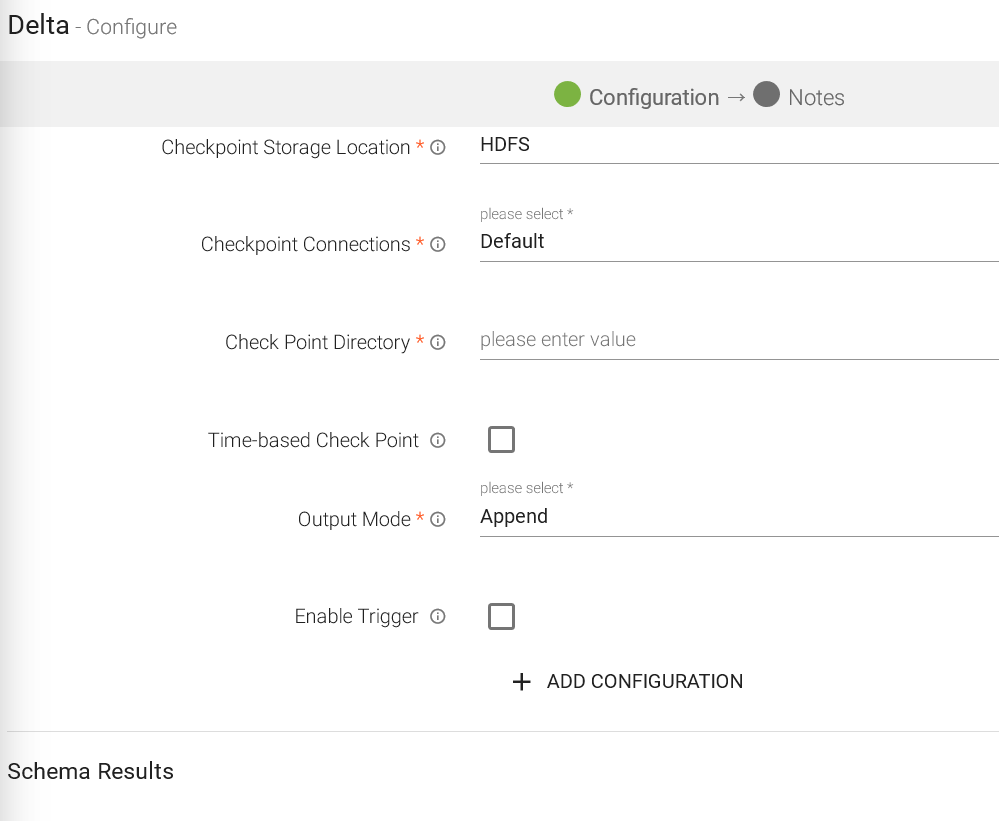
Checkpoint Storage Location |
Select the checkpointing storage location. Available options are HDFS, S3, and EFS. |
|
Checkpoint Connections |
Select the connection. Connections are listed corresponding to the selected storage location. |
|
Checkpoint Directory |
It is the path where Spark Application stores the checkpointing data.
For HDFS and EFS, enter the relative path like /user/hadoop/ , checkpointingDir system will add suitable prefix by itself. For S3, enter an absolute path like: S3://BucketName/checkpointingDir |
|
Time-Based Check Point |
Select checkbox to enable timebased checkpoint on each pipeline run i.e. in each pipeline run above provided checkpoint location will be appended with current time in millis. |
|
Output Mode |
Output mode to be used while writing the data to Streaming sink.
Select the output mode from the given three options: Append: Output Mode in which only the new rows in the streaming data will be written to the sink Complete Mode: Output Mode in which all the rows in the streaming data will be written to the sink every time there are some updates Update Mode: Output Mode in which only the rows that were updated in the streaming data will be written to the sink every time there are some updates. |
|
Enable Trigger |
Trigger defines how frequently a streaming query should be executed. |
|
Processing Time |
It will appear only when Enable Trigger checkbox is selected. Processing Time is the trigger time interval in minutes or seconds. |
|
ADD CONFIGURATION |
Additional properties can be added. |
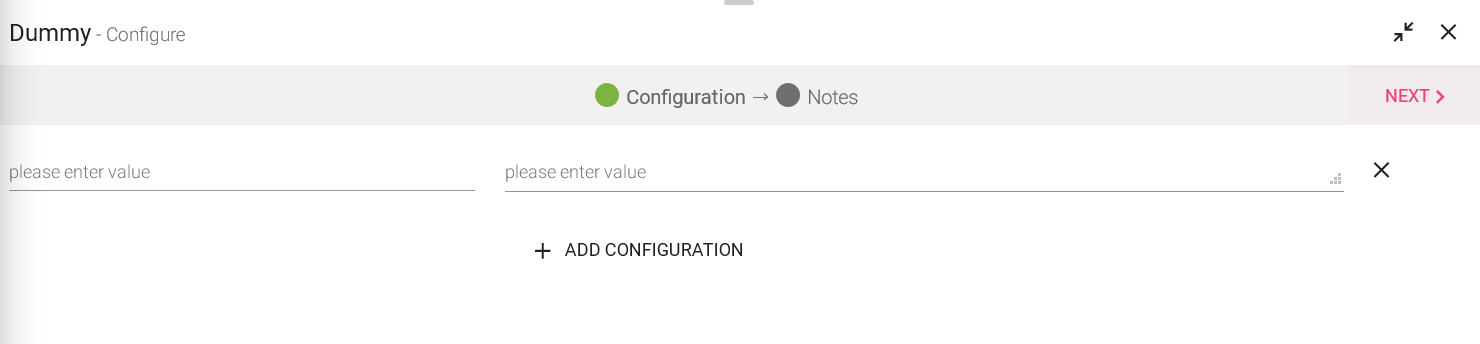
Dummy emitters are required in cases where the pipeline has a processor that does not require an emitter. For example, in case of a custom processor, if the data is to be indexed on elastic search, we may not require an emitter in such a case. However, with StreamAnalytix it is a mandate to have an emitter in the pipeline. In such a scenarios, you can use a Dummy Emitter so that you can test the processors without the requirement of emitting the data using an actual emitter.
Configuration window of a Dummy Emitter is shown below:,
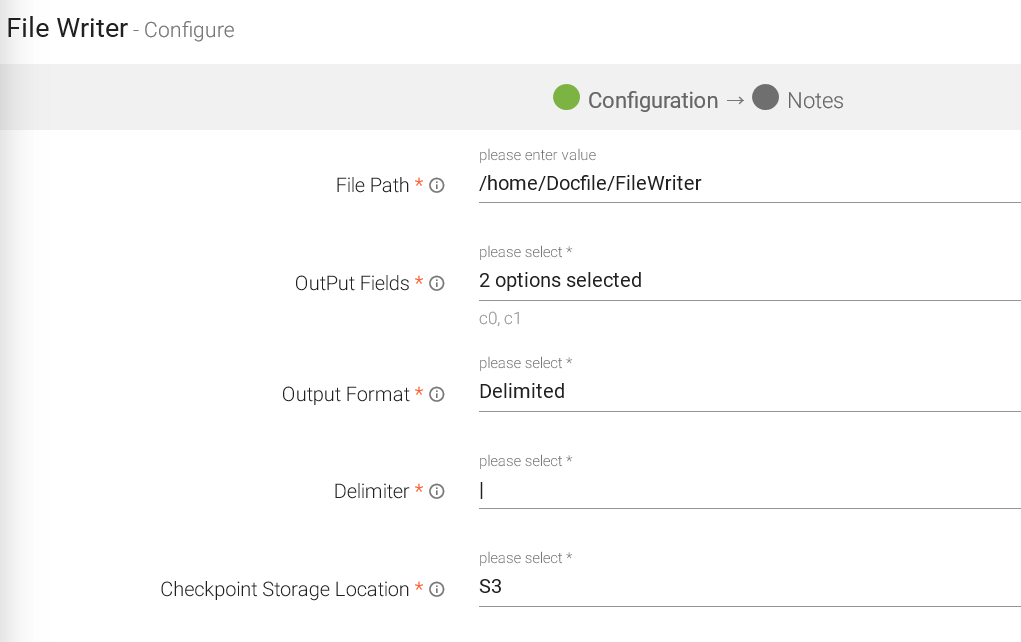
A local file emitter can save data to local file system. Local file System is the File System where StreamAnalytix is deployed.
Configure File Writer Emitter for Spark Pipelines
To add a File Writer emitter to your pipeline, drag it to the canvas, connect it to a Data Source or processor, and right click on it to configure.
Note: If the data source in pipeline has a streaming component, then the emitter will show four additional properties, Checkpoint Storage Location; Checkpoint Connections; Checkpoint Directory; and Time-Based checkpoint.

|
Field |
Description |
|---|---|
|
File Path |
Path where the data file will be read/saved. This is where you can use the Scope Variable using @. To know more about the same, read about Scope Variable. |
|
Output Fields |
Fields to be included in the Output File. |
|
Output Format |
Format in which the output file will be saved. |
|
Delimiter |
Separator to separate different fields. |
|
Checkpoint Storage Location |
Select the check pointing storage location. Available options are HDFS, S3, and EFS. |
|
Checkpoint Connections |
Select the connection. Connections are listed corresponding to the selected storage location. |
|
Checkpoint Directory |
It is the path where Spark Application stores the checkpointing data.
For HDFS and EFS, enter the relative path like /user/hadoop/, checkpointingDir system will add suitable prefix by itself. For S3, enter an absolute path like: S3://BucketName/checkpointingDir |
|
Time-Based Check Point |
Select checkbox to enable timebased checkpoint on each pipeline run i.e. in each pipeline run above provided checkpoint location will be appended with current time in millis. |
|
Output Mode |
Mode in which File writer will run. Output mode to be used while writing the data to Streaming emitter. Select the output mode from the given three options: Append: Output Mode in which only the new rows in the streaming data will be written to the sink. Complete Mode: Output Mode in which all the rows in the streaming data will be written to the sink every time there are some updates. Update Mode: Output Mode in which only the rows that were updated in the streaming data will be written to the sink every time there are some updates. |
|
ADD CONFIGURATION |
Enables to configure additional properties. |
HTTP Emitter allows you to emit data into different APIs.
For example: You have Employee Information available in JSON, TEXT or CSV format and you would like to update information for any employee but also save the same on HTTP emitter. This can be done using PUT or POST method.
Configuring HTTP Emitter for Spark pipelines
To add an HTTP emitter into your pipeline, drag the emitter on the canvas and connect it to a Data Source or processor. The configuration settings of the HTTP emitter are as follows:
Note: If the data source in pipeline has a streaming component, then the emitter will show four additional properties, Checkpoint Storage Location; Checkpoint Connections; Checkpoint Directory; and Time-Based checkpoint.
|
Field |
Description |
|---|---|
|
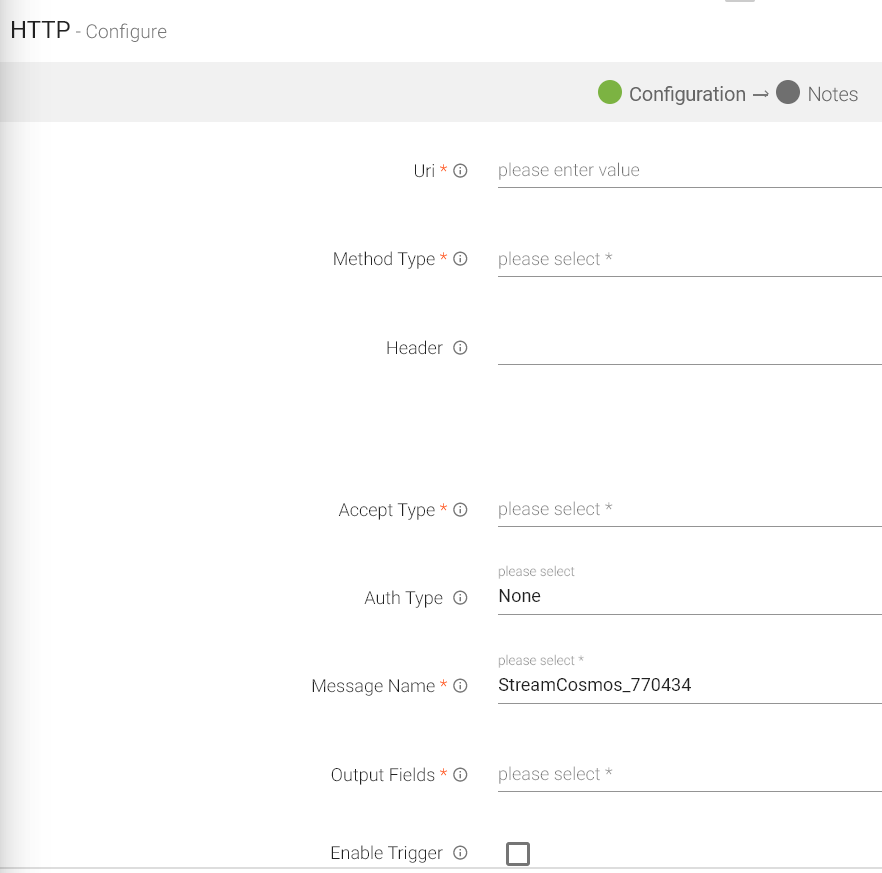
Uri |
HTTP or HTTPS URL to fetch data. |
|
Method Type |
HTTP request method- GET, POST, PUT, DELETE. |
|
Header |
Header’s parameter name and value. |
|
Accept Type |
Content type that URI accepts. For example: JSON, CSV and Text. |
|
Auth Type |
Used to specify the authorization type associated with the URL. Includes None, Basic, Token and Oauth2 as authorization types. All the types are explained below in detail. |
|
Output Fields |
Message fields which will be a part of the output data. |
|
Enable Trigger |
Trigger defines how frequently a streaming query should be executed. |
|
Processing Time |
It will appear only when Enable Trigger checkbox is selected. Processing Time is the trigger time interval in minutes or seconds. |
1. None
This option specify that URL can be accessed without any authentication.
2. Basic
This option specify that accessing URL requires Basic Authorization. For accessing the URL you need to provide user name and password.
|
User name |
Enter the user name for accessing the URL. |
|
Password |
Enter the password for accessing the URL. |
3. Token Based
Token-based authentication is a security technique that authenticates the users who attempts to log in to a server, a network, or some other secure system, using a security token provided by the server
|
Token ID |
Key with which token is referred in request. |
|
Token |
Token which is provided to access the URL. |
4. OAuth2
Oauth2 is an authentication technique in which application gets a token that authorizes access to the user's account.
|
AuthURL |
The endpoint for authorization server, which retrieves authorization code |
|
ClientId |
Client ID identifier, given to client during application registration process |
|
Secret Key |
The client secret, given to client during application registration process |
|
Header |
Used to specify the headers associated with AuthUrl, through which authorization code is generated. |
JDBC Emitter allows you to push data to relational databases like MySQL, PostgreSQL, Oracle DB and MS-SQL.
JDBC emitter also enables you to configure data on DB2 database using JDBC emitter for both batch and stream.
It is enriched with lookup functionality for the DB2 database so that you can enrich fields with external data read from DB2. Select a DB2 connection while configuring JDBC emitter.
Configuring JDBC Emitter for Spark pipelines
To add a JDBC emitter into your pipeline, drag the JDBC emitter on the canvas and connect it to a Data Source or processor. The configuration settings of the JDBC emitter are as follows:
Note: If the data source in pipeline has a streaming component, then the emitter will show four additional properties, Checkpoint Storage Location; Checkpoint Connections; Checkpoint Directory; and Time-Based checkpoint.
|
Field |
Description |
|---|---|
|
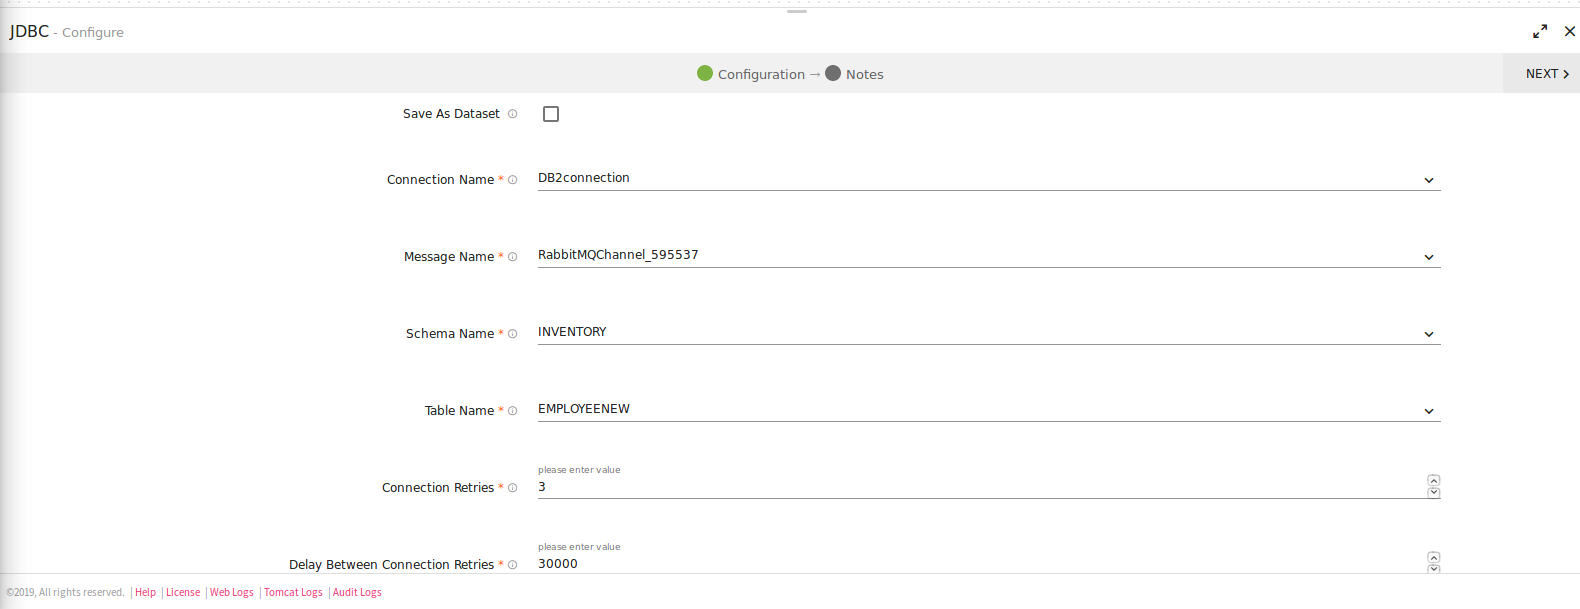
Save as Dataset |
Save the JDBC emitter configuration as a Dataset. |
|
Dataset Name |
Provide a unique name to the Dataset. |
|
Connection Name |
All JDBC connections will be listed here. Select a connection for connecting to JDBC. |
|
Message Name |
Name of the message configuration that acts as metadata. |
|
Schema Name |
Existing database Schema Names whose tables are fetched. (for MSSQL, DB2 and POSTGRES) |
|
Table Name |
Existing tablename of the specified database. |
|
Is Batch Enable |
Enable parameter to batch multiple messages and improve write performances. |
|
Batch Size |
Batch Size, which determines how many rows to insert per round trip. This can help the performance on JDBC drivers. This option applies only to writing. It defaults to 1000. |
|
Connection Retries |
Number of retries for component connection. |
|
Delay Between Connection Retries |
Defines the retry delay intervals for component connection in millis. |
|
Save Mode |
Save Mode is used to specify the expected behavior of saving data to a data sink. Append: When persisting data, if data/table already exists, contents of the Schema are expected to be appended to existing data. Overwrite: When persisting data, if data/table already exists, existing data is expected to be overwritten by the contents of the Data. Ignore: When persisting data, if data/table already exists, the save operation is expected to not save the contents of the Data and to not change the existing data. This is similar to a CREATE TABLE IF NOT EXISTS in SQL. |
|
Check Point Directory |
It is the HDFS Path where the Spark application stores the checkpoint data. |
|
Output Mode |
Output Mode is used to what data will be written to a streaming sink when there is new data available.
Select the output mode from the given three options: Append: Output Mode in which only the new rows in the streaming data will be written to the sink Complete Mode: Output Mode in which all the rows in the streaming data will be written to the sink every time there are some updates. Update Mode: Output Mode in which only the rows that were updated in the streaming data will be written to the sink every time there are some updates. |
|
Enable Trigger |
Trigger defines how frequently a streaming query should be executed. |
|
Processing Time |
It will appear only when Enable Trigger checkbox is selected. Processing Time is the trigger time interval in minutes or seconds. |
|
ADD CONFIGURATION |
Enables to configure custom properties. |
|
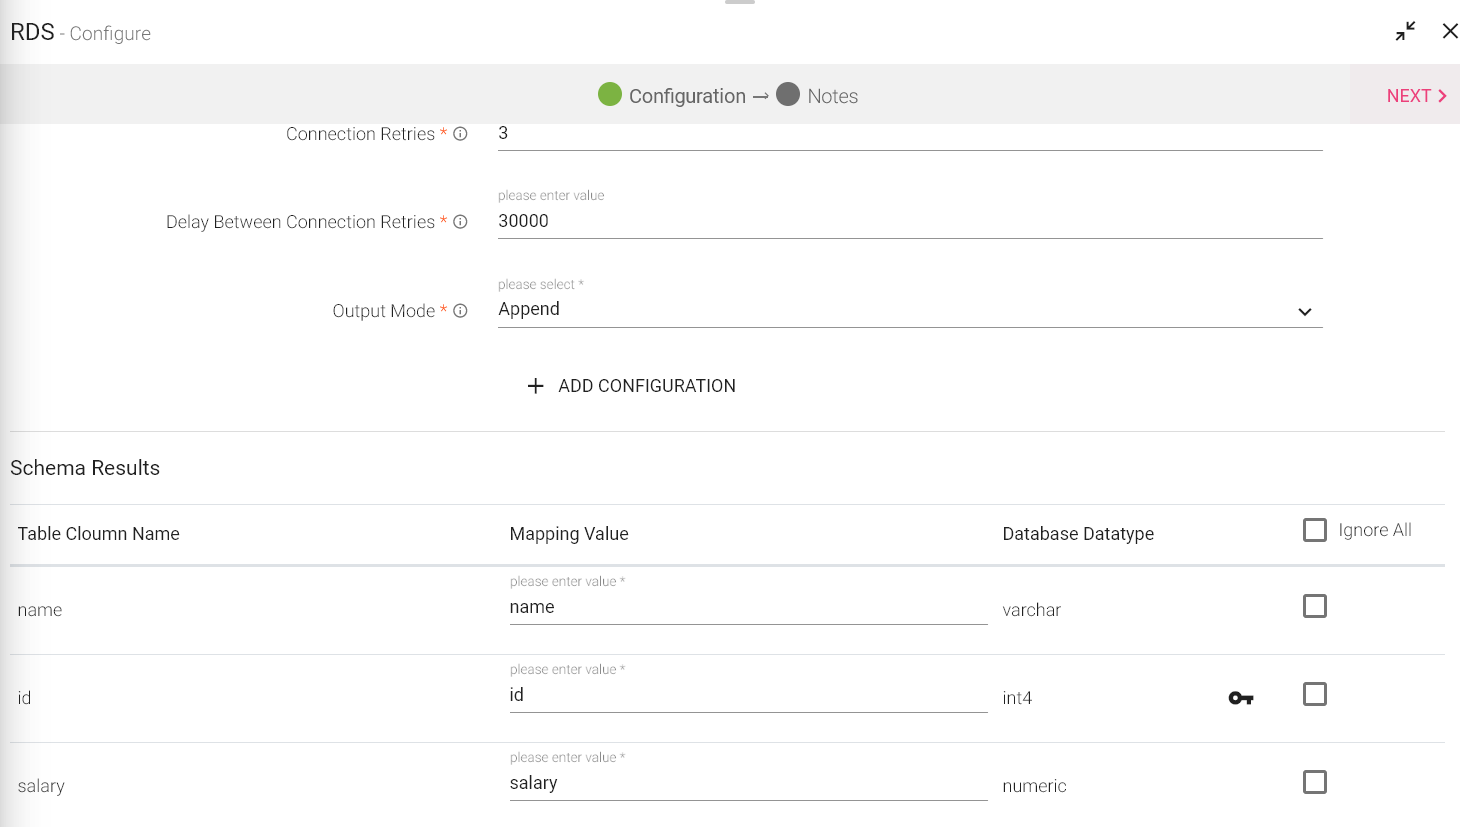
Schema Results: Map the values coming in pipeline with any table columns name. |
|
|
Table Column Name |
The columns from the selected table are populated here. |
|
Mapping Value |
Enter a mapping value to the corresponding column. |
|
Database Data Type |
The data type of the value, i.e., String, Int, Text and so on.. |
|
Ignore All |
Use Ignore All or selected fields while pushing data to emitter. |
Click on the NEXT button. Enter the notes in the space provided. Click DONE for saving the configuration.
Kafka emitter stores data to Kafka cluster. Data format supported are JSON and DELIMITED.
Configuring Kafka Emitter for Spark Pipelines
To add a Kafka emitter into your pipeline, drag the Kafka emitter on the canvas and connect it to a Data Source or Processor. The configuration settings of the Kafka emitter are as follows:

Note: If the data source in pipeline has a streaming component, then the emitter will show four additional properties, Checkpoint Storage Location; Checkpoint Connections; Checkpoint Directory; and Time-Based checkpoint.
|
Field |
Description |
|---|---|
|
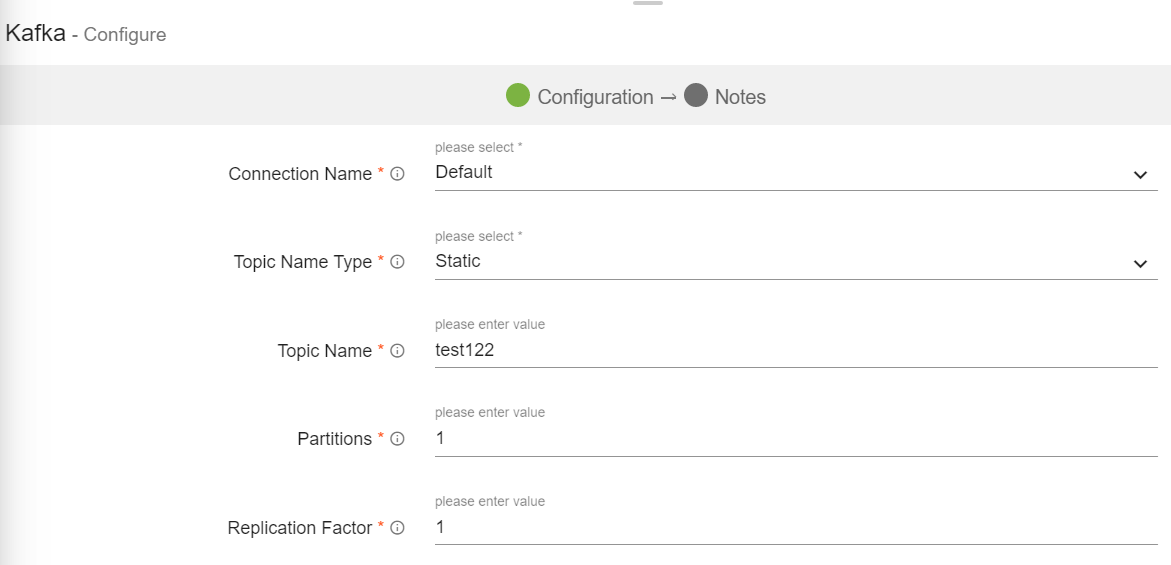
Connection Name |
All Kafka connections will be listed here.Select a connection for connecting to Kafka. |
|
Topic Name Type |
Topic Name Type could be either Static or Dynamic. Static: When you select Static, field “Topic Name” is pertained as a text box. Provide a unique topic name to emit data.
Dynamic: With Dynamic, topic name will be populated with a drop down of the field names of incoming dataset. On selecting any of the field name, it will create topics based on the value of the selected field name in the topic name. (which means at runtime it will create topics dynamically using the selected field name values.) |
|
Topic Name |
Kafka topic name where you want to emit data.
In case of Dynamic Topic Name Type, at runtime the Kafka Emitter will take the value of the selected field as a topic name for each incoming records. |
|
Partitions |
Number of partitions to be created for a topic. Each partition is ordered, immutable sequence of messages that is continually appended to a commit log. |
|
Replication Factor |
For a topic with replication factor N, Kafka will tolerate up to N-1 failures without losing any messages committed to the log. |
|
Producer Type |
Specifies whether the messages are sent asynchronously or synchronously in a background thread. Valid values are async for asynchronous send and sync for synchronous send |
|
Output Format |
Data type format of the output message. Three types of output format are available: JSON Delimited AVRO |
|
Avro Schema Source |
Select the Source of Avro Schema: Input Text Schema: Manually enter the text schema in the field, Input Schema.
Schema Registry: It allows you to enter a schema registry subject name for Avro schema, in the field, Subject Name.
Auto Generate Schema: Schema generated is automatic based on the previous incoming dataset. |
|
Output Fields |
Message fields which will be a part of output data. |
|
Message Key |
The type of key you want to store in Kafka along with the data. It can be stored in the following four types: Field Value: The values of the fields present in dataset concatenated by "#". Field Value Hash: The hash value of the values of the fields present in dataset concatenated by "#" Static: The static value to be put as key in kafka along with data. UUID: UUID to be put as a key along with data in kafka. |
|
Kafka Partitioner |
Kafka uses the default partition mechanism to distribute the data.
Key Based: kafka partitioning is done on the basis of keys.
Custom: Enables to write custom partition class by implementing the com.streamanalytix.framework.api.spark.partitioner.SAXKafkaPartitioner interface. The partition method contains logic to calculate the destination partition and returns the target partition number. |
|
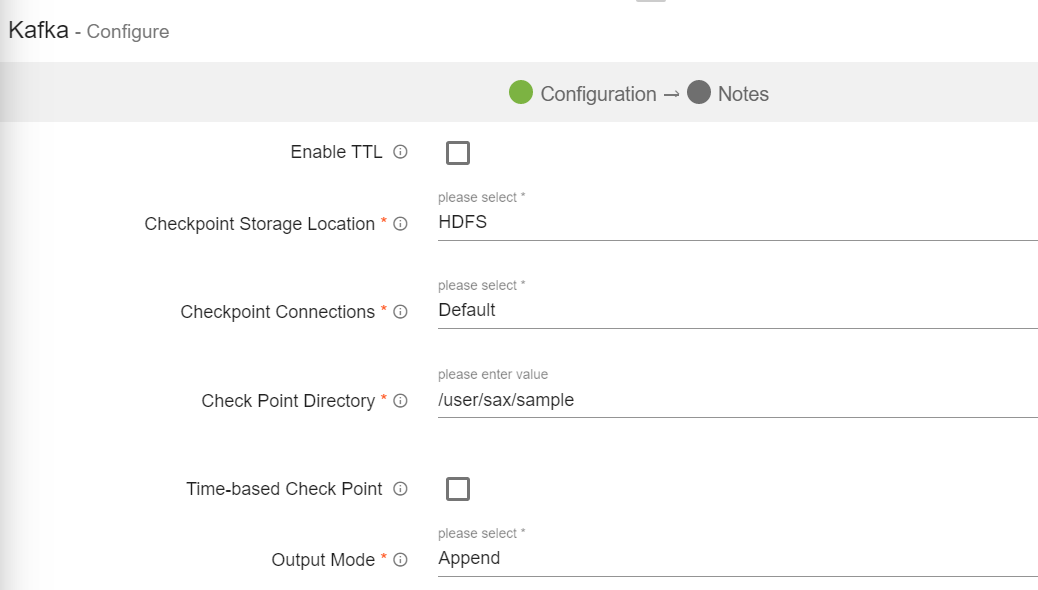
Enable TTL |
Select the checkbox to enable TTL(Time to Live) for records to persist for that time duration. |
|
Checkpoint Directory |
Location where the checkpoint data is stored. |
|
Output Mode |
Output mode to be used while writing the data to Streaming emitter. Select the output mode from the given three options: Append: Output Mode in which only the new rows in the streaming data will be written to the sink
Complete Mode: Output Mode in which all the rows in the streaming data will be written to the sink every time there are some updates
Update Mode: Output Mode in which only the rows that were updated in the streaming data will be written to the sink every time there are some updates. |
|
Enable Trigger |
Trigger defines how frequently a streaming query should be executed. |
|
Processing Time |
It will appear only when Enable Trigger checkbox is selected. Processing Time is the trigger time interval in minutes or seconds. |
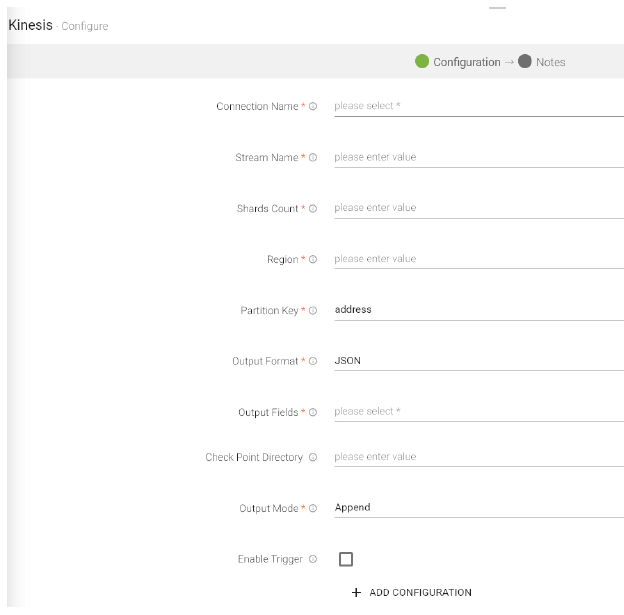
Kinesis emitter emits data to Amazon Kinesis stream. Supported data type formats of the output are Json and Delimited.
Configure Kinesis Emitter for Spark Pipelines
To add a Kinesis emitter into your pipeline, drag the emitter on to the canvas, connect it to a Data Source or a Processor, and right-click on it to configure it:
Note: If the data source in pipeline has a streaming component, then the emitter will show four additional properties, Checkpoint Storage Location; Checkpoint Connections; Checkpoint Directory; and Time-Based checkpoint.
|
Field |
Description |
|---|---|
|
Connection Name |
Select a Kinesis connection for connecting to Kinesis. |
|
Stream Name |
Name of the Kinesis Stream. |
|
Shard Count |
Number of shards required to create the stream, in case stream is not present. |
|
Region |
Name of the region. For example, us-west-2 |
|
Partition Key |
Used by Amazon Kinesis to distribute data across shards. |
|
Output Format |
Datatype format of the output. |
|
Output Fields |
Fields in the message that needs to be a part of the output data. |
|
Checkpoint Directory |
Location where the checkpoint data is stored. |
|
Output Mode |
Mode to be used while writing the data to Streaming sink.
Select the output mode from the given three options:
Append: Output Mode in which only the new rows in the streaming data will be written to the sink.
Complete Mode: Output Mode in which all the rows in the streaming data will be written to the sink every time there are some updates.
Update Mode: Output Mode in which only the rows that were updated in the streaming data will be written to the sink every time there are some updates. |
|
Enable Trigger |
Trigger defines how frequently a streaming query should be executed. |
|
Processing Time |
It will appear only when Enable Trigger checkbox is selected. Processing Time is the trigger time interval in minutes or seconds. |
|
ADD CONFIGURATION |
Enables to configure additional properties. |
Click on the Next button. Enter the notes in the space provided. Click Save for saving the configuration details.
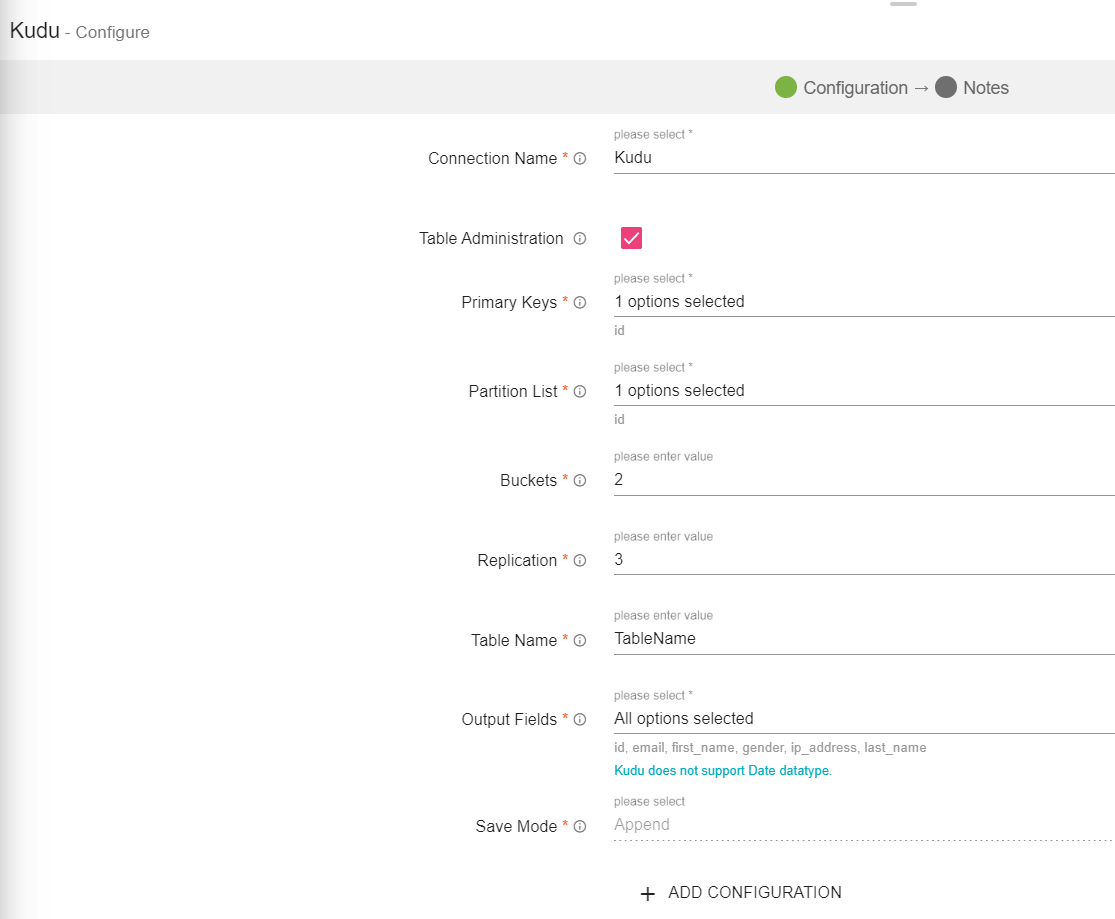
Apache Kudu is a column-oriented data store of the Apache Hadoop ecosystem. It enable fast analytics on fast (rapidly changing) data. The emitter is engineered to take advantage of hardware and in-memory processing. It lowers query latency significantly from similar type of tools.
Configuring KUDU Emitter for Spark Pipelines
To add a KUDU emitter into your pipeline, drag the emitter to the canvas and connect it to a Data Source or processor. The configuration settings are as follows:
Note: If the data source in pipeline has a streaming component, then the emitter will show four additional properties, Checkpoint Storage Location; Checkpoint Connections; Checkpoint Directory; and Time-Based checkpoint.
|
Field |
Description |
|---|---|
|
Connection Name |
Connection URL for creating Kudu connection. |
|
Table Administration |
If checked, the table will be created. |
|
Primary Keys |
This option is to select fields which will be primary keys of the table. |
|
Partition List |
This option is to select fields on which table will be partitioned. |
|
Buckets |
Buckets used for partitioning. |
|
Replication |
Replication factor used to make additional copies of data. The value should be either 1, 3, 5 or 7, only. |
|
Checkpoint Storage Location |
Select the checkpointing storage location. Available options are HDFS, S3, and EFS. |
|
Checkpoint Connections |
Select the connection. Connections are listed corresponding to the selected storage location. |
|
Checkpoint Directory |
It is the path where Spark Application stores the checkpointing data.
For HDFS and EFS, enter the relative path like /user/hadoop/ , checkpointingDir system will add suitable prefix by itself. For S3, enter an absolute path like: S3://BucketName/checkpointingDir |
|
Time-Based Check Point |
Select checkbox to enable timebased checkpoint on each pipeline run i.e. in each pipeline run above provided checkpoint location will be appended with current time in millis. |
|
Output Fields |
This option is to select fields whose value you want to persist in Table. |
|
Output Mode |
Output mode to be used while writing the data to Streaming sink. Append: Output Mode in which only the new rows in the streaming data will be written to the sink. Complete Mode: Output Mode in which all the rows in the streaming data will be written to the sink every time there are some updates. Update Mode: Output Mode in which only the rows that were updated in the streaming data will be written to the sink every time there are some updates. |
|
Save Mode |
Save mode specifies how to handle the existing data. |
|
Enable Trigger |
Trigger defines how frequently a streaming query should be executed. |
|
Processing Time |
It will appear only when Enable Trigger checkbox is selected. Processing Time is the trigger time interval in minutes or seconds. |
|
ADD CONFIGURATION |
Enables additional configuration properties of Elasticsearch. |
Click on the Next button. Enter the notes in the space provided.
Click on the DONE for saving the configuration.
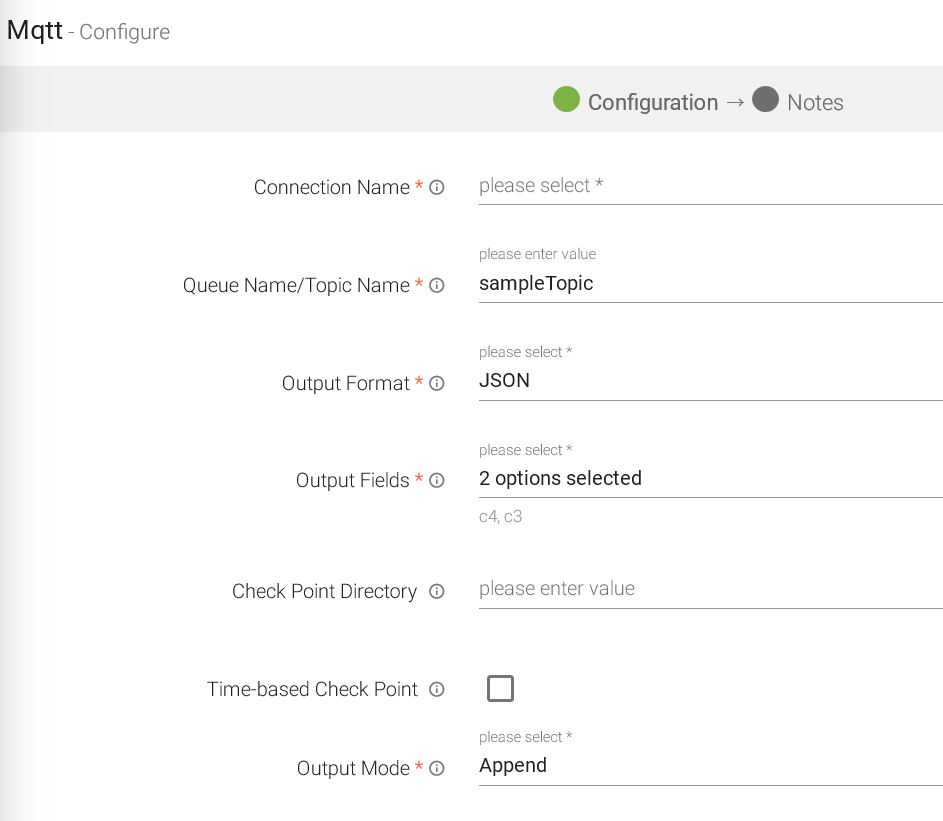
Mqtt emitter emits data to Mqtt queue or topic. Supported output formats are Json, and Delimited.
Mqtt supports wireless network with varying levels of latency.
Configuring Mqtt Emitter for Spark Pipelines
To add Mqtt emitter into your pipeline, drag the emitter on to the canvas, connect it to a Data Source or processor, and right click on it to configure it.
Note: If the data source in pipeline has a streaming component, then the emitter will show four additional properties, Checkpoint Storage Location; Checkpoint Connections; Checkpoint Directory; and Time-Based checkpoint.
|
Field |
Description |
|---|---|
|
Connection Name |
All Mqtt connections will be listed here. Select a connection for connecting to Mqtt. |
|
Queue Name/Topic Name |
Queue or topic name to which messages will be published. |
|
Output Format |
Datatype format of the output. JSON and Delimited. If Delimited is selected, provide a delimiter as well. |
|
Output Fields |
Fields in the message that needs to be a part of the output data. |
|
Checkpoint Directory |
It is the path where Spark Application stores the checkpointing data.
For HDFS and EFS, enter the relative path like /user/hadoop/ , checkpointingDir system will add suitable prefix by itself. For S3, enter an absolute path like: S3://BucketName/checkpointingDir |
|
Time-Based Check Point |
Select checkbox to enable timebased checkpoint on each pipeline run i.e. in each pipeline run above provided checkpoint location will be appended with current time in millis. |
|
Output Mode |
Output mode to be used while writing the data to Streaming sink.
Append: Output Mode in which only the new rows in the streaming data will be written to the sink
Complete Mode: Output Mode in which all the rows in the streaming data will be written to the sink every time there are some updates
Update Mode: Output Mode in which only the rows that were updated in the streaming data will be written to the sink every time there are some updates. |
|
Enable Trigger |
Trigger defines how frequently a streaming query should be executed. |
|
Processing Time |
Trigger time interval in minutes or seconds. |
|
ADD CONFIGURATION |
Enables to configure additional properties. |
Click on the Add Notes tab. Enter the notes in the space provided.
Click SAVE for saving the configuration.
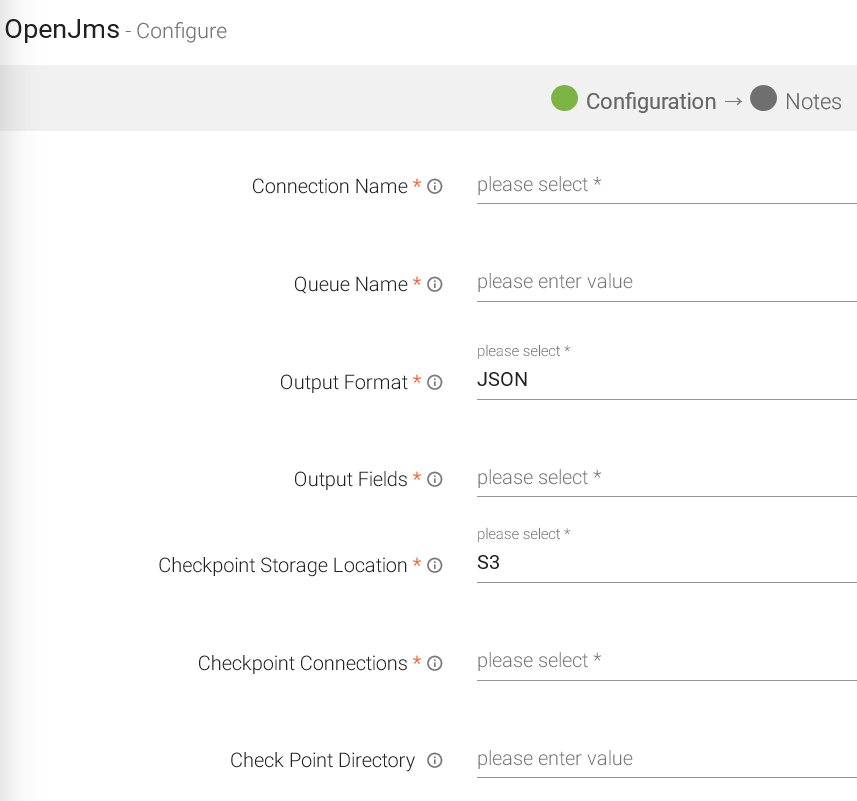
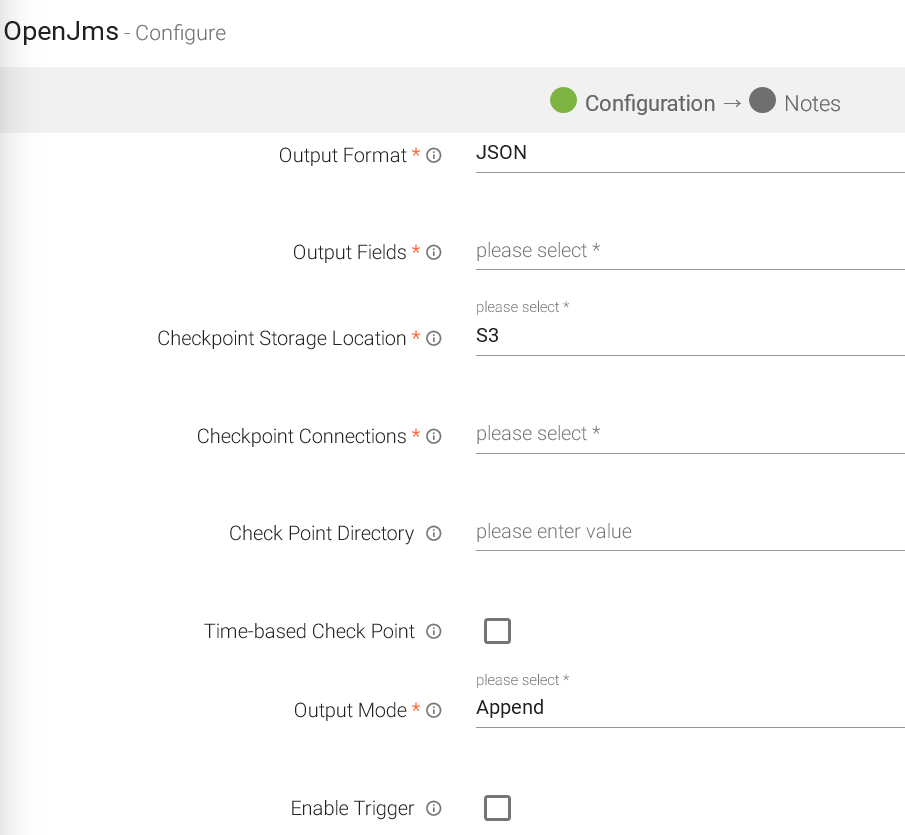
OpenJMS is used to send and receive messages from one application to another. OpenJms emitter is used to write data to JMS queues or topics. All applications that have subscribed to those topics/queues will be able to read that data.
Configuring OpenJms Emitter for Spark Pipelines
To add an OpenJms emitter into your pipeline, drag the emitter on to the canvas, connect it to a Data Source or processor, and right click on it to configure it.
Note: If the data source in pipeline has a streaming component, then the emitter will show four additional properties, Checkpoint Storage Location; Checkpoint Connections; Checkpoint Directory; and Time-Based checkpoint.
|
Field |
Description |
|---|---|
|
Connection Name |
All OpenJms connections will be listed here. Select a connection for connecting to the OpenJMS. |
|
Queue Name |
Queue name on which messages are published. |
|
Output Format |
Select the data format in which OpenJMS is configured to write the data. |
|
Output Fields |
Select the fields which should be a part of the output data. |
|
Checkpoint Storage Location |
Select the checkpointing storage location. Available options are HDFS, S3, and EFS. |
|
Checkpoint Connections |
Select the connection. Connections are listed corresponding to the selected storage location. |
|
Checkpoint Directory |
It is the path where Spark Application stores the checkpointing data.
For HDFS and EFS, enter the relative path like /user/hadoop/ , checkpointingDir system will add suitable prefix by itself. For S3, enter an absolute path like: S3://BucketName/checkpointingDir |
|
Time-Based Check Point |
Select checkbox to enable timebased checkpoint on each pipeline run i.e. in each pipeline run above provided checkpoint location will be appended with current time in millis. |
|
Output Mode |
Output Mode to be used while writing the data to data sink. Select the output mode from the given three options:
Append: Output Mode in which only the new rows in the streaming data will be written to the sink
Complete Mode: Output Mode in which all the rows in the streaming data will be written to the sink every time there are some updates
Update Mode: Output Mode in which only the rows that were updated in the streaming data will be written to the sink every time there are some updates. |
|
Enable Trigger |
Trigger defines how frequently a streaming query will be executed. |
|
Processing Time |
It will appear only when Enable Trigger checkbox is selected. Processing Time is the trigger time interval in minutes or seconds. |
|
ADD CONFIGURATION |
Enables to configure additional properties. |
Click on the Next button. Enter the notes in the space provided.
Click SAVE for saving the configuration details.
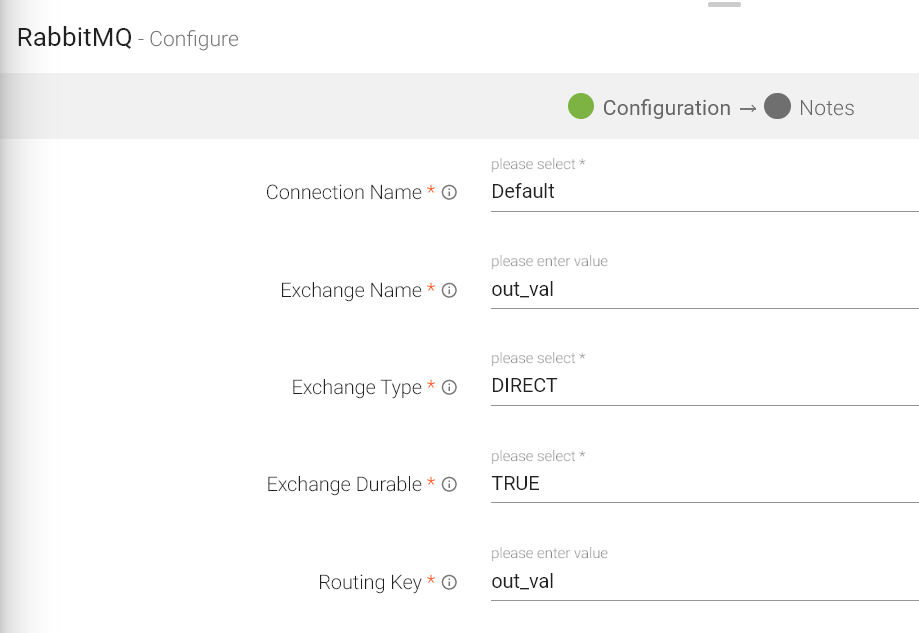
The RabbitMQ emitter is used when you want to write data to RabbitMQ cluster.
Data formats supported are JSON and DELIMITED (CSV, TSV, PSV, etc).
Configuring RabbitMQ Emitter for Spark Pipelines
To add a RabbitMQ emitter into your pipeline, drag the RabbitMQ emitter on the canvas and connect it to a Data Source or processor. Right click on the emitter to configure it as explained below:
Note: If the data source in pipeline has a streaming component, then the emitter will show four additional properties, Checkpoint Storage Location; Checkpoint Connections; Checkpoint Directory; and Time-Based checkpoint.
|
Field |
Description |
|---|---|
|
Connection Name |
All RabbitMQ connections will be listed here. Select a connection for connecting to the RabbitMQ server. |
|
Exchange Name |
Rabbit MQ Exchange name. |
|
Exchange Type |
Specifies how messages are routed through Exchange.
Direct: A message goes to the queue(s) whose binding key exactly matches the routing key of the message.
Fanout: The fanout copies and routes a received message to all queues that are bound to it regardless of routing keys or pattern matching as with direct and topic exchanges. Keys provided will simply be ignored
Topic: Topic exchanges route messages to queues based on wildcard matches between the routing key and something called the routing pattern specified by the queue binding. Messages are routed to one or many queues based on a matching between a message routing key and this pattern. |
|
Exchange Durable |
Specifies whether exchange will be deleted or will remain active on server restart.
TRUE: Exchange will not be deleted if you restart RabbitMQ server.
FALSE: Exchange will be deleted if you restart RabbitMQ server. |
|
Routing Key |
Select RabbitMQ Routing Key where data will be published. |
|
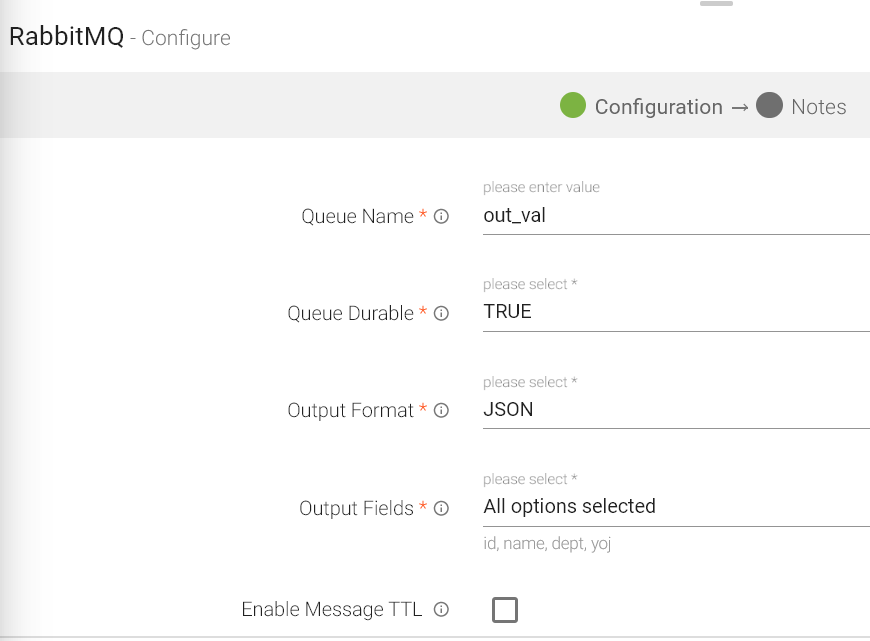
Queue Name |
RabbitMQ Queue Name where data will be published. |
|
Queue Durable |
Specifies whether queue will remain active or deleted on server restart. TRUE: Queue will not be deleted if you restart RabbitMQ. FALSE: Queue will be deleted if you restart RabbitMQ. |
|
Output Format |
Select the data format in which RabbitMQ should write the data. |
|
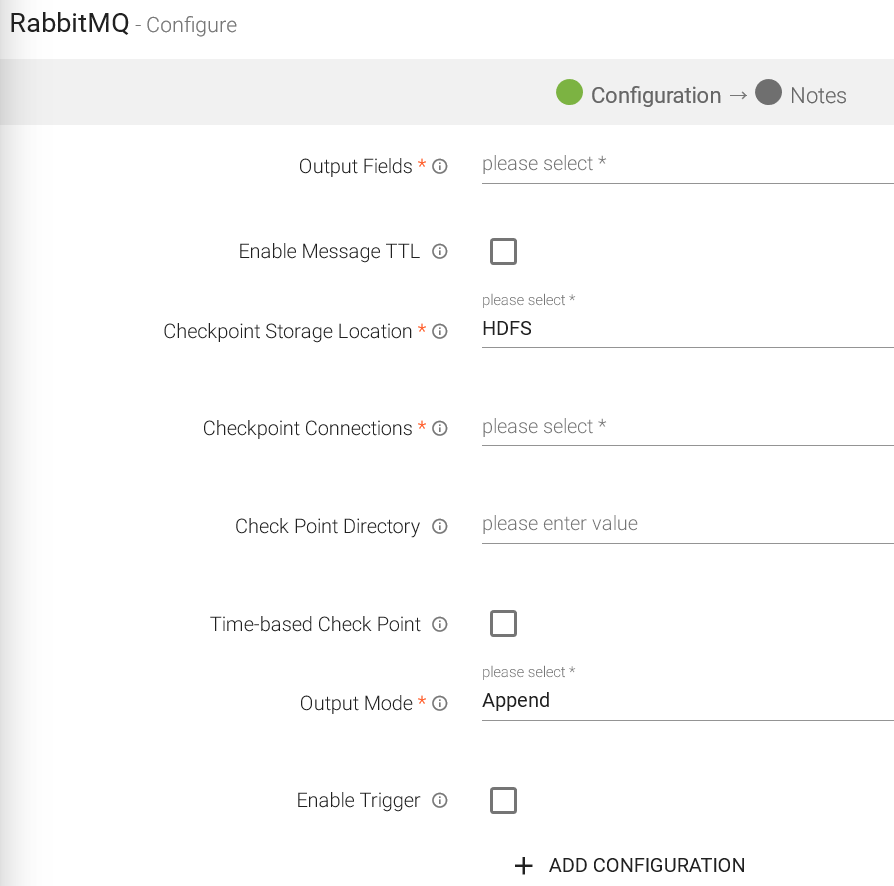
Output Fields |
Select the fields which should be a part of the output data. |
|
Enable Message TTL |
RMQ allows you to set TTL (time to live) for messages. |
|
Message TTL |
Time to live in seconds after which message will be discarded to the specified TTL Exchange. |
|
TTL Exchange |
Name of the Exchange, on which message will be sent once time to live expires. |
|
TTL Queue |
Name of the Queue on which message will be sent once time to live expires. |
|
TTL Routing Key |
Routing key used to bind TTL queue with TTL exchange. |
|
Checkpoint Storage Location |
Select the checkpointing storage location. Available options are HDFS, S3, and EFS. |
|
Checkpoint Connections |
Select the connection. Connections are listed corresponding to the selected storage location. |
|
Checkpoint Directory |
It is the path where Spark Application stores the checkpointing data.
For HDFS and EFS, enter the relative path like /user/hadoop/ , checkpointingDir system will add suitable prefix by itself. For S3, enter an absolute path like: S3://BucketName/checkpointingDir |
|
Time-Based Check Point |
Select checkbox to enable timebased checkpoint on each pipeline run i.e. in each pipeline run above provided checkpoint location will be appended with current time in millis. |
|
Output Mode |
Output mode to be used while writing the data to Streaming sink. Select the output mode from the given three options:
Append Mode: Output Mode in which only the new rows in the streaming data will be written to the sink
Complete Mode: Output Mode in which all the rows in the streaming data will be written to the sink every time there are some updates.
Update Mode: Output Mode in which only the rows that were updated in the streaming data will be written to the sink every time there are some updates. |
|
Enable Trigger |
Trigger defines how frequently a streaming query should be executed. |
|
Processing Time |
Trigger time interval in minutes or seconds. |
|
Add Configuration |
Enables to configure additional RabbitMQ properties. |
Click on the NEXT button. Enter the notes in the space provided. Click SAVE for saving the configuration details.
RDS emitter allows you to write to RDS (un)Secured DB Engine. RDS is Relational Database service on Cloud.
Configuring RDS Emitter for Spark Pipelines
To add an RDS emitter into your pipeline, drag the emitter to the canvas and connect it to a Data Source or processor.
Note: If the data source in pipeline has a streaming component, then the emitter will show four additional properties, Checkpoint Storage Location; Checkpoint Connections; Checkpoint Directory; and Time-Based checkpoint.
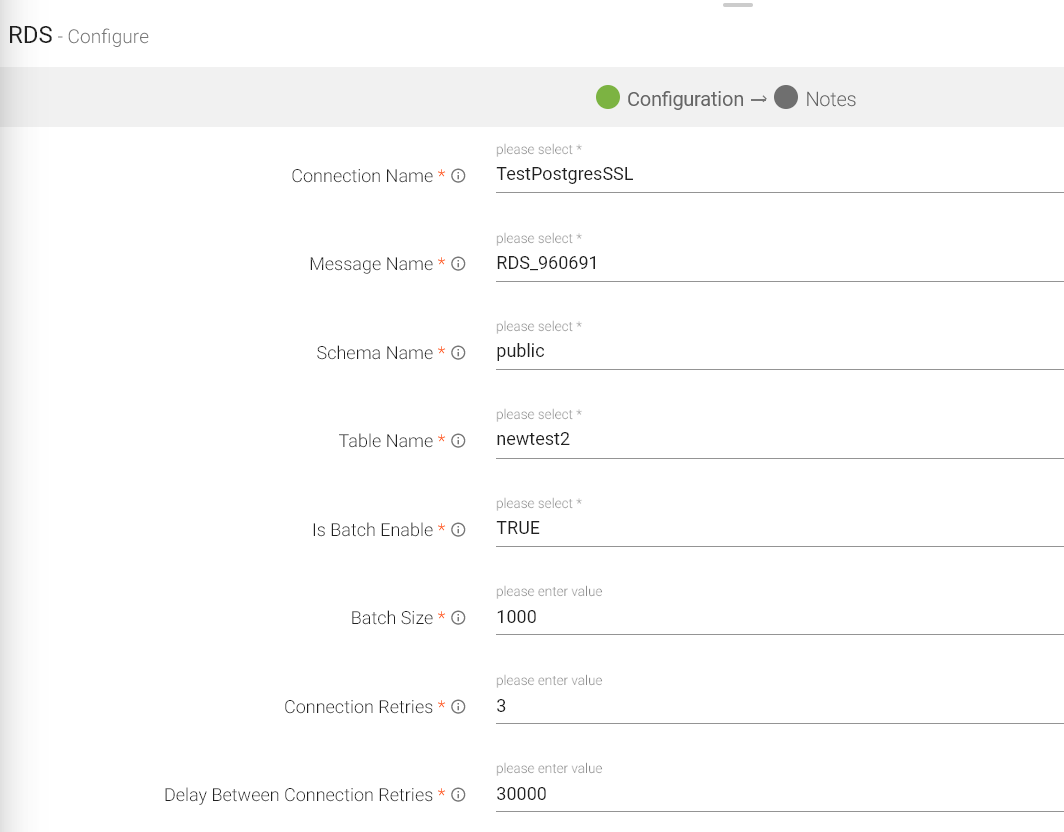
The configuration settings are as follows:
|
Field |
Description |
|---|---|
|
Connection Name |
All OpenJms connections will be listed here. Select a connection for connecting to the OpenJMS. |
|
Message Name |
The name for the message configuration which will act as metadata for the actual data. |
|
Schema Name |
Existing database Schema Names whose tables are fetched. (for MSSQL, DB2 and POSTGRES) |
|
Table Name |
Existing tablename of the specified database. |
|
Is Batch Enable |
Enable parameter to process batch multiple messages and improve write performance. |
|
Batch Size |
Batch Size determines how many rows to insert per round trip. This helps the performance on JDBC drivers. This option applies only to writing. It defaults to 1000. |
|
Connection Retries |
Number of retries for component connection |
|
Delay Between Connection Retries |
Defines the retry delay intervals for component connection in millis. |
|
Checkpoint Storage Location |
Select the checkpointing storage location. Available options are HDFS, S3, and EFS. |
|
Checkpoint Connections |
Select the connection. Connections are listed corresponding to the selected storage location. |
|
Checkpoint Directory |
It is the path where Spark Application stores the checkpointing data.
For HDFS and EFS, enter the relative path like /user/hadoop/ , checkpointingDir system will add suitable prefix by itself. For S3, enter an absolute path like: S3://BucketName/checkpointingDir |
|
Time-Based Check Point |
Select checkbox to enable timebased checkpoint on each pipeline run i.e. in each pipeline run above provided checkpoint location will be appended with current time in millis. |
|
Output Mode |
Output Mode to be used while writing the data to data sink. Select the output mode from the given three options:
Append: Output Mode in which only the new rows in the streaming data will be written to the sink
Complete Mode: Output Mode in which all the rows in the streaming data will be written to the sink every time there are some updates
Update Mode: Output Mode in which only the rows that were updated in the streaming data will be written to the sink every time there are some updates. |
|
Enable Trigger |
Trigger defines how frequently a streaming query will be executed. |
|
Processing Time |
It will appear only when Enable Trigger checkbox is selected. Processing Time is the trigger time interval in minutes or seconds. |
|
ADD CONFIGURATION |
Enables to configure additional properties. |
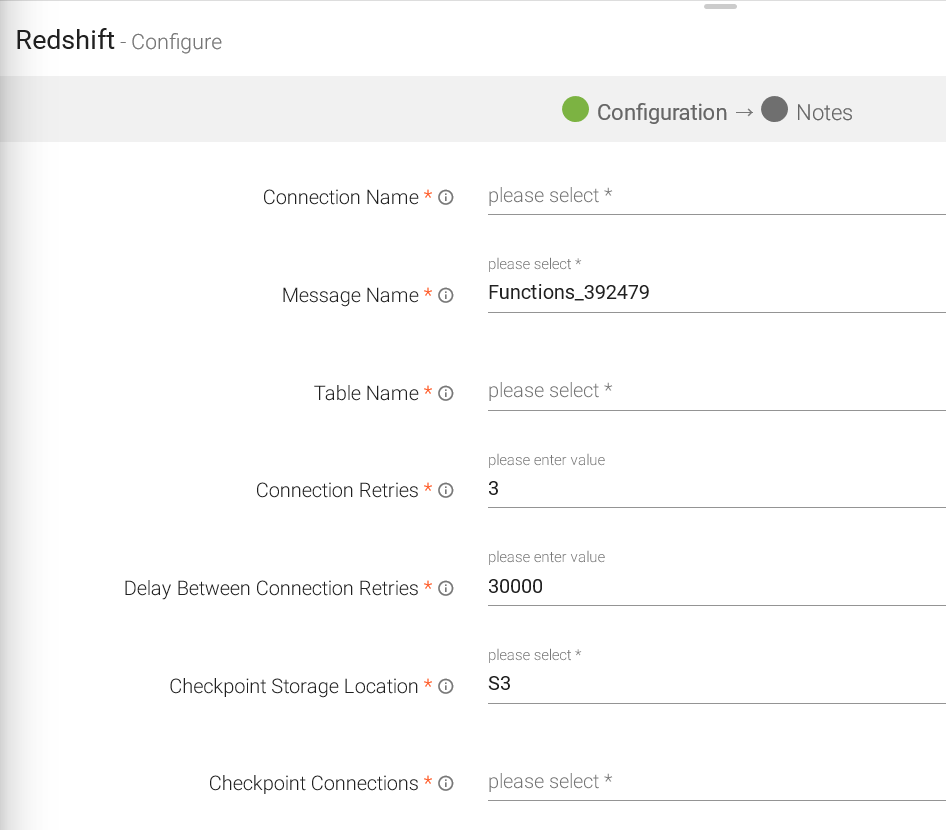
Redshift emitter works for both Streaming and Batch Datasets. It allows data to be pushed into the Redshift tables.
Configuring Redshift Emitter for Spark Pipelines
To add a Redshift emitter into your pipeline, drag the emitter on the canvas and connect it to a Data Source or processor. Right click on the emitter to configure it as explained below:
Note: If the data source in pipeline has a streaming component, then the emitter will show four additional properties, Checkpoint Storage Location; Checkpoint Connections; Checkpoint Directory; and Time-Based checkpoint.
|
Field |
Description |
|---|---|
|
Connection Name |
All Redshift connections will be listed here. Select a connection for connecting to Redshift |
|
Message Name |
Message used in the pipeline |
|
Table Name |
Existing database tablename whose schema is to be fetched. |
|
Connection Retries |
Number of retries for component connection. |
|
Delay Between Connection Retries |
Defines the retry delay intervals for component connection in millis. |
|
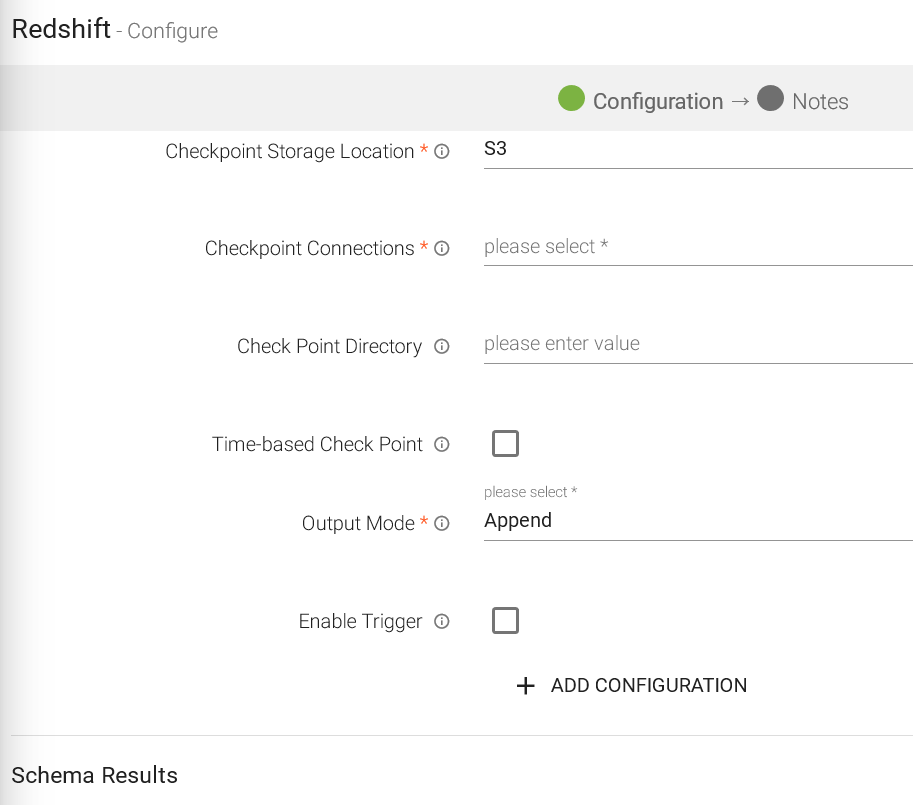
Checkpoint Storage Location |
Select the checkpointing storage location. Available options are HDFS, S3, and EFS. |
|
Checkpoint Connections |
Select the connection. Connections are listed corresponding to the selected storage location. |
|
Checkpoint Directory |
It is the path where Spark Application stores the checkpointing data.
For HDFS and EFS, enter the relative path like /user/hadoop/ , checkpointingDir system will add suitable prefix by itself. For S3, enter an absolute path like: S3://BucketName/checkpointingDir |
|
Time-Based Check Point |
Select checkbox to enable timebased checkpoint on each pipeline run i.e. in each pipeline run above provided checkpoint location will be appended with current time in millis. |
|
Output Mode |
Output mode to be used while writing the data to Streaming emitter. Select the output mode from the given three options: Append: Output Mode in which only the new rows in the streaming data will be written to the sink. Complete Mode: Output Mode in which all the rows in the streaming data will be written to the sink every time there are some updates. Update Mode: Output Mode in which only the rows that were updated in the streaming data will be written to the sink every time there are some updates. |
|
Enable Trigger |
Trigger defines how frequently a streaming query should be executed. |
|
Processing Time |
Processing Time is the trigger time interval in minutes or seconds. This property will appear only when Enable Trigger checkbox is selected. |
|
ADD CONFIGURATION |
Enables to configure additional custom properties. |
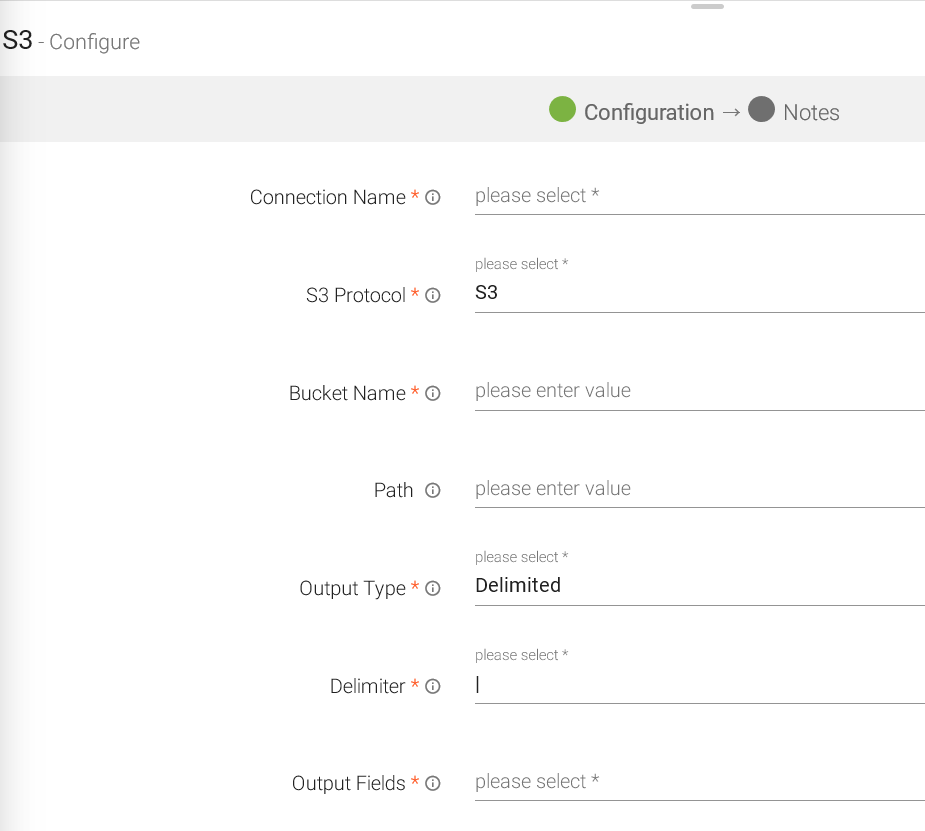
Amazon S3 stores data as objects within resources called Buckets. S3 emitter stores objects on Amazon S3 bucket.
Configuring S3 Emitter for Spark Pipelines
To add a S3 emitter into your pipeline, drag the emitter on the canvas and connect it to a Data Source or processor. Right click on the emitter to configure it as explained below:
Note: If the data source in pipeline has a streaming component, then the emitter will show four additional properties, Checkpoint Storage Location; Checkpoint Connections; Checkpoint Directory; and Time-Based checkpoint.
|
Field |
Description |
|---|---|
|
Connection Name |
All S3 connections will be listed here. Select a connection for connecting to S3. |
|
S3 protocol |
S3 protocol to be used while writing on S3. |
|
Bucket Name |
Buckets are storage units used to store objects, which consists of data and meta-data that describes the data. |
|
Path |
File or directory path from where data is to be stored. |
|
Output Type |
Output format in which result will be processed. |
|
Delimiter |
Message Field seperator. |
|
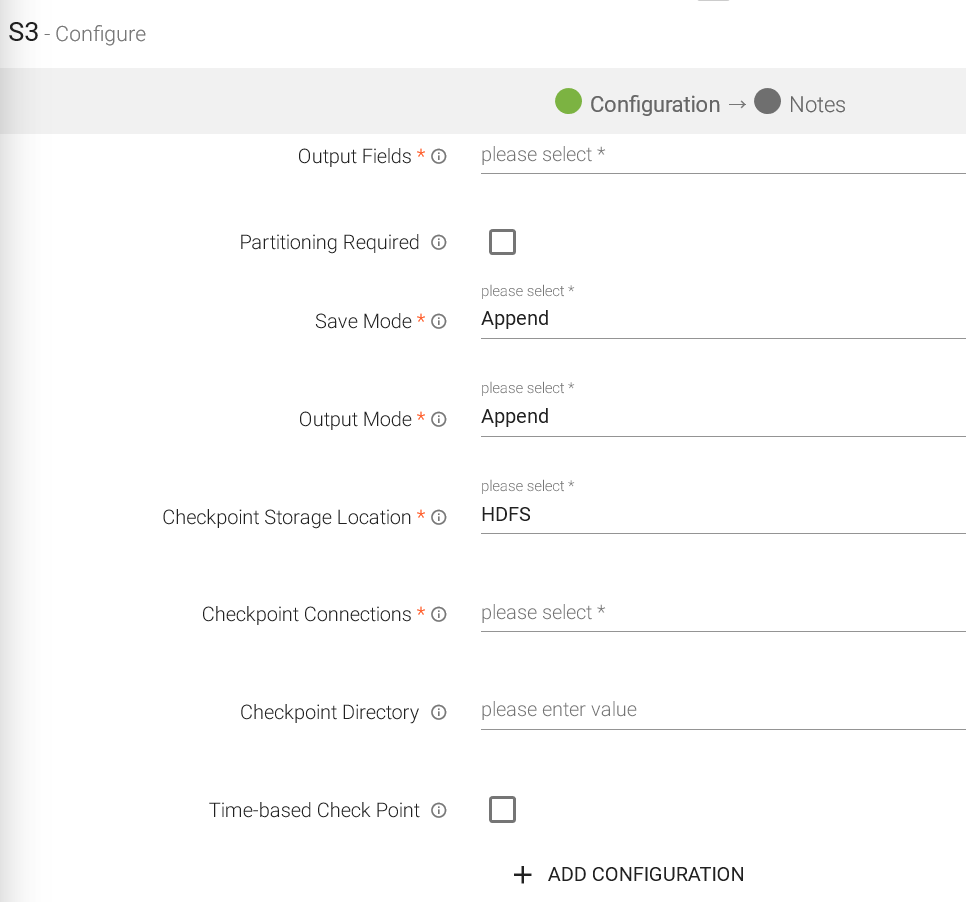
Output Field |
Fields of the output message. |
|
Partitioning Required |
Whether to partition data on s3 or not. |
|
Save Mode |
Save Mode is used to specify the expected behavior of saving data to a data sink. ErrorifExist: When persisting data, if the data already exists, an exception is expected to be thrown. Append: When persisting data, if data/table already exists, contents of the Schema are expected to be appended to existing data. Overwrite: When persisting data, if data/table already exists, existing data is expected to be overwritten by the contents of the Data. Ignore: When persisting data, if data/table already exists, the save operation is expected to not save the contents of the Data and to not change the existing data. This is similar to a CREATE TABLE IF NOT EXISTS in SQL. |
|
Output Mode |
Output mode to be used while writing the data to Streaming emitter. Select the output mode from the given three options: Append: Output Mode in which only the new rows in the streaming data will be written to the sink
Complete Mode: Output Mode in which all the rows in the streaming data will be written to the sink every time there are some updates
Update Mode: Output Mode in which only the rows that were updated in the streaming data will be written to the sink every time there are some updates. |
|
Checkpoint Storage Location |
Select the checkpointing storage location. Available options are HDFS, S3, and EFS. |
|
Checkpoint Connections |
Select the connection. Connections are listed corresponding to the selected storage location. |
|
Checkpoint Directory |
It is the path where Spark Application stores the checkpointing data.
For HDFS and EFS, enter the relative path like /user/hadoop/ , checkpointingDir system will add suitable prefix by itself. For S3, enter an absolute path like: S3://BucketName/checkpointingDir |
|
Time-Based Check Point |
Select checkbox to enable timebased checkpoint on each pipeline run i.e. in each pipeline run above provided checkpoint location will be appended with current time in millis. |
|
ADD CONFIGURATION |
Enables to configure additional custom properties. |
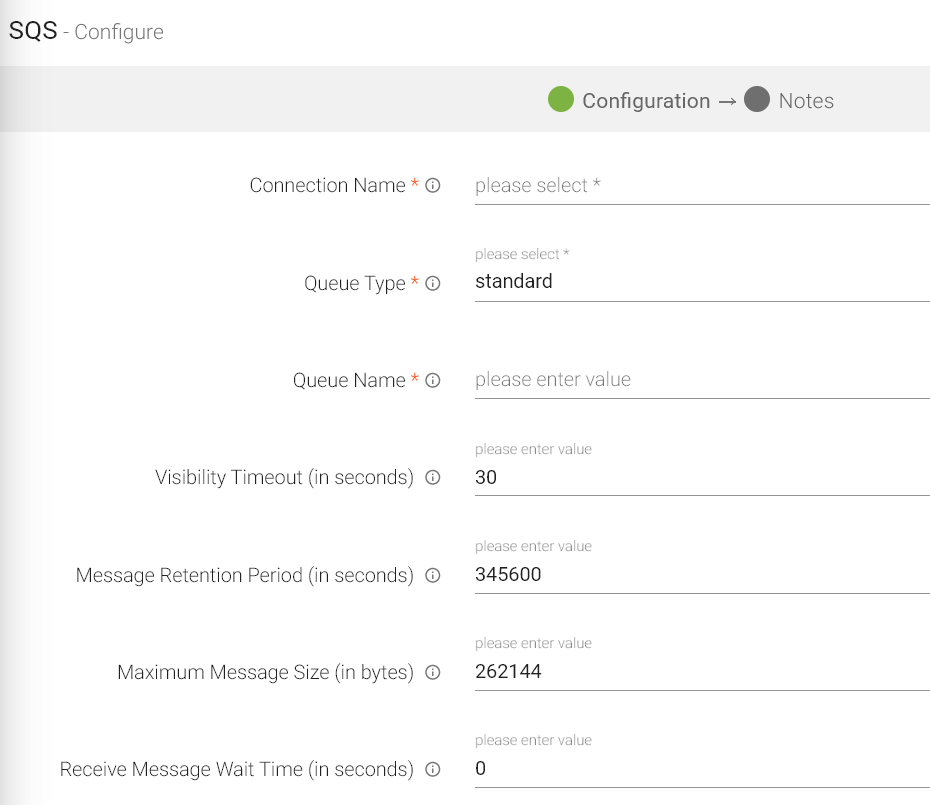
SQS emitter allows to emit data in Streaming manner into SQS Queues.
Configuring SQS Emitter for Spark Pipelines
To add an SQS emitter into your pipeline, drag the emitter to the canvas and connect it to a Data Source or processor. The configuration settings are as follows:
Note: If the data source in pipeline has a streaming component, then the emitter will show four additional properties, Checkpoint Storage Location; Checkpoint Connections; Checkpoint Directory; and Time-Based checkpoint.
|
Field |
Description |
|---|---|
|
Connection Name |
All RabbitMQ connections will be listed here. Select a connection for connecting to the RabbitMQ server. |
|
Queue Type |
Select either type of Queue for incoming messages, Standard or SQS FIFO. |
|
Queue Name |
Name of the Queue where data will be published. |
|
Content-Based Deduplication |
Enable content based deduplication for the queue (each of your message has a unique body). The producer can omit the message deduplication ID. |
|
Message Group ID For FIFO Queue |
The tag that specifies that a message belongs to a specific message group. Messages that belong to the same message group are guaranteed to be processed in FIFO manner. |
|
Message Deduplication ID for FIFO Queue |
The token used for deduplication of messages within the deduplication interval. |
|
Visibility Timeout (in seconds) |
The length of time (in seconds) that a message received from a queue will be invisible for, to other receiving components. |
|
Message Retention Period (in seconds) |
The amount of time in which Amazon SQS will retain a message if it does not get deleted. |
|
Maximum Message Size (in bytes) |
Maximum message size (in bytes) accepted by Amazon SQS. |
|
Receive Message Wait Time (In seconds) |
The maximum amount of time that a long polling receive call will wait for a message to become available before returning an empty response. |
|
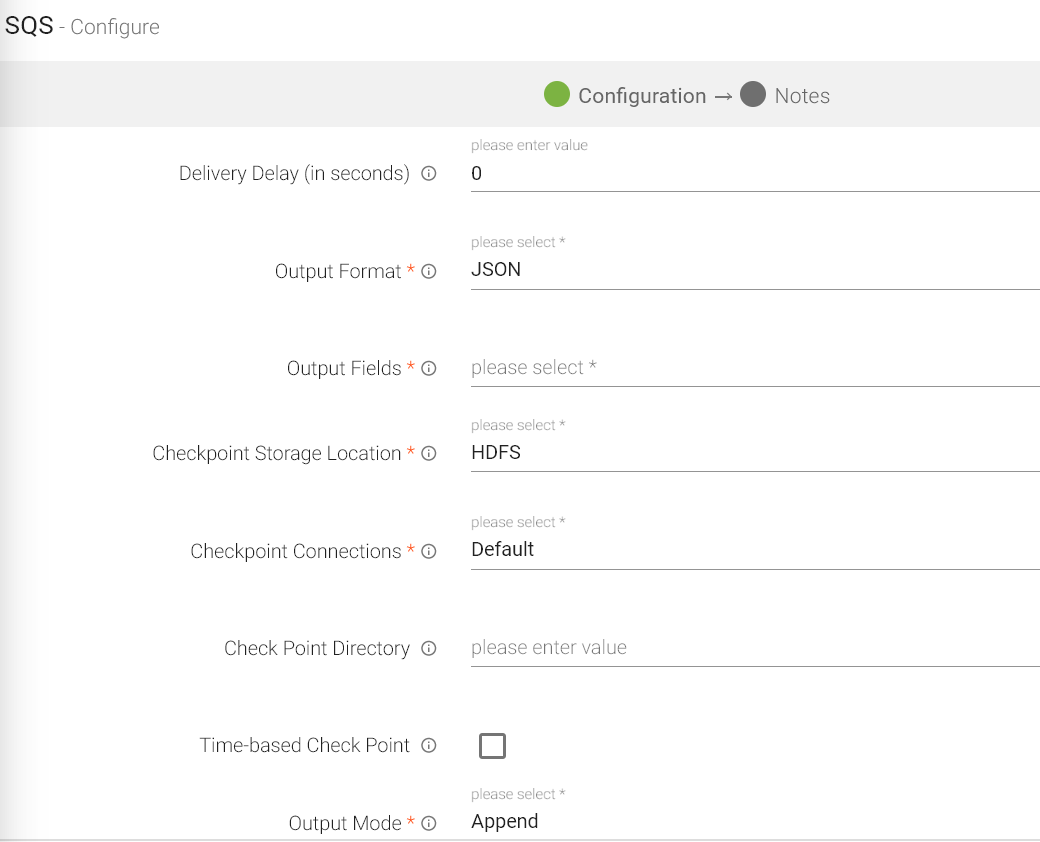
Delivery Delay (in seconds) |
The amount of time to delay the first delivery of all messages added to this queue. |
|
Output Format |
Select the data format in which RabbitMQ should write the data. |
|
Output Fields |
Select the fields which should be a part of the output data. |
|
Checkpoint Storage Location |
Select the check-pointing storage location. Available options are HDFS, S3, and EFS. |
|
Checkpoint Connections |
Select the connection. Connections are listed corresponding to the selected storage location. |
|
Checkpoint Directory |
It is the path where Spark Application stores the checkpointing data.
For HDFS and EFS, enter the relative path like /user/hadoop/ , checkpointingDir system will add suitable prefix by itself. For S3, enter an absolute path like: S3://BucketName/checkpointingDir |
|
Time-Based Check Point |
Select checkbox to enable timebased checkpoint on each pipeline run i.e. in each pipeline run above provided checkpoint location will be appended with current time in millis. |
|
Output Mode |
Output mode to be used while writing the data to Streaming sink. Select the output mode from the given three options:
Append Mode: Output Mode in which only the new rows in the streaming data will be written to the sink
Complete Mode: Output Mode in which all the rows in the streaming data will be written to the sink every time there are some updates.
Update Mode: Output Mode in which only the rows that were updated in the streaming data will be written to the sink every time there are some updates. |
|
Enable Trigger |
Trigger defines how frequently a streaming query should be executed. |
|
Processing Time |
Trigger time interval in minutes or seconds. |
|
Add Configuration |
Enables to configure additional RabbitMQ properties. |
Streaming Emitter is an action provided by Spark Structured Streaming. It provides a custom implementation for processing streaming data which is executed using the emitter.
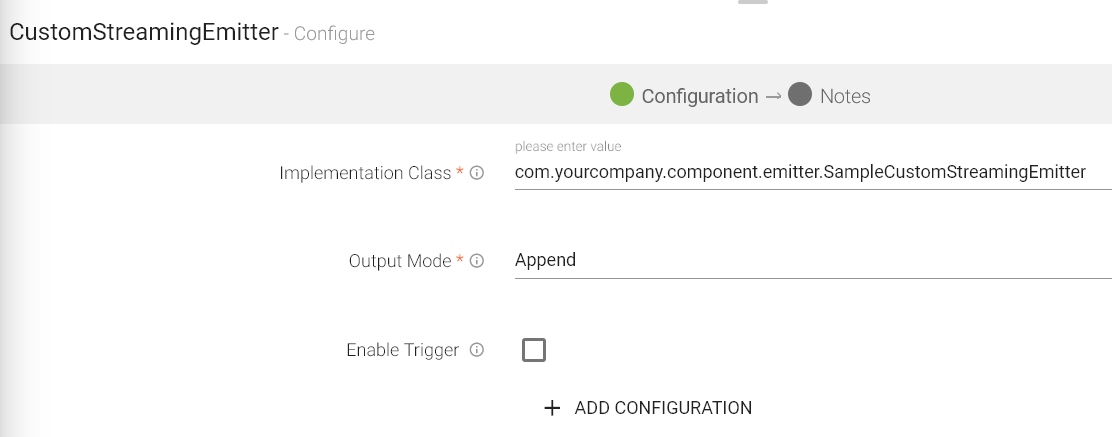
Configuring CustomStreamingEmitter for Spark Pipelines
To add a CustomStreamingEmitter into your pipeline, drag the CustomStreamingEmitter; to the canvas, connect it to a Data Source or processor, and right click on it to configure:
Note: If the data source in pipeline has a streaming component, then the emitter will show four additional properties, Checkpoint Storage Location; Checkpoint Connections; Checkpoint Directory; and Time-Based checkpoint.
|
Field |
Description |
|---|---|
|
Implementation Class |
Foreach implementation class to which control will be passed to process incoming data flow. |
|
Output Mode |
Output mode to be used while writing the data to Streaming sink.
Select the output mode from the given three options: Append: Output Mode in which only the new rows in the streaming data will be written to the sink Complete Mode: Output Mode in which all the rows in the streaming data will be written to the sink every time there are some updates Update Mode: Output Mode in which only the rows that were updated in the streaming data will be written to the sink every time there are some updates. |
|
Enable Trigger |
Trigger defines how frequently a streaming query should be executed. |
|
Processing Time |
It will appear only when Enable Trigger checkbox is selected. Processing Time is the trigger time interval in minutes or seconds. |
|
ADD CONFIGURATION |
Additional properties can be added. |
Click on the Next button. Enter the notes in the space provided.
Click on the Done button for saving the configuration.
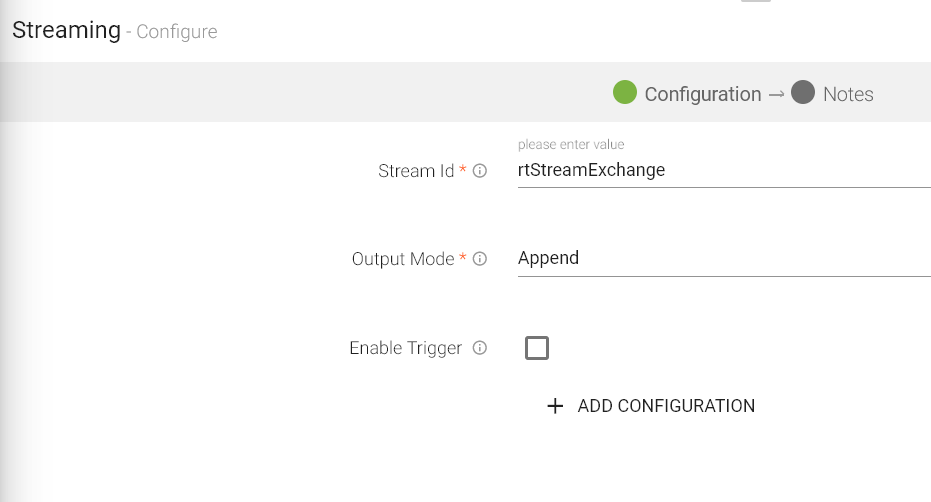
Streaming emitter enables you to visualize the data running in the pipeline at the built-in real-time dashboard.
For example, you may use Streaming emitter to view real-time price fluctuation of stocks.
|
Field |
Description |
|---|---|
|
Stream Id |
Exchange name on which streaming messages will be sent. |
|
Output Mode |
Output mode to be used while writing the data to streaming sink. Select the output mode from the given three options: Append: Output Mode in which only the new rows in the streaming data will be written to the sink. Complete Mode: Output Mode in which all the rows in the streaming data will be written to the sink every time there are some updates. Update Mode: Output Mode in which only the rows that were updated in the streaming data will be written to the sink every time there are some updates. |
|
Enable Trigger |
Trigger defines how frequently a streaming query should be executed. |
|
Processing Time |
Trigger time interval in minutes or seconds. |
|
ADD CONFIGURATION |
Enables to configure additional custom properties. |
Click on the Next button. Enter the notes in the space provided. Click Done for saving the configuration details.
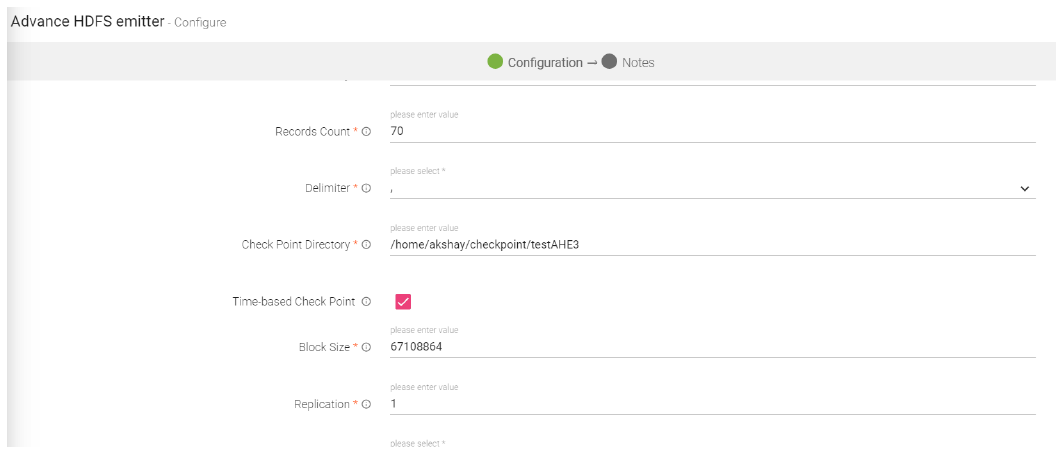
Advance HDFS emitter allows you to add rotation policy to the emitter.
Configuring Advance HDFS Emitter for Spark Pipelines
To add an Advance HDFS emitter into your pipeline, drag the emitter to the canvas and connect it to a Data Source or processor. The configuration settings are as follows:
|
Field |
Description |
|---|---|
|
Save as Dataset |
When you select this checkbox, you will be able to save the data of this emitter a a dataset. After selecting this, provide a name to the Dataset. |
|
Connection Name |
All advance HDFS connections will be listed here. Select a connection for connecting to HDFS. |
|
Output Mode |
Output mode to be used while writing the data to Streaming emitter. Select the output mode from the given three options: Append: Output Mode in which only the new rows in the streaming data will be written to the sink Complete Mode: Output Mode in which all the rows in the streaming data will be written to the sink every time there are some updates. Update Mode: Output Mode in which only the rows that were updated in the streaming data will be written to the sink every time there are some updates. |
|
Save Mode |
Save Mode is used to specify the expected behavior of saving data to a data sink. ErrorifExist: When persisting data, if the data already exists, an exception is expected to be thrown. Append: When persisting data, if data/table already exists, contents of the Schema are expected to be appended to existing data. Overwrite: When persisting data, if data/table already exists, existing data is expected to be overwritten by the contents of the data. Ignore: When persisting data, if data/table already exists, the save operation is expected to not save the contents of the data and to not change the existing data. This is similar to a CREATE TABLE IF NOT EXISTS in SQL. |
|
Enable Triggers |
Trigger defines how frequently a streaming query should be executed. |
|
Path Type |
Path Type could be either Static or Dynamic.
Static: When you select Static, “HDFS Path” field is pertained as a text box. Provide a valid HDFS PATH to emit data.
Dynamic: With Dynamic, HDFS Path will be populated with a drop down of the field names of incoming dataset.
The value of the field as selected should be a valid HDFS path and that is considered as a value of the field. This value/path is the location where the records will be emitted. |
|
HDFS Path |
Enter the Directory path/Field name. |
|
Output Fields |
Fields in the message that needs to be a part of the output message. |
|
Partitioning Required |
Check this option if table is to be partitioned. You will view Partition List input box. |
|
Partition List |
This option is to select fields on which table will be partitioned. |
|
Include Column name in Partition |
Includes the column name in partition path. Example- {Column Name}={Column Value} |
|
Output Type |
Output format in which the results will be processed. |
|
Rotation Policy |
Select a rotation policy from - None, Size based, Time based, Size and time based both.
None- there will be no rotation policy applied. Size based - the data will be written until the mentioned size in bytes has been reached. Time based - the data will be written in same file for the mentioned amount of time in seconds. Time and Size based - data will be written in same file until one criteria from mentioned size and time is achieved. Record Based: The data will be written in same file until the mentioned number of records has been written. |
|
Raw Data Size |
If rotation policy is Size Based or Time and Size based - Enter the raw data size in bytes after which the file will be rotated. |
|
File Rotation Time |
If rotation policy is Time Based or Time and Size based - Enter the time in milliseconds after which the file will be rotated. |
|
Record count |
Records count after which the data will be written in the new file. This field is generated when you select your Rotation Policy as Record Based. |
|
Delimiter |
Message field separator. |
|
Checkpoint Directory |
It is the path where Spark Application stores the checkpointing data.
For HDFS and EFS, enter the relative path like /user/hadoop/, checkpointingDir system will add suitable prefix by itself. For S3, enter an absolute path like: S3://BucketName/checkpointingDir |
|
Time-based Check Point |
Select checkbox to enable time-based checkpoint on each pipeline run i.e. in each pipeline run above provided checkpoint location will be appended with current time in millis. |
|
Block Size |
Size of each block (in bytes) allocated in HDFS. |
|
Replication |
Replication factor used to make additional copies of the data. |
|
Compression Type |
Algorithm used to compress data. Types of Compression algorithms that you can apply are: • NONE • DEFLATE • GZIP • BZIP2 • SNAPPY |
Cassandra emitter allows you to store data in a Cassandra table.
Configuring Cassandra emitter for Spark pipelines
To add a Cassandra emitter into your pipeline, drag the emitter to the canvas and connect it to a Data Source or processor.
Note: If the data source in pipeline has a streaming component, then the emitter will show four additional properties, Checkpoint Storage Location; Checkpoint Connections; Checkpoint Directory; and Time-Based checkpoint.
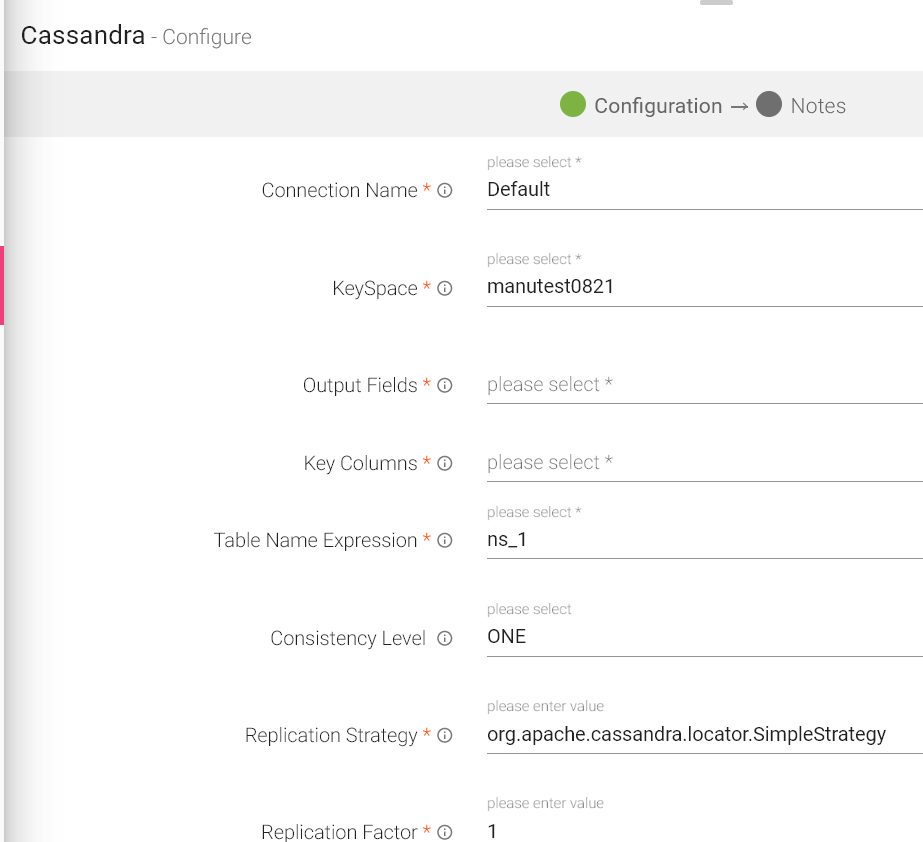
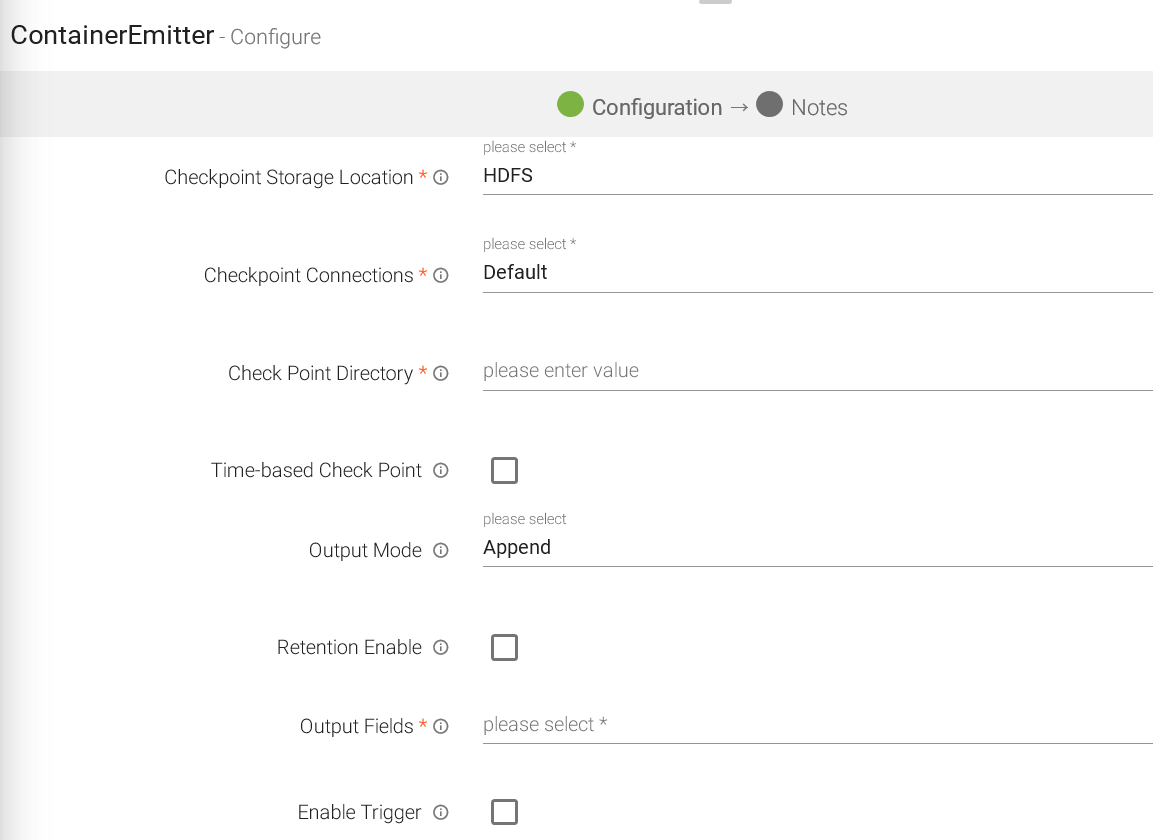
The configuration settings are as follows:
|
Field |
Description |
|---|---|
|
Connection Name |
All Cassandra connections will be listed here. Select a connection for connecting to Advance Kafka. |
|
KeySpace |
Cassandra keyspace name. If keyspace name does not exist in Cassandra, then it will create new keyspace. |
|
Output Fields |
Output messages fields. |
|
Key Columns |
A single/compound primary key consists of the partition key and one or more additional columns that determines clustering. |
|
Table Name Expression |
Casandra table name. If the table name does not exist on the keyspace then it will create a new table. |
|
Consistency Level |
Consistency level refers to how up-to-date and synchronized a row of Cassandra data is on all its replicas.
Consistency levels are as follows: ONE: Only a single replica must respond. TWO: Two replicas must respond. THREE: Three replicas must respond. QUORUM: A majority (n/2 + 1) of the replicas must respond. ALL: All of the replicas must respond. LOCAL_QUORUM: A majority of the replicas in the local data center (whichever data center the coordinator is in) must respond. EACH_QUORUM: A majority of the replicas in each data center must respond. LOCAL_ONE: Only a single replica must respond. In a multi-data center cluster, this also guarantees that read requests are not sent to replicas in a remote data center. |
|
Replication Strategy |
A replication strategy specifies the implementation class for determining the nodes where replicas are placed. Possible strategies are SimpleStrategy and NetworkTopologyStrategy. |
|
Replication Factor |
Replication factor used to make additional copies of data. |
|
Enable TTL |
Select the checkbox to enable TTL (Time to Live) for records to persist for that time duration. |
|
TTL Value |
It will appear only when Enable TTL checkbox is selected. Provide TTL value in seconds. |
|
Checkpoint Storage Location |
Select the checkpointing storage location. Available options are HDFS, S3, and EFS. |
|
Checkpoint Connections |
Select the connection. Connections are listed corresponding to the selected storage location. |
|
Checkpoint Directory |
It is the path where Spark Application stores the checkpointing data.
For HDFS and EFS, enter the relative path like /user/hadoop/ , checkpointingDir system will add suitable prefix by itself. For S3, enter an absolute path like: S3://BucketName/checkpointingDir |
|
Time-Based Check Point |
Select checkbox to enable timebased checkpoint on each pipeline run i.e. in each pipeline run above provided checkpoint location will be appended with current time in millis. |
|
Batch Size |
Number of records to be picked for inserting into Cassandra. |
|
Output Mode |
Output mode to be used while writing the data to Streaming emitter. Select the output mode from the given three options: Append: Output Mode in which only the new rows in the streaming data will be written to the sink Complete Mode: Output Mode in which all the rows in the streaming data will be written to the sink every time there are some updates Update Mode: Output Mode in which only the rows that were updated in the streaming data will be written to the sink every time there are some updates. |
|
Save Mode |
Save Mode is used to specify the expected behavior of saving data to a data sink. ErrorifExist: When persisting data, if the data already exists, an exception is expected to be thrown. Append: When persisting data, if data/table already exists, contents of the Schema are expected to be appended to existing data. Overwrite: When persisting data, if data/table already exists, existing data is expected to be overwritten by the contents of the data. Ignore: When persisting data, if data/table already exists, the save operation is expected to not save the contents of the data and to not change the existing data. This is similar to a CREATE TABLE IF NOT EXISTS in SQL. |
|
Enable Trigger |
Trigger defines how frequently a streaming query should be executed. |
|
Processing Time |
It will appear only when Enable Trigger checkbox is selected. Processing Time is the trigger time interval in minutes or seconds. |
|
Add Configuration |
Enables to configure additional Cassandra properties. |
Note: Append output mode should only be used if an Aggregation Processor with watermarking is used in the data pipeline.
HBase emitter stores streaming data into HBase. It provides quick random access to huge amount of structured data.
Configure Hbase Emitter for Spark Pipelines
To add Hbase emitter to your pipeline, drag it to the canvas, connect it to a Data Source or processor, and right click on it to configure.
Note: If the data source in pipeline has a streaming component, then the emitter will show four additional properties, Checkpoint Storage Location; Checkpoint Connections; Checkpoint Directory; and Time-Based checkpoint.
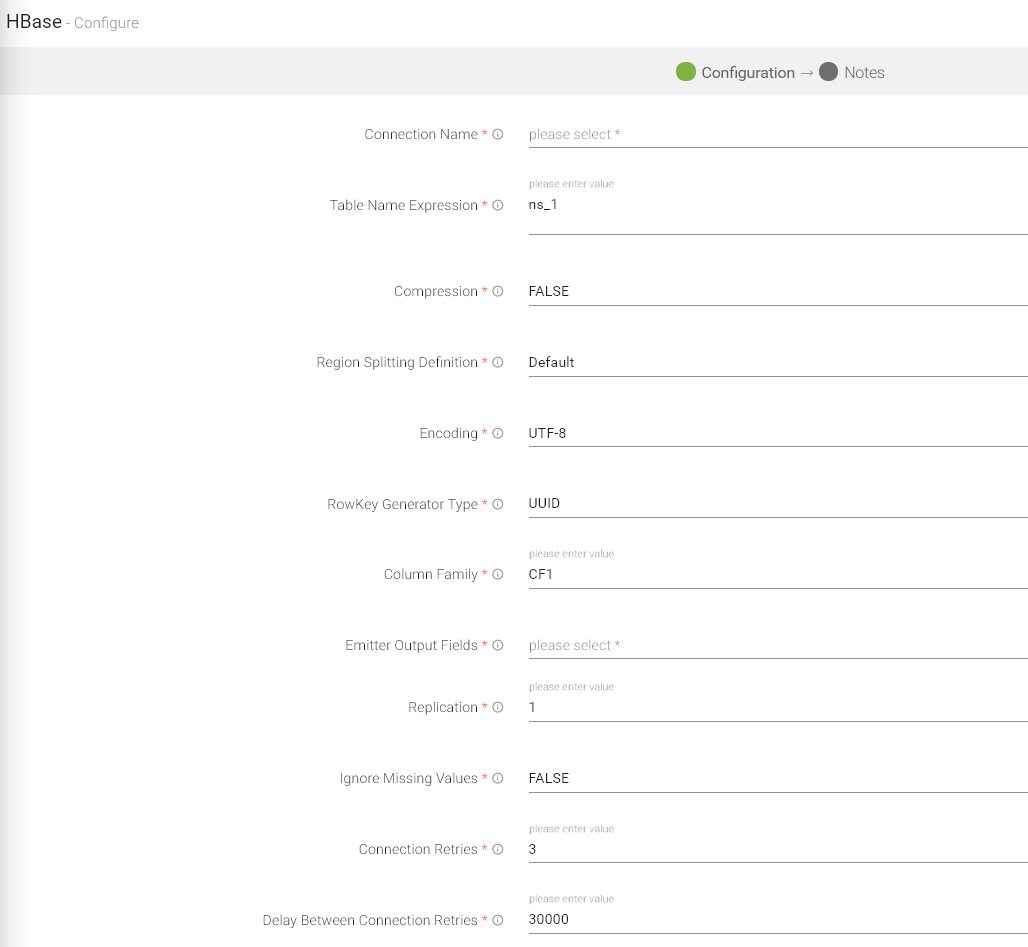
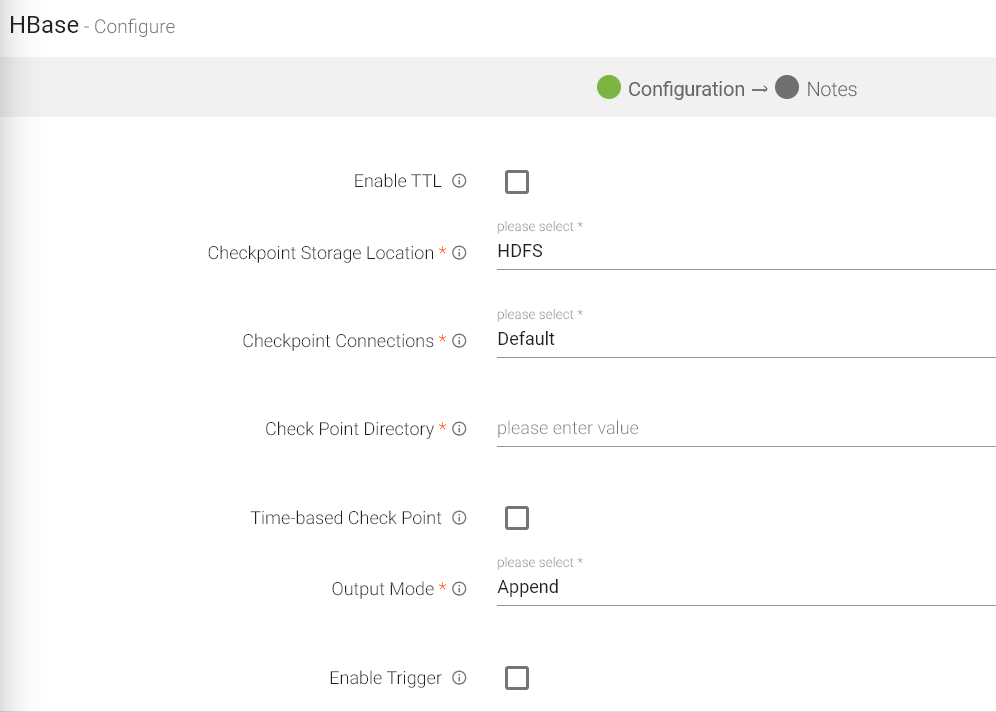
|
Field |
Description |
|---|---|
|
Connection Name |
All HBase connections will be listed here. Select a connection for connecting to HBase. |
|
Table Name Expression |
Javascript expression used to evaluate table name. The keyspace will be formed as ns_+{tenanatId}. For example, ns_1 |
|
Compression |
Provides the facility to compress the message before storing it. The algorithm used is Snappy. When selected true, enables compression on data |
|
Region Splitting Definition |
This functionality defines how the HBase tables should be pre-split. The default value is ‘No pre-split’. The supported options are: Default: No Pre-Split- Only one region will be created initially. Based on Region Boundaries: Regions are created based on given key boundaries. For example, if your key is a hexadecimal key and you provide a value ‘4, 8, d’, it will create four regions as follows:
1st region for keys less than 4.
2nd region for keys greater than 4 and less than 8.
3rd region for keys greater than 8 and less than d.
4th region for keys greater than d. |
|
Encoding |
Data encoding type either UTF-8 (base encoding) or BASE 64(64 bit encoding). |
|
Row Key Generator Type |
Enables to generate the custom row key.
Following type of key generators are available:
UUID: Universally unique identifier.
Key Based: In this case, key is generated by appending the values of selected fields. An additional field – “Key Fields” will be displayed where you can select the keys you want to combine. The keys will be appended in the same order as selected on the user interface.
Custom: Write your custom logic to create the row key. For example, if you want to use an UUID key but want to prefix it with HSBC, then you can write the logic in a Java class.
If you select this option then an additional field - “Class Name” will be displayed on UI where you need to mention the fully qualified class name of your Java class. You can download the sample project from the “Data Pipeline” landing page and refer Java class “com.yourcompany.custom.keygen.SampleKeyGenerator” to write the custom code. |
|
Column Family |
Specify the name of column family that will be used while saving your data in a HBase table. |
|
Output Fields |
Fields in the message that needs to be a part of the output message. |
|
Replication |
Enables to copy your data on underlying Hadoop file system. For example, if you specify “2” as Replication, then two copies will be created on HDFS |
|
Ignore Missing Values |
Ignore or persist empty or null values of message fields in emitter. When selected true, ignores null value of message fields. |
|
Connection Retries |
The number of retries for component connection. Possible values are -1, 0 or positive number. -1 denotes infinite retries. |
|
Delay Between Connection Retries |
Defines the retry delay intervals for component connection in millis. |
|
Enable TTL |
Specifies the life time of a record. When selected, record will persist for that time duration which you specify in TTL field text box. |
|
TTL Value |
Provide TTL value in seconds. |
|
Checkpoint Storage Location |
Select the checkpointing storage location. Available options are HDFS, S3, and EFS. |
|
Checkpoint Connections |
Select the connection. Connections are listed corresponding to the selected storage location. |
|
Checkpoint Directory |
It is the path where Spark Application stores the checkpointing data.
For HDFS and EFS, enter the relative path like /user/hadoop/ , checkpointingDir system will add suitable prefix by itself. For S3, enter an absolute path like: S3://BucketName/checkpointingDir |
|
Time-Based Check Point |
Select checkbox to enable timebased checkpoint on each pipeline run i.e. in each pipeline run above provided checkpoint location will be appended with current time in millis. |
|
Output Mode |
Output mode to be used while writing the data to Streaming sink. Select the output mode from the given three options: Append: Output Mode in which only the new rows in the streaming data will be written to the sink. Complete Mode: Output Mode in which all the rows in the streaming data will be written to the sink every time there are some updates. Update Mode: Output Mode in which only the rows that were updated in the streaming data will be written to the sink every time there are some updates. |
|
Enable Trigger |
Trigger defines how frequently a streaming query should be executed. |
|
Processing Time |
It will appear only when Enable Trigger checkbox is selected. Processing Time is the trigger time interval in minutes or seconds. |
|
ADD CONFIGURATION |
Enables to configure additional properties. |
Click on the Next button. Enter the notes in the space provided.
Click on the DONE button for saving the configuration.
Hive emitter allows you to store streaming/batch data into HDFS. Hive queries can be implemented to retrieve the stored data.
To configure a Hive emitter, provide the database name, table name along with the list of fields of schema to be stored. This list of data rows get stored in Hive table, in a specified format, inside the provided database.
You must have the necessary permissions for creating table partitions and then writing to partition tables.
Configuring Hive Emitter for Spark Pipelines
To add a Hive emitter into your pipeline, drag it to the canvas, connect it to a Data Source or processor, and right click on it to configure.
Note: If the data source in pipeline has a streaming component, then the emitter will show four additional properties, Checkpoint Storage Location; Checkpoint Connections; Checkpoint Directory; and Time-Based checkpoint.
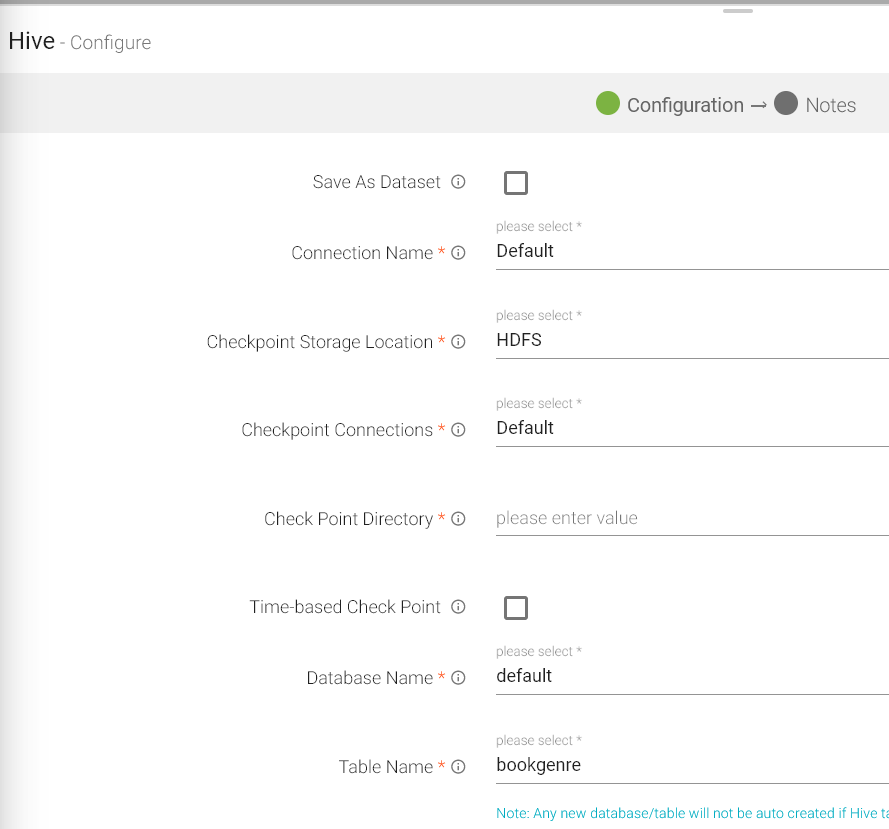
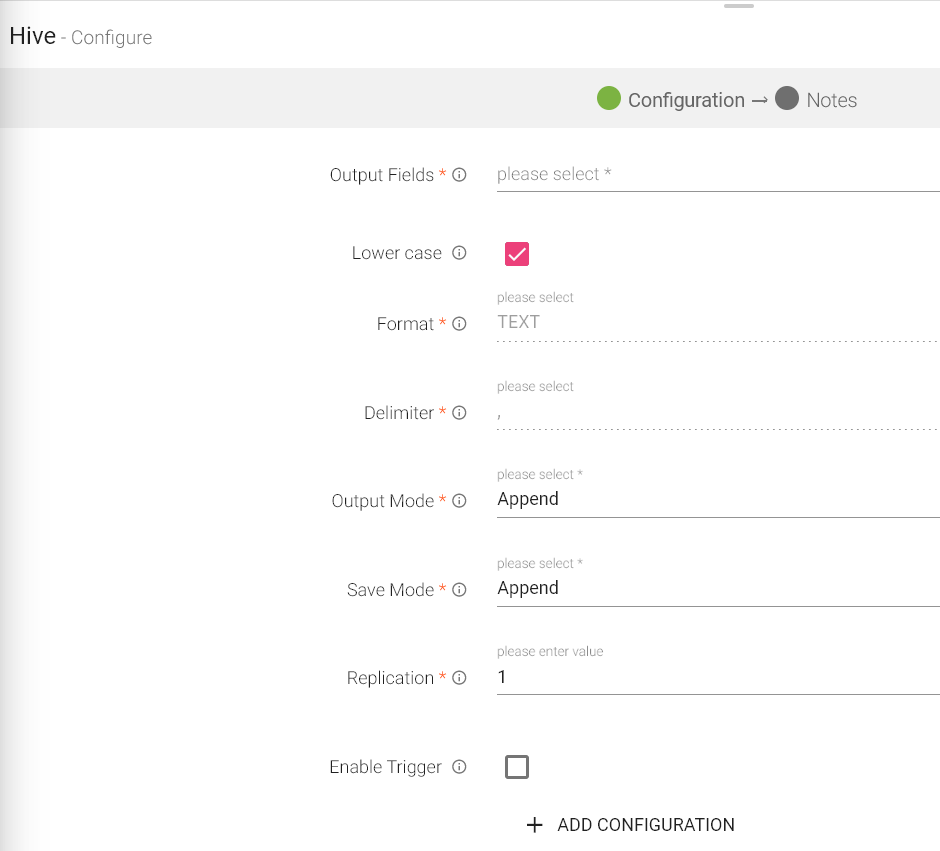
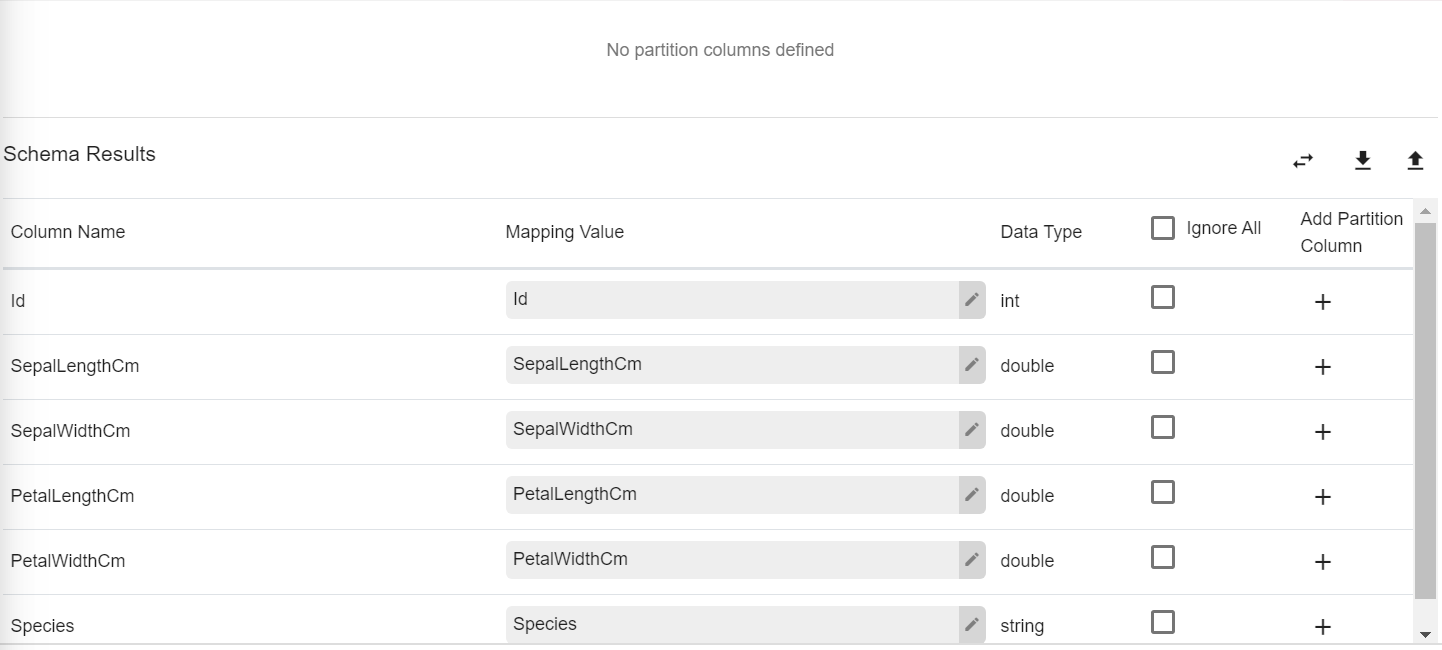
|
Field |
Description |
|---|---|
|
Save as Dataset |
Select the checkbox to save the schema as Dataset. |
|
Connection Name |
All Hive connections will be listed here. Select a connection for connecting to Hive. |
|
Checkpoint Storage Location |
Select the checkpointing storage location. Available options are HDFS, S3, and EFS. |
|
Checkpoint Connections |
Select the connection. Connections are listed corresponding to the selected storage location. |
|
Checkpoint Directory |
It is the path where Spark Application stores the checkpointing data.
For HDFS and EFS, enter the relative path like /user/hadoop/ , checkpointingDir system will add suitable prefix by itself. For S3, enter an absolute path like: S3://BucketName/checkpointingDir |
|
Time-Based Check Point |
Select checkbox to enable timebased checkpoint on each pipeline run i.e. in each pipeline run above provided checkpoint location will be appended with current time in millis. |
|
Database Name |
HIVE database name. |
|
Table Name |
HIVE table name. |
|
Output Fields |
Fields in the schema that needs to be a part of the output data. |
|
Lower Case |
Convert all the selected partition columns into the lower while writing data into hive. |
|
Format |
TEXT: Stores information as plain text. Space’ ’ Delimiter is not supported in TEXT format. ORC: ORC stands for Optimized Row Columnar which means it can store data in an optimized way than the other file formats. AVRO: AVRO stores the data definition in JSON format making it easy to read and interpret. Parquet: Parquet stores nested data structures in a flat columnar format. Note: HDP 3.1.0, for an ORC format, table is created as Manage Table and for other formats such as Avro, Parquet and Text format, an external table is created. |
|
Delimiter |
Message field separator. |
|
Output Mode |
Output mode to be used while writing the data to Streaming sink. Append: Output Mode in which only the new rows in the streaming data will be written to the sink Complete Mode: Output Mode in which all the rows in the streaming data will be written to the sink every time there are some updates. Update Mode: Output Mode in which only the rows that were updated in the streaming data will be written to the sink every time there are some updates. |
|
Save Mode |
Save Mode is used to specify the expected behavior of saving data to a data sink. ErrorifExist: When persisting data, if the data already exists, an exception is expected to be thrown. Append: When persisting data, if data/table already exists, contents of the Schema are expected to be appended to existing data. Overwrite: When persisting data, if data/table already exists, existing data is expected to be overwritten by the contents of the Data. Ignore: When persisting data, if data/table already exists, the save operation is expected to not save the contents of the Data and to not change the existing data. This is similar to a CREATE TABLE IF NOT EXISTS in SQL. |
|
Replication |
Enables to copy your data on underlying Hadoop file system. For example, if you specify “2” as Replication, then two copies will be created on HDFS. |
|
Enable Trigger |
Trigger defines how frequently a streaming query should be executed.g |
|
Processing Time |
It will appear only when Enable Trigger checkbox is selected. Processing Time is the trigger time interval in minutes or seconds. |
|
Add Configuration |
Enables to configure custom properties. |
|
Schema Results |
|
|
Column Name |
Name of the column populated from the selected Table. |
|
Mapping Value |
Map a corresponding value to the column. |
|
Data Type |
Data type of the Mapped Value. |
|
Ignore All |
Select the Ignore All check box to ignore all the Schema Results or select a checkbox adjacent to the column to ignore that column from the Schema Results.
Use Ignore All or selected fields while pushing data to emitter.
This will add that field as the part of partition fields while creating the table. |
|
Add partition Column |
This will add that field as the part of partition fields while creating the table. |
|
Auto Fill |
Auto Fill automatically populates and map all incoming schema fields with the fetched table columns. The left side shows the table columns and right side shows the incoming schema fields.
If same field, as of table column, not found in incoming schema then the first field will be selected by default. |
|
Download Mapping |
It downloads the mappings of schema fields and table columns in a file. |
|
Upload Mapping |
Uploading the mapping file automatically populates the table columns and schema fields. |
Click on the Next button. Enter the notes in the space provided.
Click on the DONE button after entering all the details.
HDFS emitter stores data in Hadoop Distributed File System.
To configure a Native HDFS emitter, provide the HDFS directory path along with the list of fields of schema to be written. These field values get stored in HDFS file(s), in a specified format, inside the provided HDFS directory.
Configuring Native HDFS for Spark Pipelines
To add Native HDFS emitter into your pipeline, drag the emitter on to the canvas, connect it to a Data Source or processor, and right click on it to configure it. You can also save it as a Dataset.
Note: If the data source in pipeline has a streaming component, then the emitter will show four additional properties, Checkpoint Storage Location; Checkpoint Connections; Checkpoint Directory; and Time-Based checkpoint.

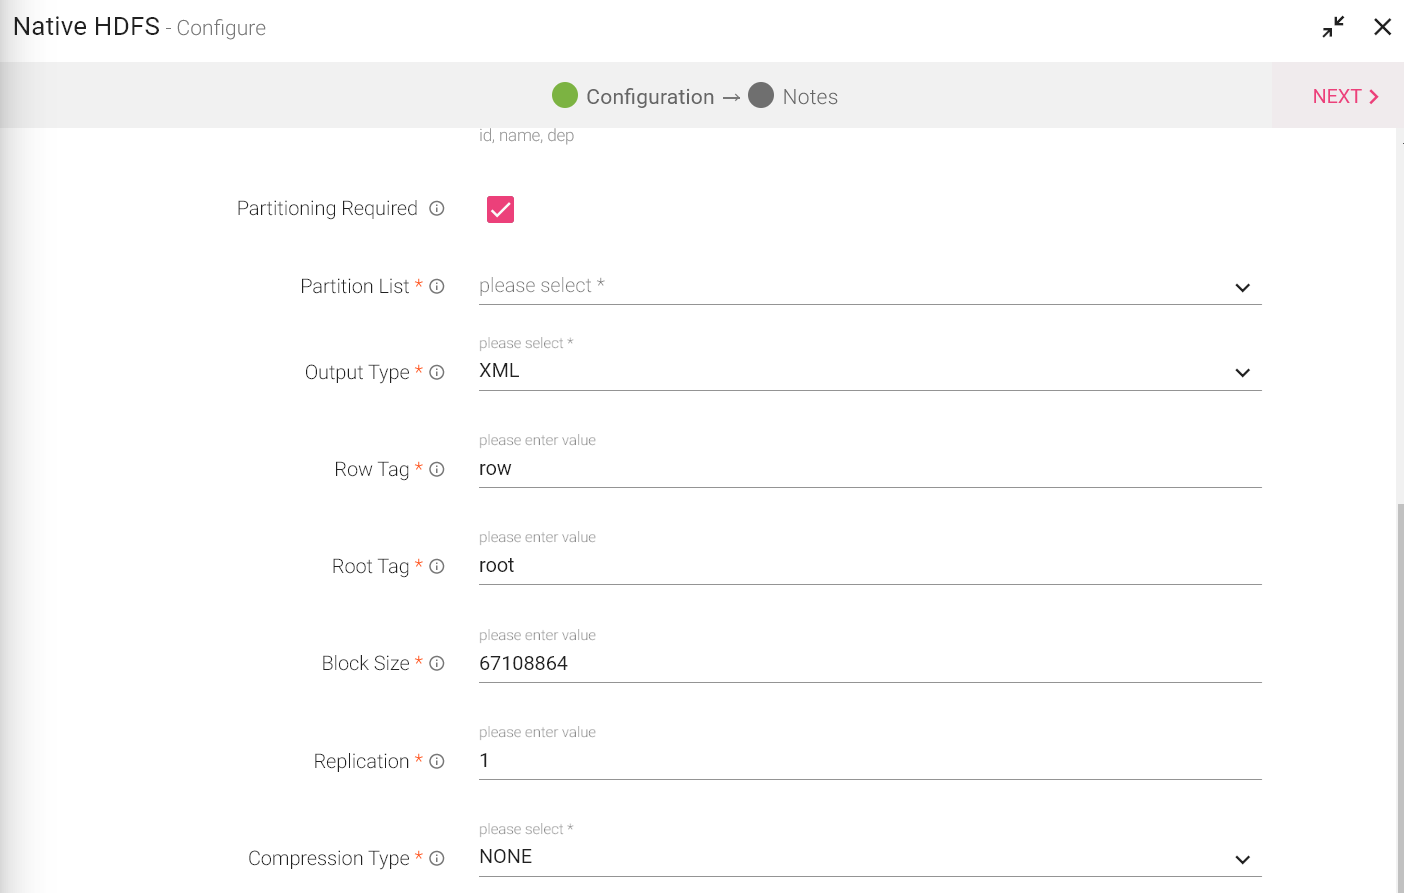
|
Field |
Description |
|---|---|
|
Save As Dataset |
When you select this checkbox, you will be able to save the data of this emitter a a dataset. After selecting this, provide a name to the Dataset. |
|
Connection Name |
All Native HDFS connections will be listed here.Select a connection for connecting to HDFS. |
|
Save Mode |
Save Mode is used to specify the expected behavior of saving data to a data sink. ErrorifExist: When persisting data, if the data already exists, an exception is expected to be thrown. Append: When persisting data, if data/table already exists, contents of the Schema are expected to be appended to existing data. Overwrite: When persisting data, if data/table already exists, existing data is expected to be overwritten by the contents of the Data. Ignore: When persisting data, if data/table already exists, the save operation is expected to not save the contents of the Data and to not change the existing data. This is similar to a CREATE TABLE IF NOT EXISTS in SQL. . |
|
HDFS Path |
Directory path on HDFS where data has to be written. |
|
Output Fields |
Fields which will be part of output data. |
|
Partitioning Required |
If checked, table will be partitioned. |
|
Partition List |
Select the fields on which table is to be partitioned. |
|
Output Type |
Output format in which result will be processed. Delimited: Delimited formats In a comma-separated values (CSV) file the data items are separated using commas as a delimiter. JSON is an open-standard file format that uses human-readable text to transmit data objects consisting of attribute–value pairs and array data types (or any other serializable value). ORC: ORC stands for Optimized Row Columnar which means it can store data in an optimized way than the other file formats. AVRO: Avro stores the data definition in JSON format making it easy to read and interpret. Parquet: Parquet stores nested data structures in a flat columnar format. XML: Extensible Markup Language (XML) is a markup language that defines a set of rules for encoding documents in a format that is both human-readable and machine-readable. In case of Multi Level JSON, multi array testing is done.
Output <root> <row> <arrayArrayLevel1>[1,2]</arrayArrayLevel1> <arrayArrayLevel1>[3,4]</arrayArrayLevel1> <arrayArrayLevel1>[6,7]</arrayArrayLevel1> <arrayJsonLevel1> <array1StringLevel2>jj</array1StringLevel2> </arrayJsonLevel1> <arrayJsonLevel1> <array2StringLevel2>jj22</array2StringLevel2> </arrayJsonLevel1> <arrayStringLevel1>a</arrayStringLevel1> <arrayStringLevel1>b</arrayStringLevel1> <arrayStringLevel1>c</arrayStringLevel1> <doubleLevel1>10.0</doubleLevel1> <intLevel1>1</intLevel1> <jsonLevel1> <jsonLevel2> <stringLevel3>bye</stringLevel3> </jsonLevel2> <stringLevel2>hello</stringLevel2> </jsonLevel1> <stringLevel1>hi1</stringLevel1> </row> </root>
Sample nested json
{"stringLevel1":"hi1","intLevel1":1,"doubleLevel1":10.0,"jsonLevel1":{"stringLevel2":"hello","jsonLevel2":{"stringLevel3":"bye"}},"arrayStringLevel1":["a","b","c"],"arrayJsonLevel1":[{"array1StringLevel2":"jj"},{"array2StringLevel2":"jj22"}],"arrayArrayLevel1":[[1,2],[3,4],[6,7]]}
NOTE: Every option selected will produce a field as per the output selected, For example in case of Delimited, a Delimiter field is populated, select the delimiter accordingly. |
|
Output Type |
Output Format in which results will be processed. |
|
Delimiter |
Message Field separator. |
|
Checkpoint Directory |
It is the path where Spark Application stores the checkpointing data.
For HDFS and EFS, enter the relative path like /user/hadoop , checkpointingDir system will add suitable prefix by itself. For S3, enter an absolute path like: S3://BucketName/checkpointingDir |
|
Time-based Check Point |
Select checkbox to enable time-based checkpoint on each pipeline run i.e. in each pipeline run above provided checkpoint location will be appended with current time in millis. |
|
Row Tag |
Row Tag for Output XML. |
|
Root Tag |
Root Tag for Output XML. |
|
Block Size |
Size of each block (in Bytes) allocated in HDFS. |
|
Replication |
Enables to make additional copies of data. |
|
Compression Type |
Algorithm used to compress the data. |
|
ADD CONFIGURATION |
Enables to configure additional Elasticsearch properties. |
NOTE: In case of Multi Level JSON, multi array testing is done. (Confirm this note and where should it be included)
Every option selected will produce a field as per the output selected, for example in case of Delimited, a Delimiter field is populated, select the delimiter accordingly.
Limitation-This emitter works only for batch pipeline. Partitioning does not work when output format is selected as XML.
Click on the NEXT button. Enter the notes in the space provided. Click SAVE for saving the configuration details.
Elasticsearch emitter allows you to store data in Elasticsearch indexes.
Configuring Elasticsearch Emitter for Spark Pipelines
To add an Elasticsearch emitter into your pipeline, drag the emitter to the canvas and connect it to a Data Source or processor. The configuration settings are as follows:
Note: If the data source in pipeline has a streaming component, then the emitter will show four additional properties, Checkpoint Storage Location; Checkpoint Connections; Checkpoint Directory; and Time-Based checkpoint.
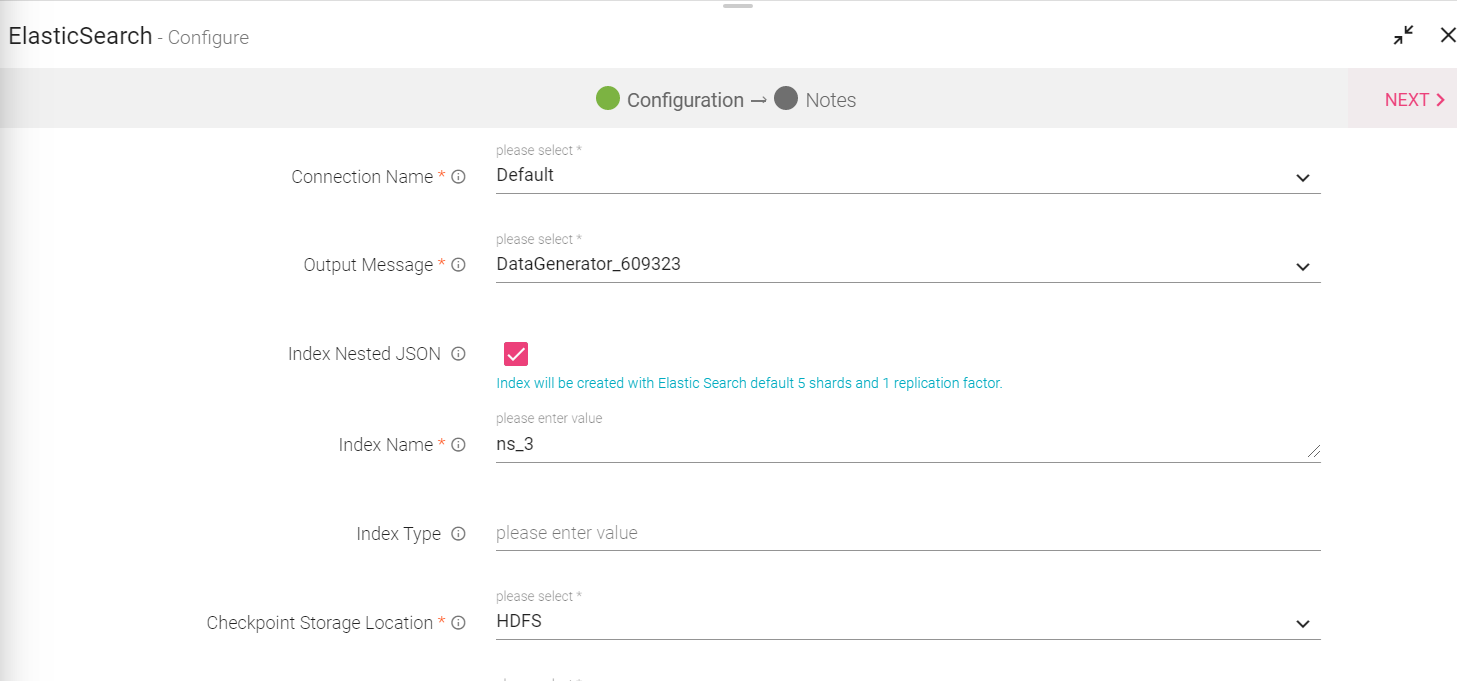
|
Field |
Description |
|---|---|
|
Connection Name |
All Elasticsearch connections will be listed here.Select a connection for connecting to Elasticsearch. |
|
Output Message |
Output message which is to be indexed. |
|
Index Nested JSON |
Select the checkbox if nested JSON fields are to be indexed. If the checkbox is not selected, three additional fields are populated: Index Number of Shards, Index Replication Factor and Output Fields. If selected, these three fields will be hidden and following note be displayed. “Index will be created with ElasticSearch default 5 shards and 1 replication factor.” Note: If this checkbox is selected, you can use curly brackets to avail schema fields in the Index name. (shown below in the diagram) |
|
Index Number of Shards |
Number of shards to be created in Index Store. |
|
Index Replication Factor |
Number of additional copies of data. |
|
Index Name |
Index name can also be created using the document/data field like emp_{document_field}.
Here{document_field} will be replaced during runtime by the value of document field of that particular record.
Index name should be in lower case and follow naming conventions of Elasticsearch.
Specify the index name where data is to be indexed. Verify dynamic index creation works only when below condition is fulfill. 1. Index Nested JSON check box should be selected on ES emitter. 2. Action.auto_create_index: true should be set in Elasticsearch cluster. 3. The field data should always be in lower case otherwise pipeline would fail. |
|
Index Type |
Index Type could be either Static or Dynamic.
Example of Dynamic Index Type:
Index type can also be created using the document/data field like emp_{document_field}.
Here {document_field} will be replaced during runtime by the value of document field of that record.
NOTE:
1. Default Index type or blank index type will be index name +“_ type”. 2. Index type should follow naming conventions of elasticsearch. 3. Make sure that in case of a static index name, index type should also be static. |
|
Checkpoint Storage Location |
Select the checkpointing storage location. Available options are HDFS, S3, and EFS. |
|
Checkpoint Connections |
Select the connection. Connections are listed corresponding to the selected storage location. |
|
Checkpoint Directory |
It is the path where Spark Application stores the checkpointing data.
For HDFS and EFS, enter the relative path like /user/hadoop/ , checkpointingDir system will add suitable prefix by itself. For S3, enter an absolute path like: S3://BucketName/checkpointingDir |
|
Time-based Check Point |
Select checkbox to enable timebased checkpoint on each pipeline run i.e. in each pipeline run above provided checkpoint location will be appended with current time in millis. |
|
ID Field Name |
Specify a name for the generated ID field. |
|
ID Generator Type |
Enables to generate the ID field.
Following type of ID generators are available: UUID: Universally unique identifier. Field Values based: In this case, ID is generated by appending the values of selected fields. If you select this option then an additional field – “Key Fields” will be displayed, where you need to select the fields you want to combine. The fields will be appended in the same order as selected on the user interface. Custom: In this case, you can write your custom logic to create the ID field. For example, if you wish to use an UUID key but want to prefix it with “HSBC”, then you can write the logic in a Java class. If you select this option then an additional field - “Class Name” will be displayed on user interface where you need to mention the fully qualified class name of your Java class.
You can download the sample project from the “Data Pipeline” landing page and refer Java class com.yourcompany.custom.keygen.SampleKeyGenerator to write the custom code. |
|
Emitter Output Fields |
Output fields of the emitter. |
|
Connection Retries |
Number of retries for component connection. Possible values are -1, 0 or positive number. -1 denotes infinite retries. |
|
Output Mode |
Output mode to be used while writing the data to Streaming sink. Append: Output Mode in which only the new rows in the streaming data will be written to the sink. Complete Mode: Output Mode in which all the rows in the streaming data will be written to the sink every time there are some updates. Update Mode: Output Mode in which only the rows that were updated in the streaming data will be written to the sink every time there are some updates. |
|
Enable Trigger |
Trigger defines how frequently a streaming query should be executed. |
|
Processing Time |
It will appear only when Enable Trigger checkbox is selected. Processing Time is the trigger time interval in minutes or seconds. |
|
ADD CONFIGURATION |
Enables additional configuration properties of Elasticsearch. |
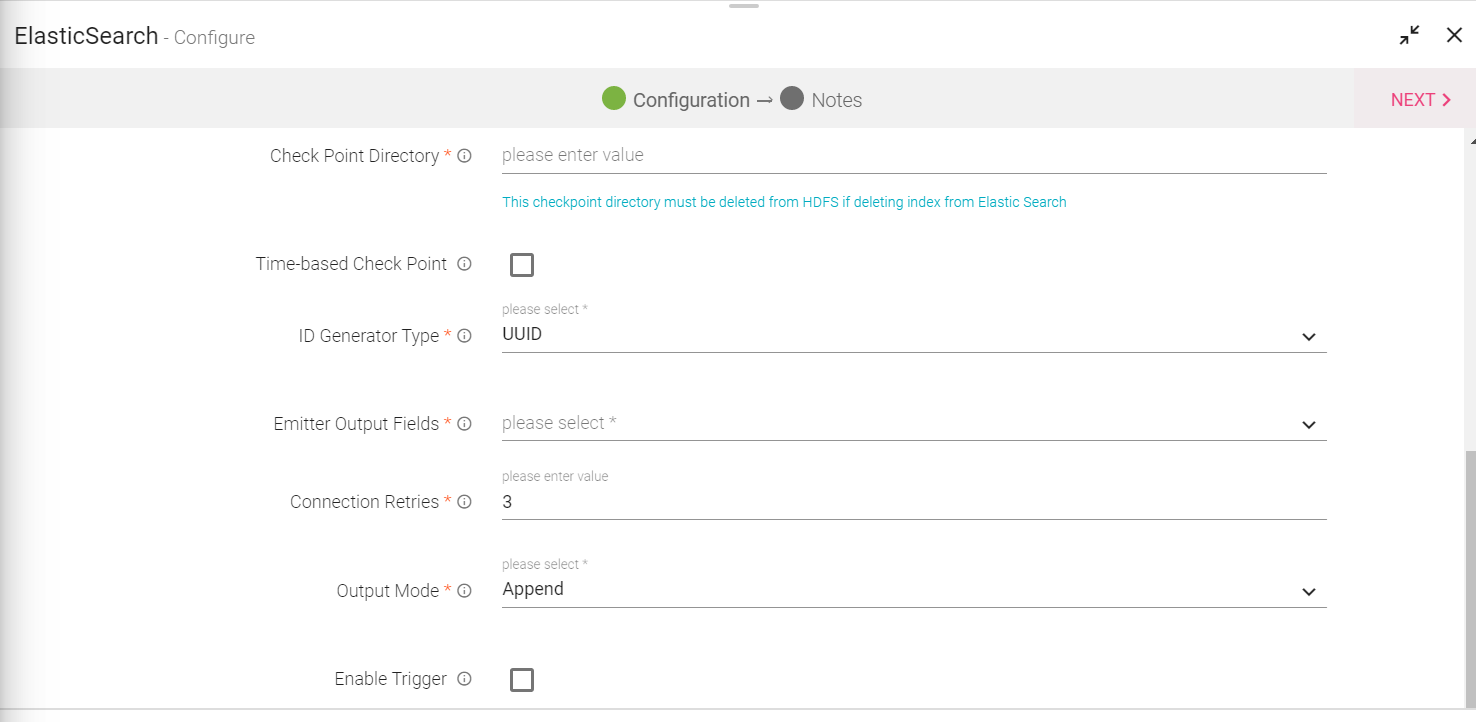
Click on the Next button. Enter the notes in the space provided.
Click on the DONE button for saving the configuration.
VERTICA emitter supports Oracle, Postgres, MYSQL, MSSQL, DB2 connections.
You can configure and connect above mentioned DB-engines with JDBC. It allows you to emit data into DB2 and other sources into your data pipeline in batches after configuring JDBC channel.
Note: This is a batch component.
For using DB2, create a successful DB2 Connection.
Configuring Vertica Emitter for Spark Pipelines
To add a Vertica emitter into your pipeline, drag it on the canvas and connect it to a Data Source or processor. The configuration settings of the Solr emitter are as follows:
Note: If the data source in pipeline has a streaming component, then the emitter will show four additional properties, Checkpoint Storage Location; Checkpoint Connections; Checkpoint Directory; and Time-Based checkpoint.
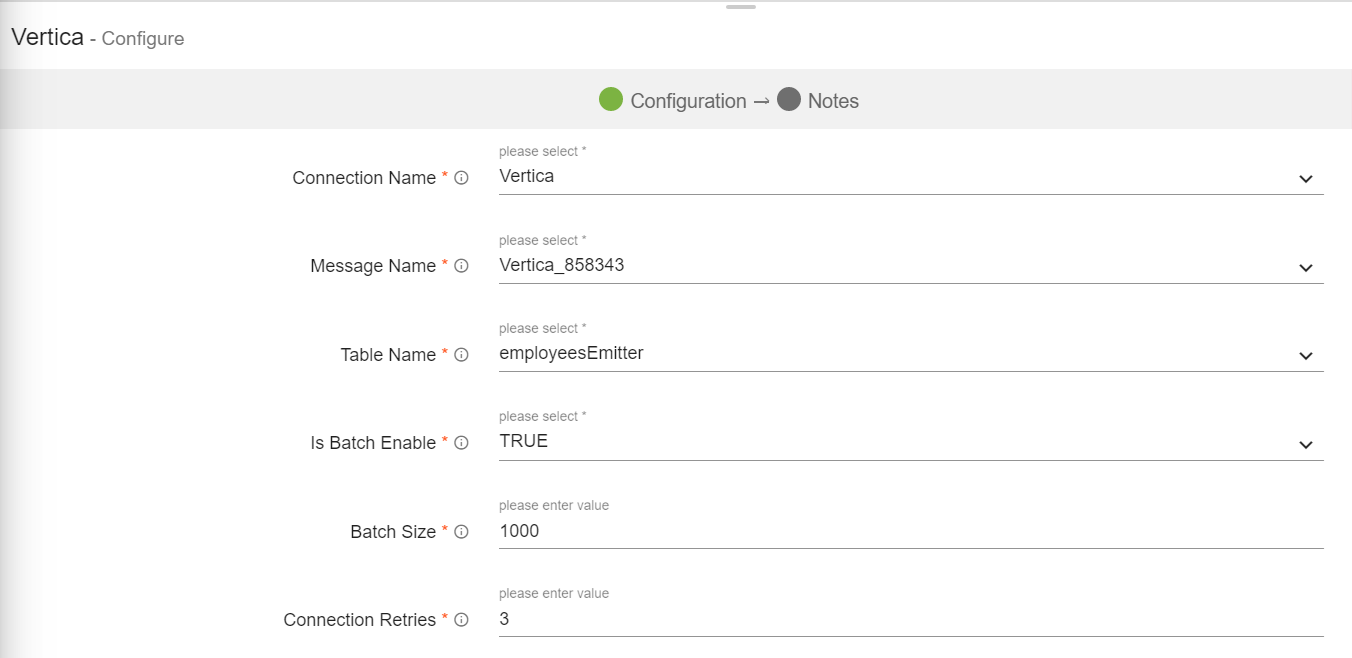
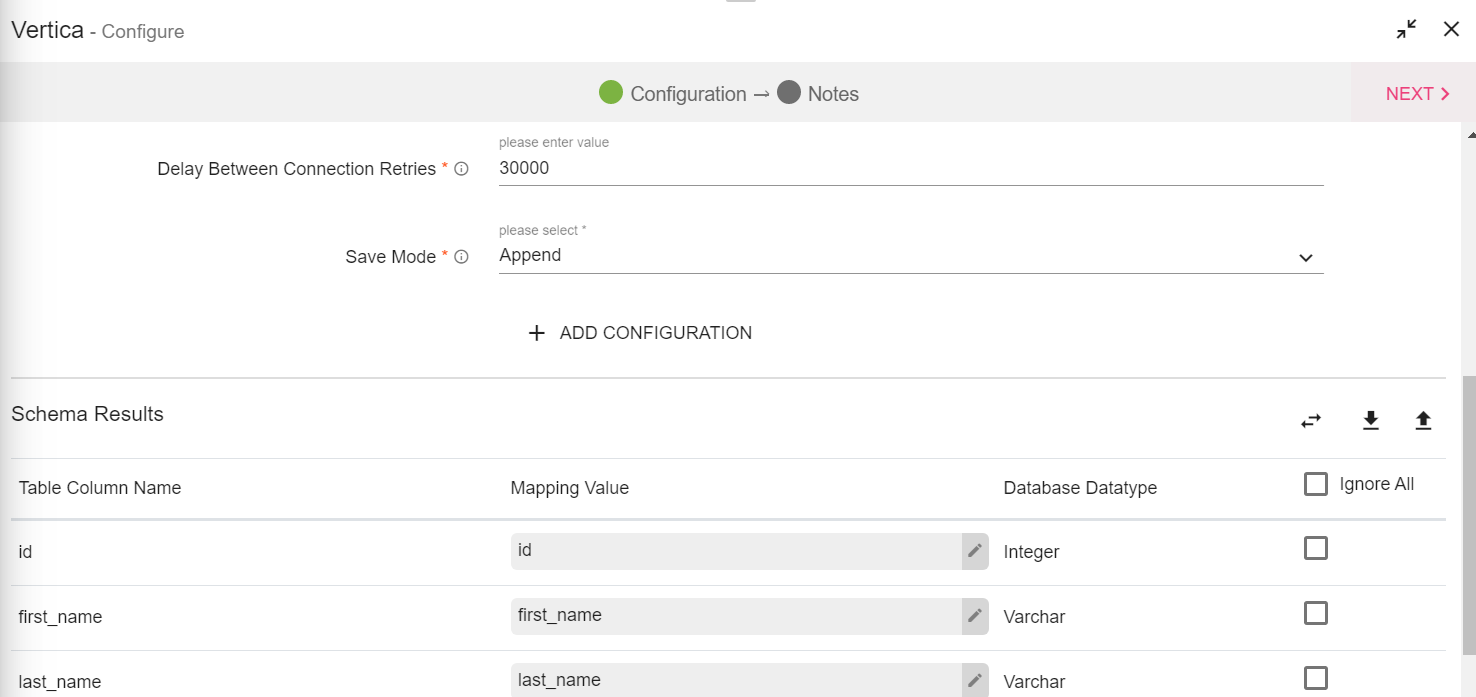
|
Field |
Description |
|---|---|
|
Connection Name |
All Vertica connections are listed here. Select a connection for connecting to Vertica. |
|
Message Name |
The name of the message configuration which will act as metadata for the actual data. |
|
Table Name |
Existing tablename of the specified database. |
|
Is Batch Enable |
Enable parameter to batch multiple messages and improve write performances. |
|
Batch Size |
Batch Size, which determines how many rows to insert per round trip. This can help the performance on JDBC drivers. This option applies only to writing. It defaults to 1000. |
|
Connection Retries |
Number of retries for component connection. Possible values are -1, 0 or positive number. -1 denotes infinite retries. If Routing Required =true, then:
Routing Policy - A json defining the custom routing policy. Example: {"1":{"company":{“Google”:20.0,"Apple":80.0}}}
Here 1 is the timestamp after which custom routing policy will be active, 'company' is the field name and the value 'Google' takes 20% shards and value 'Apple' takes 80% shards. |
|
Save Mode |
Save Mode is used to specify the expected behavior of saving data to a data sink. ErrorifExist: When persisting data, if the data already exists, an exception is expected to be thrown. Append: When persisting data, if data/table already exists, contents of the Schema are expected to be appended to existing data. Overwrite: When persisting data, if data/table already exists, existing data is expected to be overwritten by the contents of the Data. Ignore: When persisting data, if data/table already exists, the save operation is expected to not save the contents of the Data and to not change the existing data. This is similar to a CREATE TABLE IF NOT EXISTS in SQL.
|
|
Ignore Missing Values |
Ignore or persist empty or null values of message fields in sink. |
|
Delay Between Connection Retries |
Defines the retry delay intervals for component connection in milliseconds. |
|
Enable TTL |
When selected, data will be discarded to TTL exchange specified. |
|
Checkpoint Storage Location |
Select the checkpointing storage location. Available options are HDFS, S3, and EFS. |
|
Checkpoint Connections |
Select the connection. Connections are listed corresponding to the selected storage location. |
|
Checkpoint Directory |
It is the path where Spark Application stores the checkpointing data.
For HDFS and EFS, enter the relative path like /user/hadoop/ , checkpointingDir system will add suitable prefix by itself. For S3, enter an absolute path like: S3://BucketName/checkpointingDir |
|
Output Mode |
Output mode to be used while writing the data to Streaming sink. Append: Output Mode in which only the new rows in the streaming data will be written to the sink. Complete Mode: Output Mode in which all the rows in the streaming data will be written to the sink every time there are some updates. Update Mode: Output Mode in which only the rows that were updated in the streaming data will be written to the sink every time there are some updates. |
|
Enable Trigger |
Trigger defines how frequently a streaming query should be executed. |
|
Schema Results |
|
|
Table Column Name |
Name of the column populated from the selected Table. |
|
Mapping Value |
Map a corresponding value to the column. |
|
Database Data Type |
Data type of the Mapped Value. |
|
Ignore All |
Select the Ignore All check box to ignore all the Schema Results or select a checkbox adjacent to the column to ignore that column from the Schema Results.
Use Ignore All or selected fields while pushing data to emitter.
This will add that field as the part of partition fields while creating the table. |
|
Auto Fill |
Auto Fill automatically populates and map all incoming schema fields with the fetched table columns. The left side shows the table columns and right side shows the incoming schema fields.
If same field, as of table column, not found in incoming schema then the first field will be selected by default. |
|
Download Mapping |
It downloads the mappings of schema fields and table columns in a file. |
|
Upload Mapping |
Uploading the mapping file automatically populates the table columns and schema fields. |
Solr emitter allows you to store data in Solr indexes. Indexing is done to increase the speed and performance of search queries.
Configuring Solr Emitter for Spark Pipelines
To add a Solr emitter into your pipeline, drag it on the canvas and connect it to a Data Source or processor. The configuration settings of the Solr emitter are as follows:
Note: If the data source in pipeline has a streaming component, then the emitter will show four additional properties, Checkpoint Storage Location; Checkpoint Connections; Checkpoint Directory; and Time-Based checkpoint.
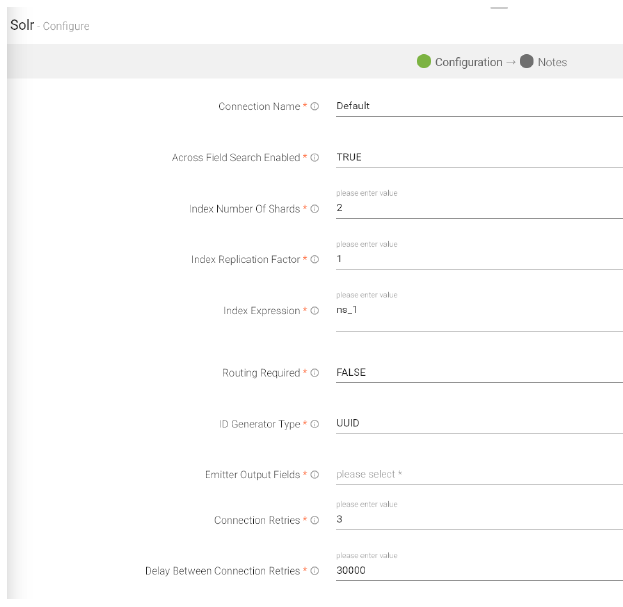
|
Field |
Description |
|---|---|
|
Connection Name |
All Solr connections are listed here. Select a connection for connecting to Solr. |
|
Across Field Search Enabled |
Specifies if full text search is to be enabled across all fields. |
|
Index Number of Shards |
Specifies number of shards to be created in index store. |
|
Index Replication Factor |
Specifies number of additional copies of data to be kept across nodes. Should be less than n-1, where n is the number of nodes in the cluster. |
|
Index Expression |
The MVEL Expression is used to evaluate the index name. This can help you leverage field based partitioning. For example consider the expression below: @{'ns_1_myindex' + Math.round(<MessageName>.timestamp 3600*1000))} A new index will be created within one-hour time range, and data will be dynamically indexed based on fields whose field alias name is 'timestamp'. |
|
Routing Required |
This specifies if custom dynamic routing is to be enabled. If enabled, a json of routing policy needs to be defined. |
|
ID Generator Type |
Enables to generate the ID field. Following types of ID generators are available: UUID: Universally unique identifier. Field Values based: In this case, ID is generated by appending the values of selected fields. If you select this option then an additional field – “Key Fields” will be displayed, select the fields to be combined. The fields will be appended in the same order as selected on the user interface. Custom: In this case, you can write your custom logic to create the ID field. For example, if you wish to use an UUID key but want to prefix it with “HSBC”, then you can write the logic in a java class. If you select this option then an additional field - “Class Name” will be displayed on user interface where you need to mention the fully qualified class name of your Java class. You can download the sample project from the “Data Pipeline” landing page and refer Java class com.yourcompany.custom.keygen.SampleKeyGenerator to write the custom code. |
|
Output Fields |
Fields of the output message. |
|
Ignore Missing Values |
Ignore or persist empty or null values of message fields in sink. |
|
Connection Retries |
Number of retries for component connection. Possible values are -1, 0 or positive number. -1 denotes infinite retries. If Routing Required =true, then:
Routing Policy - A json defining the custom routing policy. Example: {"1":{"company":{“Google”:20.0,"Apple":80.0}}}
Here 1 is the timestamp after which custom routing policy will be active, 'company' is the field name and the value 'Google' takes 20% shards and value 'Apple' takes 80% shards. |
|
Delay Between Connection Retries |
Defines the retry delay intervals for component connection in milliseconds. |
|
Enable TTL |
When selected, data will be discarded to TTL exchange specified. |
|
Checkpoint Storage Location |
Select the checkpointing storage location. Available options are HDFS, S3, and EFS. |
|
Checkpoint Connections |
Select the connection. Connections are listed corresponding to the selected storage location. |
|
Checkpoint Directory |
It is the path where Spark Application stores the checkpointing data.
For HDFS and EFS, enter the relative path like /user/hadoop/ , checkpointingDir system will add suitable prefix by itself. For S3, enter an absolute path like: S3://BucketName/checkpointingDir |
|
Output Mode |
Output mode to be used while writing the data to Streaming sink. Append: Output Mode in which only the new rows in the streaming data will be written to the sink. Complete Mode: Output Mode in which all the rows in the streaming data will be written to the sink every time there are some updates. Update Mode: Output Mode in which only the rows that were updated in the streaming data will be written to the sink every time there are some updates. |
|
Enable Trigger |
Trigger defines how frequently a streaming query should be executed. |