StreamAnalytix has got the ability to integrate multiple pipelines and workflows itself. You can orchestrate the sequence and conditions that govern the execution of these pipelines. This is achieved through the Workflow interface.
On a Workflow page, you can perform the following actions:
l Create a Workflow
l Configure Workflow
l Test Workflow
l Edit Workflow
l Schedule Workflow
l Start/Pause Workflow
l Resume Workflow
To create a workflow:
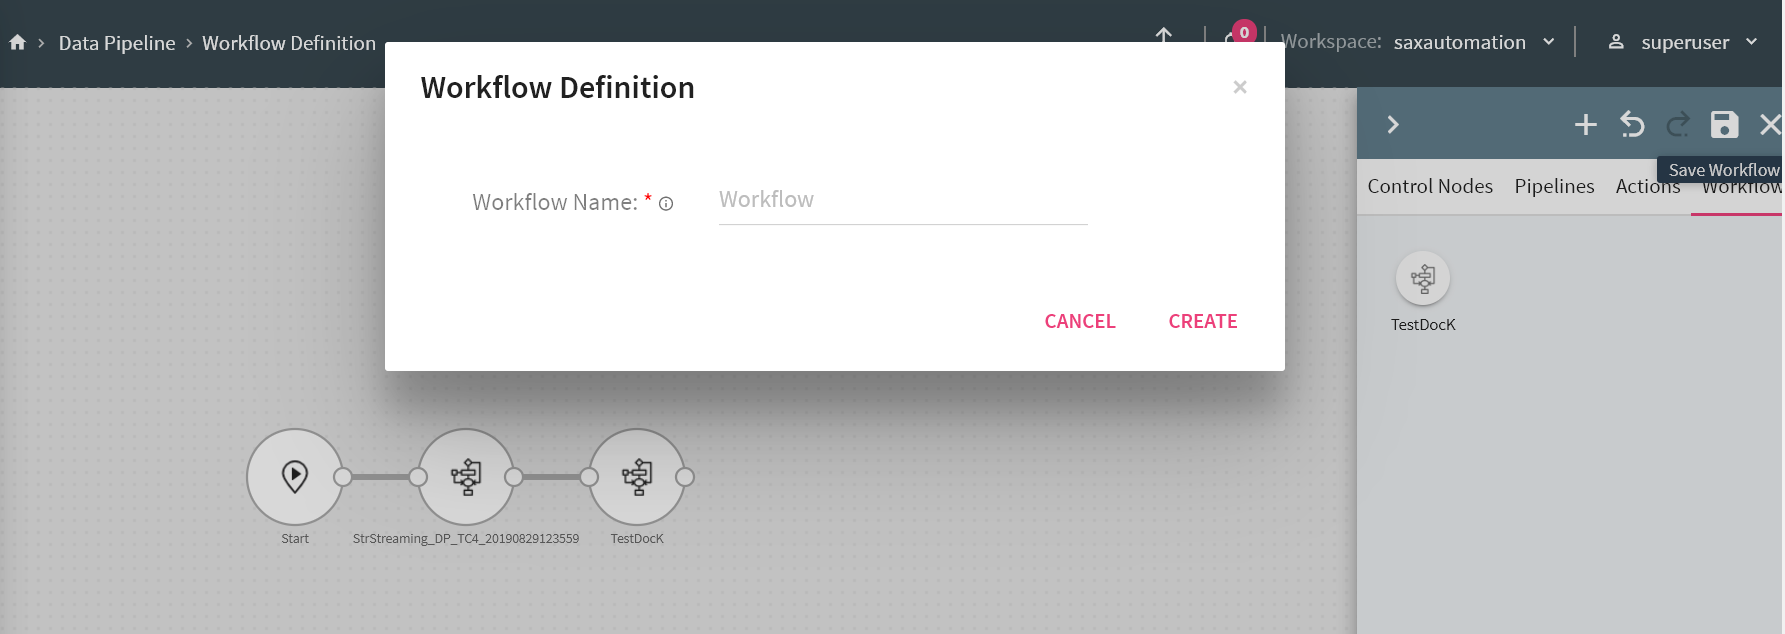
Go to Data Pipeline> Workflow and click on the + (Create New Workflow) sign on the Workflow homepage. After which, you will be redirected to Workflow Definition page.
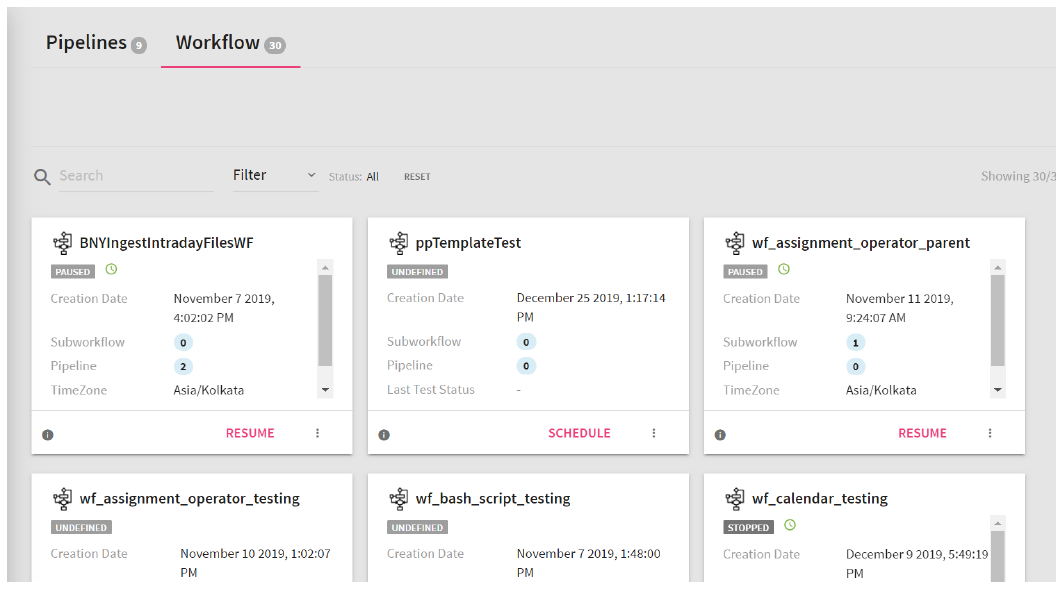
A Workflow tile has the following fields:
|
Field |
Description |
|
Creation Date |
The date when the workflow was created. |
|
Subworkflow |
If a workflow has a subworkflow in it, this field will show the subworkflow’s count. This is also called parent child marker, that shows; if a workflow has zero subworkflows then it is a child subworkflow. You can click on the number of workflows, and it will show the name of the subworkflow and its creation date. |
|
Pipeline |
If a pipeline is used in the workflow, this field shows the number of pipelines used. You can click on the number of pipelines, and it will show the name of the pipelines and their creation date. |
|
Timezone |
The timezone in which the workflow is scheduled. |
|
Last Test Status |
If the workflow is tested before scheduling it, then this property shows the status of that Test; whether it was successful or not. |
|
Schedule |
Once workflow is created, deploy the workflow to Airflow by clicking on SCHEDULE button. |
|
Test |
Test a workflow before deploying it on Airflow. |
|
Edit a workflow. |
|
|
Delete |
Delete the workflow. |
Define a new Workflow here.
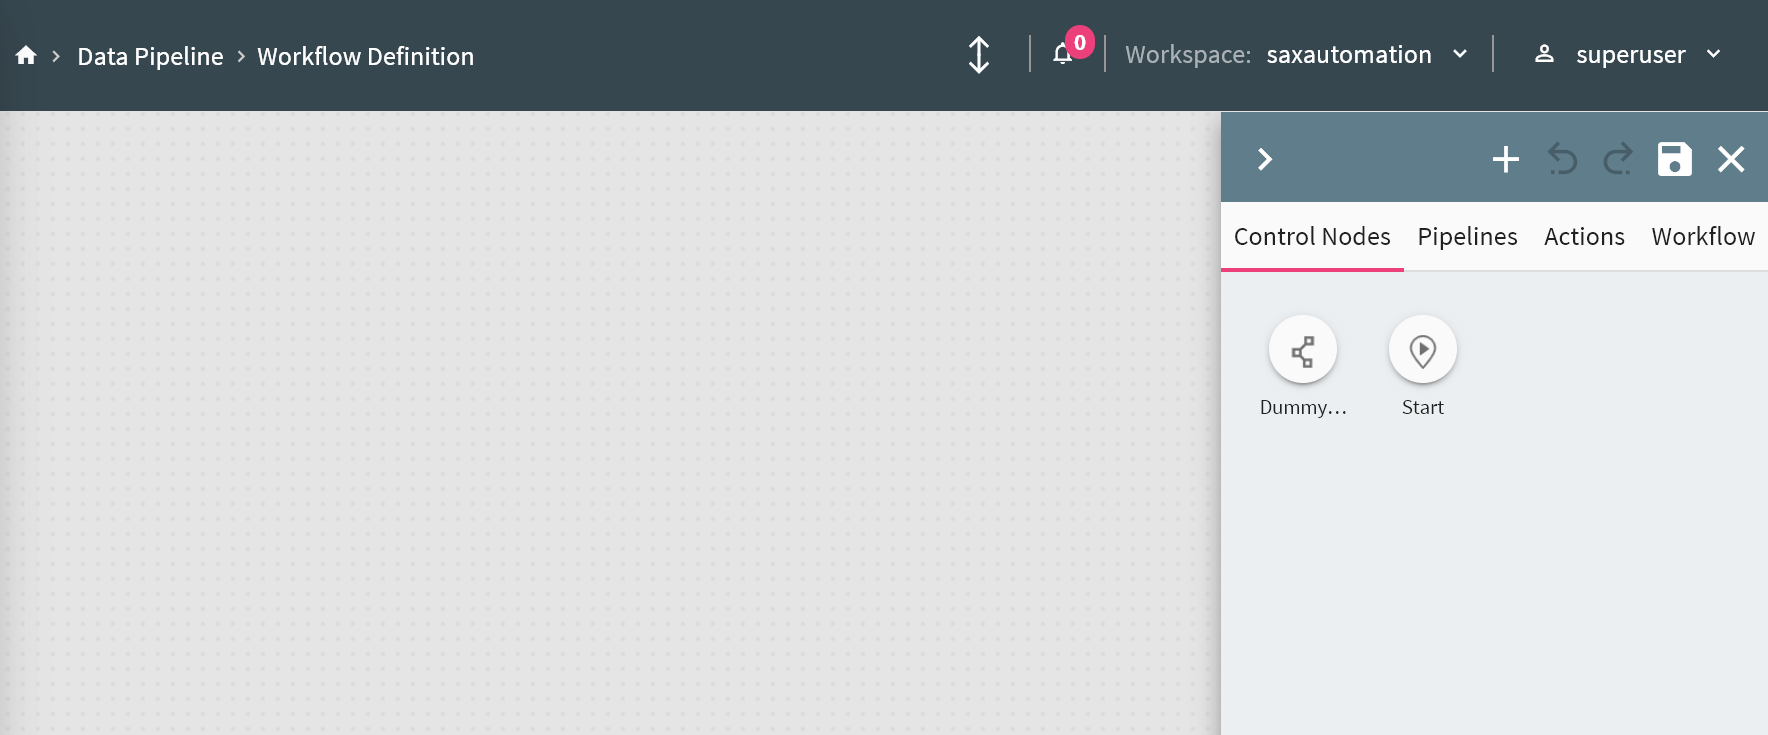
This page has nodes to create and execute the workflow. They are explained below:
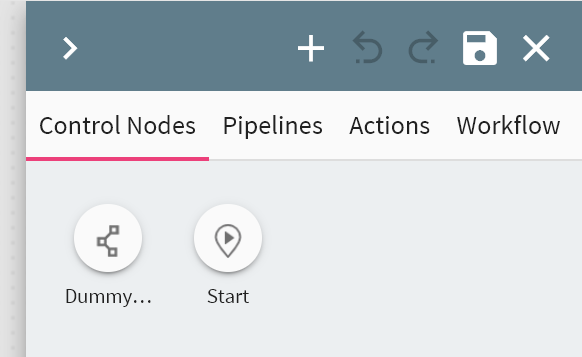
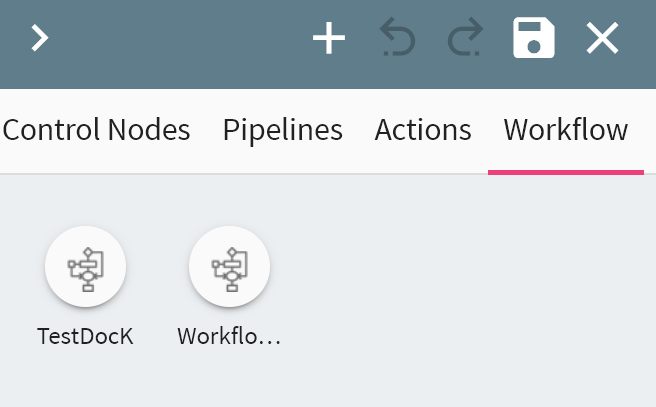
To define a workflow, four nodes are available:
l Control Nodes
l Pipelines
l Actions
l Workflows
Add Control node with one or multiple pipelines, with actions applied on it. Save your workflow. Once the Workflows are saved, you can also concatenate Workflows from the Workflow tab.
Two types of control nodes are available:
|
Field |
Description |
|
Start |
This node is mandatory for defining a workflow. This node is used to represent logical start of a workflow. You can only use one start node in a workflow. |
|
Dummy |
This node controls the flow of the workflow, based on trigger condition or group tasks defined in a workflow. |
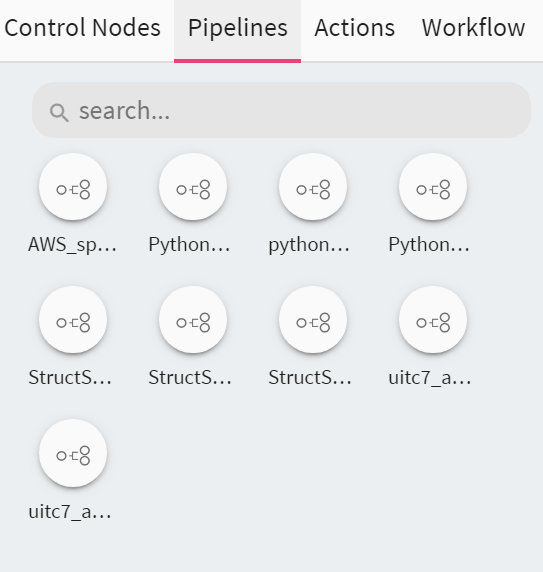
Batch Pipelines created in the workspace are reflected here.
Action nodes are available to provide functionality of the following actions to a workflow. Following are the Actions available under Action node.
1. Assignment Operator
2. Bash Operator
3. HDFS Sensor
4. Email
5. HTTP Operator
6. MSSQL Operator
7. MYSQL Operator
8. Pipeline Operator
9. POSTGRES Operator
10. Python Operator
11. SFTP Operator
12. SFTP Sensor
13. SQL Sensor
14. SSH Operator
15. Time Delta Sensor
16. VERTICA Operator
17. Kafka Alert Operator
18.Time Window Operator
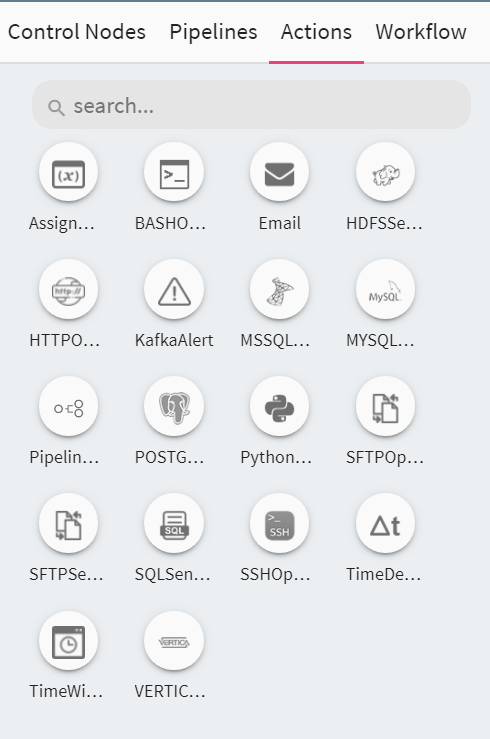
Each action node is explained below:
This operator is used to assign workflow level variable and its value.
You can define multiple variables and their values by clicking on + ADD VARIABLE button. Make sure the values of Variable are of python data type.
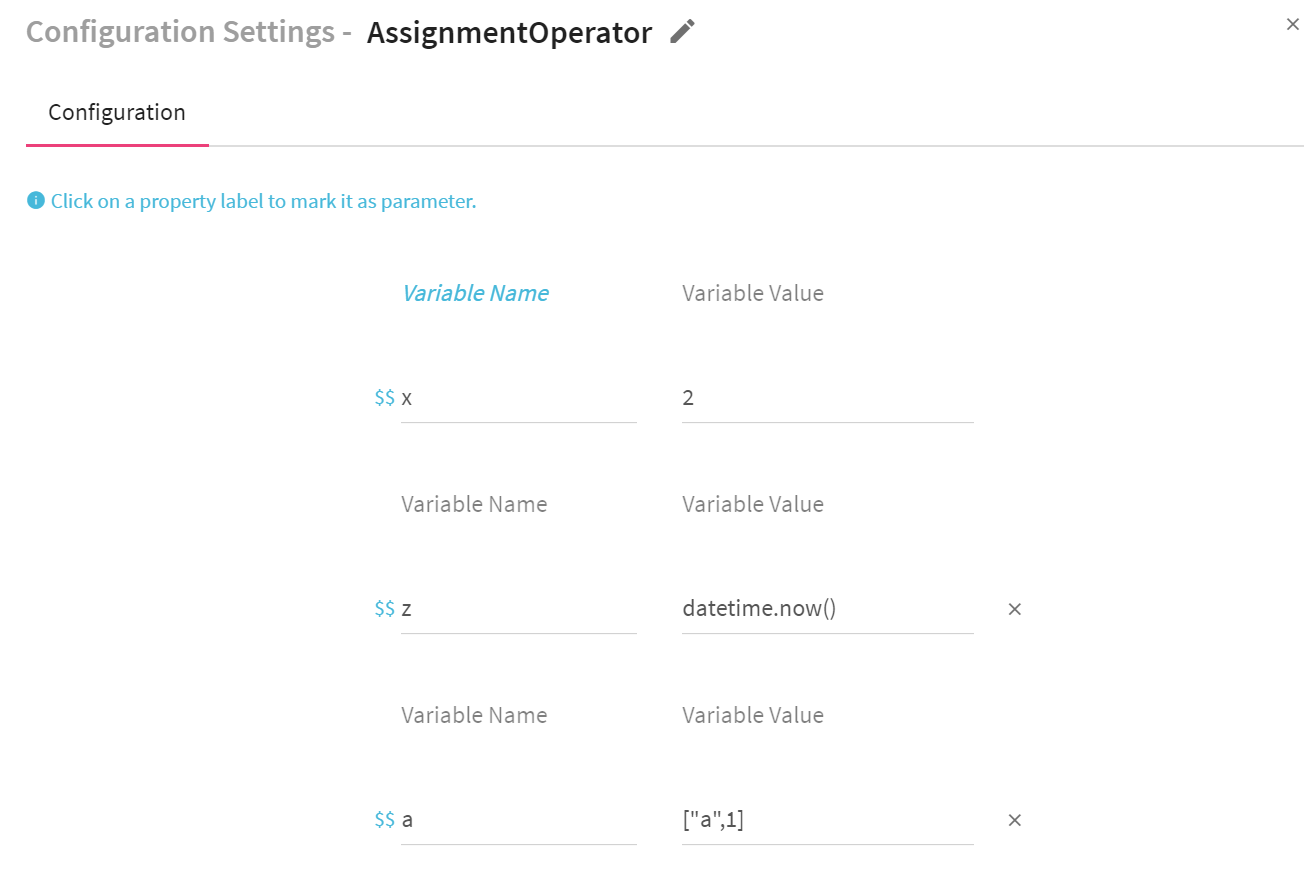

|
Field |
Description |
|
Variable Name |
Provide variable name. |
|
Variable Value |
Provide Variable value. |
|
Retries |
Number of retries. |
|
Rule to define trigger condition of this node. |
|
|
Provide SLA related details. (if required) |
|
|
Duration |
The duration decided for the SLA. |
|
Value |
Value of the SLA duration. |
This node is used to execute bash script, command or set of commands. Following are the configuration properties of Bash Operator.
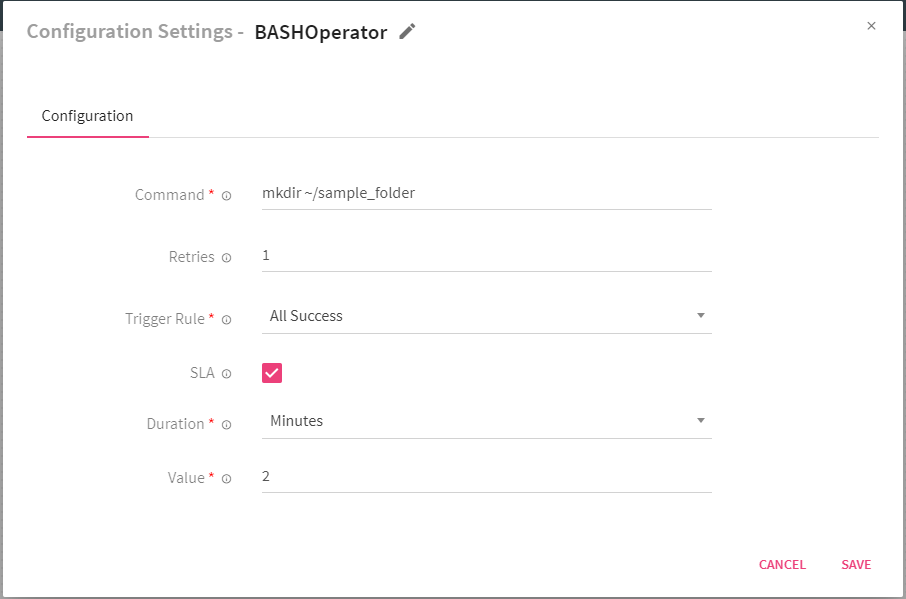
|
Field |
Description |
|
Command |
Command, set of commands or reference to bash script that is to be executed. |
|
Retries |
Number of times workflow tries to run this task in case of failure. |
|
Rule to define trigger condition of this node. |
|
|
Provide SLA related details. (if required) |
|
|
Duration |
The duration decided for the SLA. |
|
Value |
Value of the Duration. |
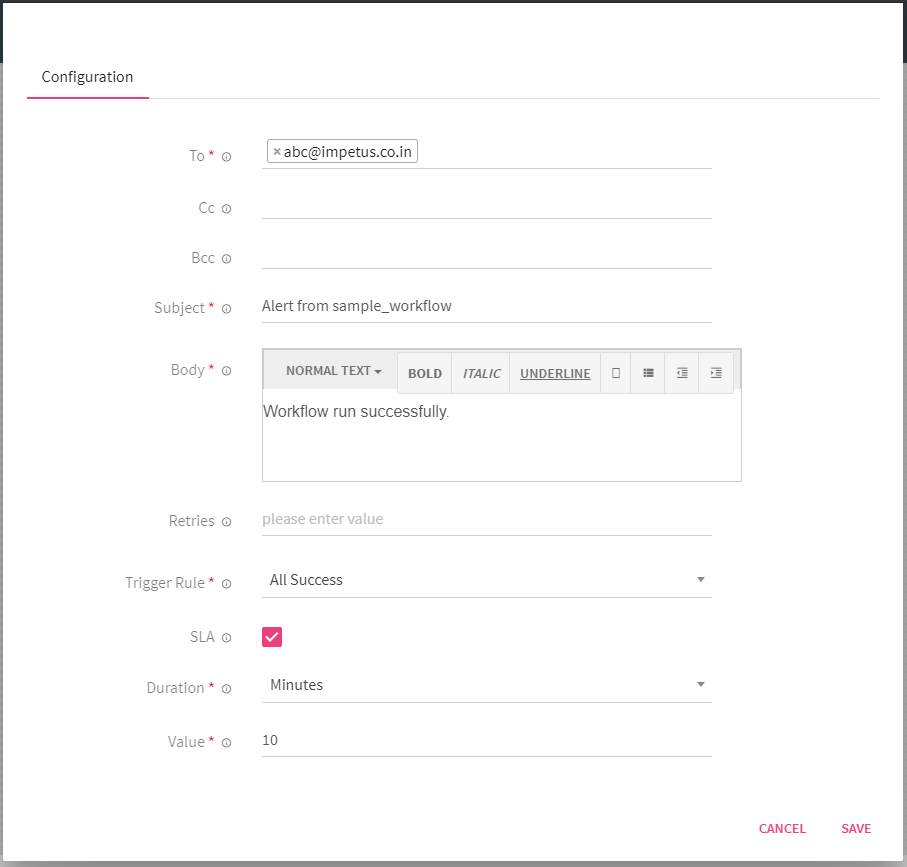
This node is used for sending email. The details provided are redirected to the mail server details given in the Airflow configuration during installation. Set the following configurations for this node.
|
Field |
Description |
|
To |
Provide mail ids for To. |
|
CC |
Provide mail ids for CC. |
|
BCC |
Provide mail ids for BCC. |
|
Subject |
Email subject. |
|
Body |
Email body. |
|
Provide SLA related details (if required) |
|
|
Retries |
Number of times workflow tries to run this task in case of failure. |
|
Rule to define trigger condition of this node. |
NOTE: You can choose multiple recipients for To, CC and BCC.
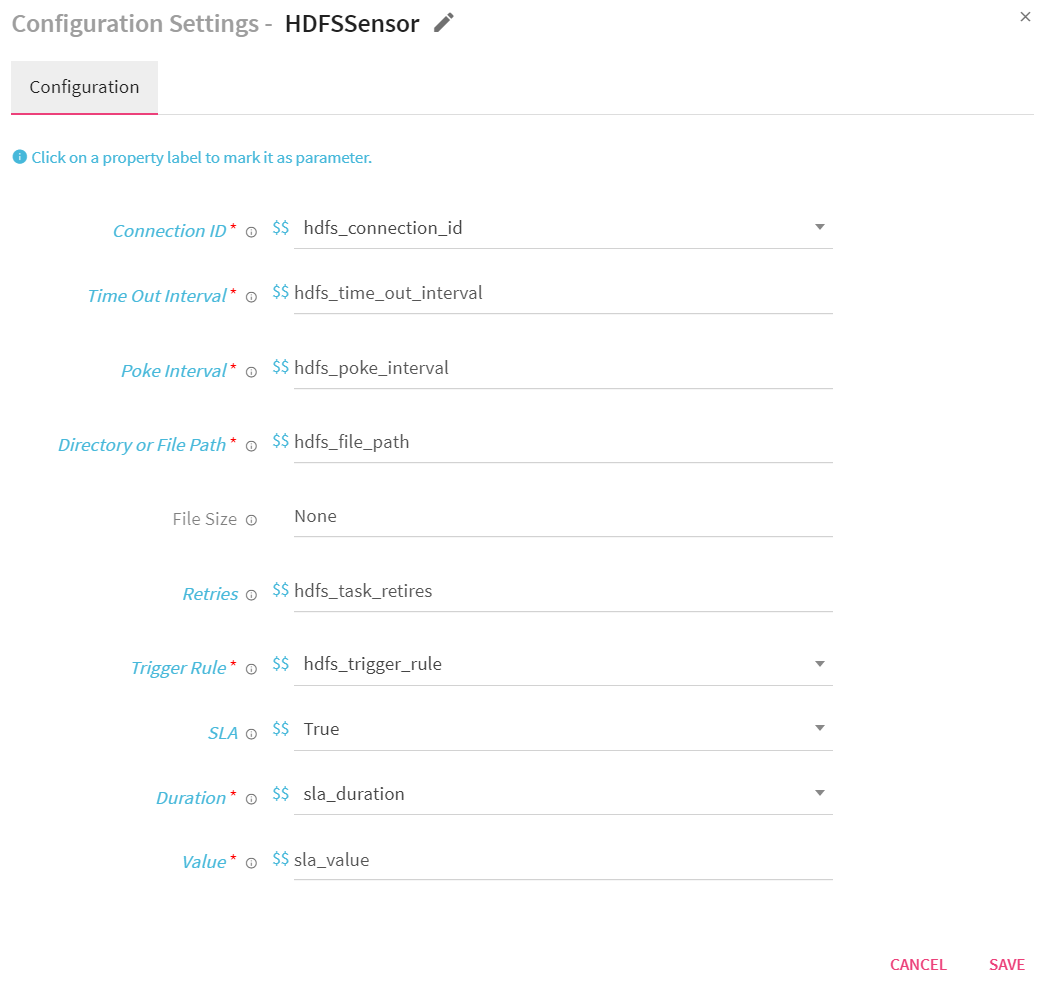
HDFS Sensor is used to check whether the given location (of the file or folder path) lands on HDFS (HDFS Sensor). If the sensor finds a given location on HDFS in the given time interval, then it will be considered successful otherwise failed.
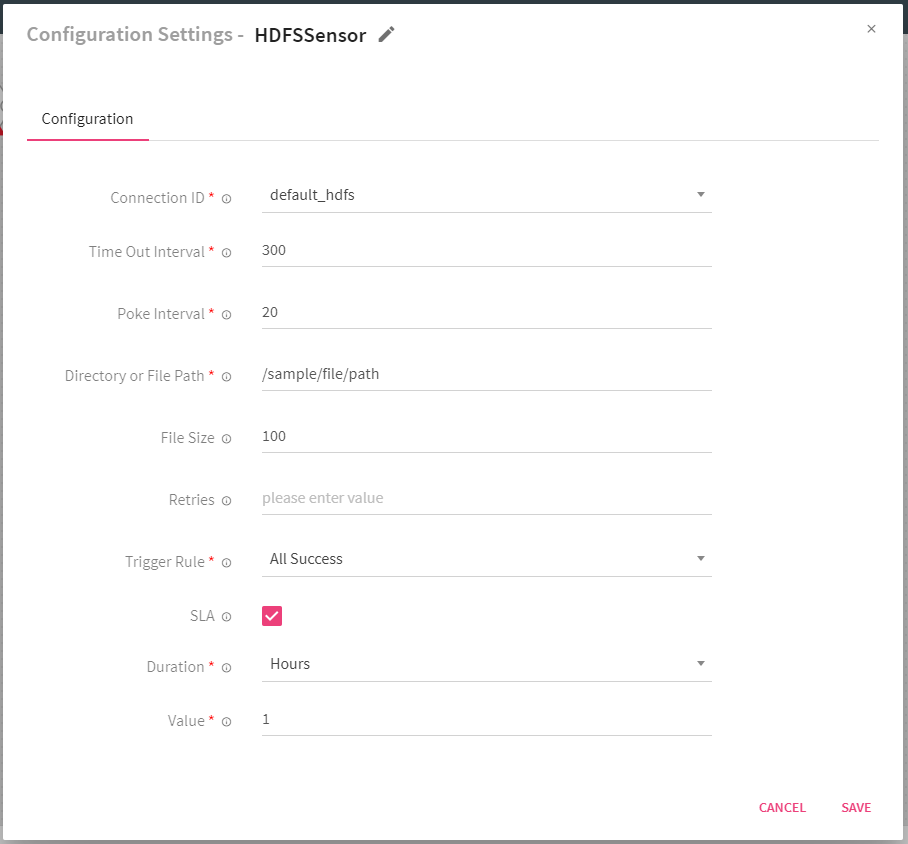
Following are the configurations for this node.
|
Field |
Description |
|
Select connection ID from drop down which is defined in airflow to connect with required HDFS. |
|
|
Time Out Interval |
Maximum time for which the sensor will check a given location (in seconds) once the node is triggered. |
|
Poke Interval |
Time interval for which the sensor will wait between each attempt of connection (in seconds). |
|
Directory or File Path |
HDFS location. It can be a directory or file. |
|
File Size |
Provide File size (in MBs). Sensor will wait till the given file size to reach up to given size. |
|
Retries |
Number of times a workflow tries to run this task in case of failure. |
|
Rules to define trigger conditions on this node. |
|
|
Provide SLA related details (if required). |
In the above configuration, once HDFSSensor is triggered, it will keep checking location(/sample/file/path) in every 20 seconds for duration of 300 seconds.
This operator is used to hit an end point over HTTP system.
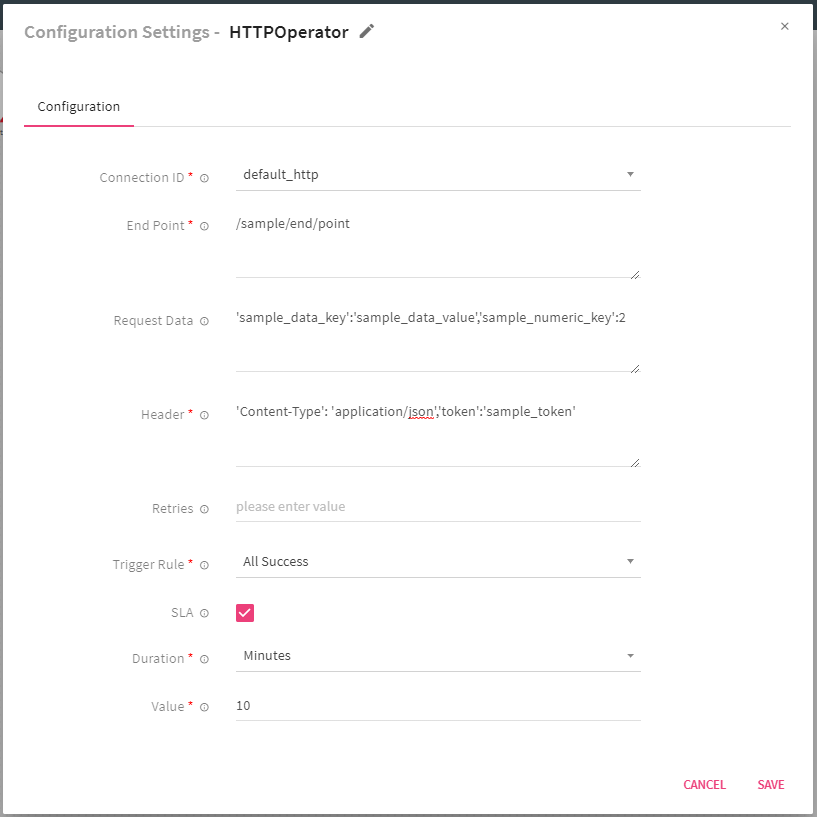
Following are the properties under the configuration:
|
Field |
Description |
|
Select connection ID from the drop-down which is defined in airflow to connect with required HTTP. |
|
|
End Point |
Calls an endpoint on an HTTP system to execute an action. |
|
Request Data |
For a POST or PUT request, The data is the content-type parameter and for GET a dictionary of key/value string pairs is accepted, However, the data is to be passed in JSON Format. |
|
Header |
HTTP headers to be added to the request (in JSON Format). |
|
Retries |
Number of times workflow tries to run the task in case of failure. |
|
Rule to define trigger condition of this node. |
|
|
Provide SLA related details (if required) |
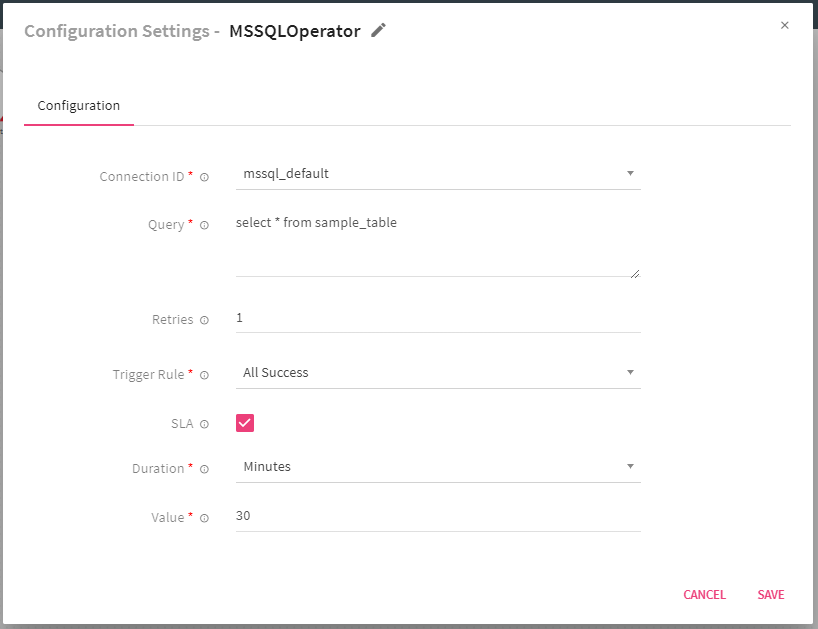
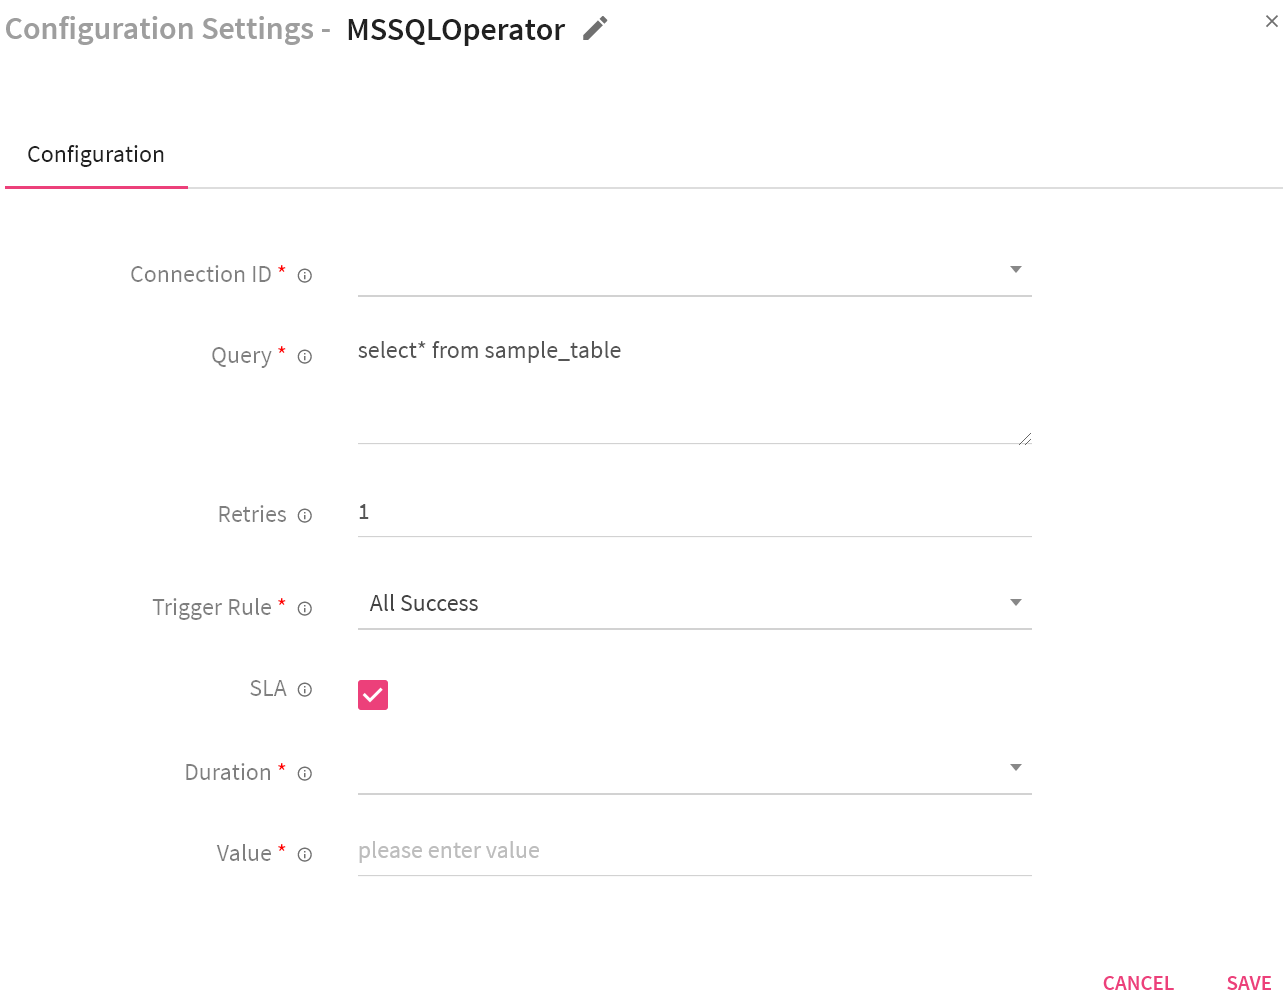
This operator use to execute SQL statements on a Microsoft SQL database.
|
Field |
Description |
|
Select connection ID from drop-down which is defined in Airflow to connect with required MSSQL database. |
|
|
Query |
SQL queries used to perform operations. |
|
Retries |
Number of times workflow tries to run this task in case of failure. |
|
Rules to define trigger conditions of this node. |
|
|
Provide SLA related details (if required). |
This operator is used to execute SQL statement on a MySQL database.
|
Field |
Description |
|
Select connection ID from drop-down which is defined in Airflow to connect with required MYSQL server. |
|
|
Query |
SQL queries used to perform operations. |
|
Retries |
Number of times workflow tries to run this task in case of failure. |
|
Rules to define trigger conditions of this node. |
|
|
Provide SLA related details (if required). |
Pipeline operator is used to run selected pipeline. You can select pipelines that needs to run. Function of this operator is same as that of a Pipeline Node.
You have to set the following configurations for this operator.
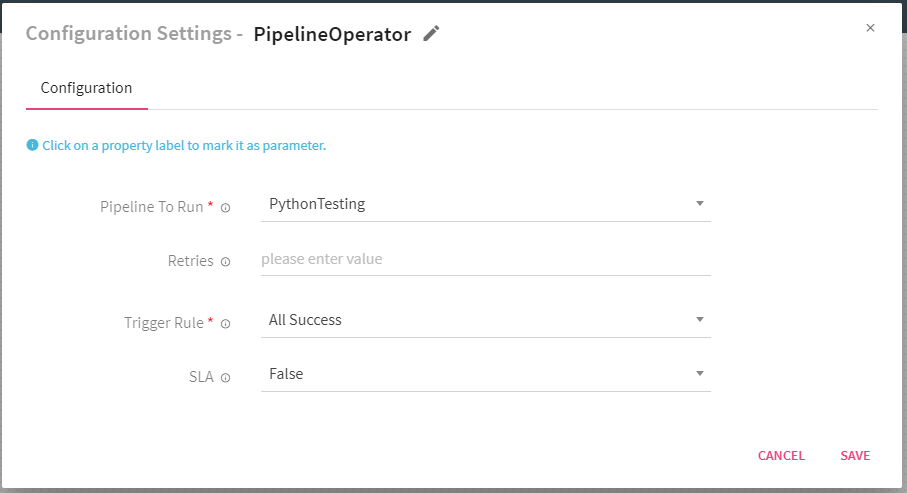
|
Field |
Description |
|
Pipeline To Run |
Write custom python code here that would be execute by workflow. |
|
Retries |
Number of times workflow tries to run this task in case of failure. |
|
Rules to define trigger conditions of this node. |
|
|
Provide SLA related details (if required). |
This operator is used to execute SQL statement on a PostgreSQL database.
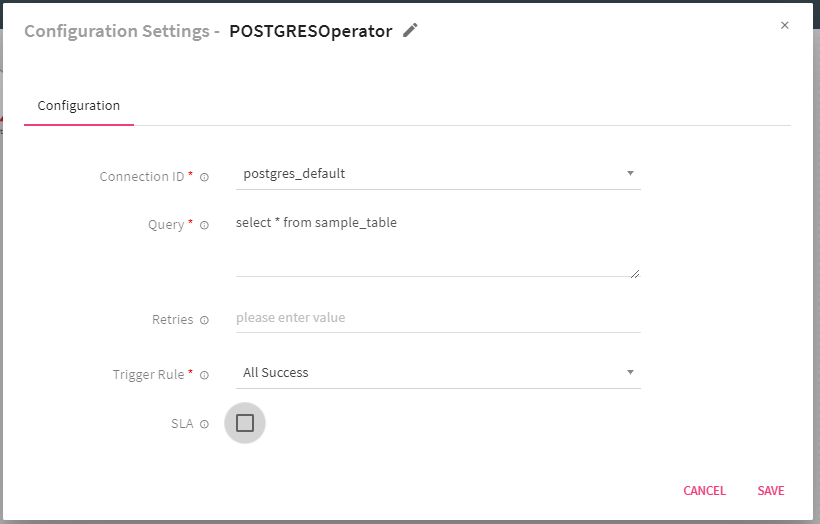
|
Field |
Description |
|
Select connection ID from drop down which is defined in airflow to connect with required Postgres database. |
|
|
Query |
SQL queries used to perform operations. |
|
Retries |
Number of times workflow tries to run this task in case of failure. |
|
Rules to define trigger condition of this node. |
|
|
Provide SLA related details (if required). |
This operator allows you to execute custom logic/code in a workflow. You can write custom code in python language and it will be execute by workflow.
Write custom code in a python method and provide method name that should be invoke by workflow. In addition, you can also get, set or update workflow variable in custom logic.
Get variable value:
get_dag_variable(variable_name, variable_type=None) :
This method is used to get workflow variable. Arguments are:
variable_name: variable name
variable_type (optional): provide variable type
Set variable value:
set_dag_variable(variable_name, variable_value):
This method is used to set/update workflow variable. Arguments are:
variable_name: provide variable name
variable_value: provide variable value
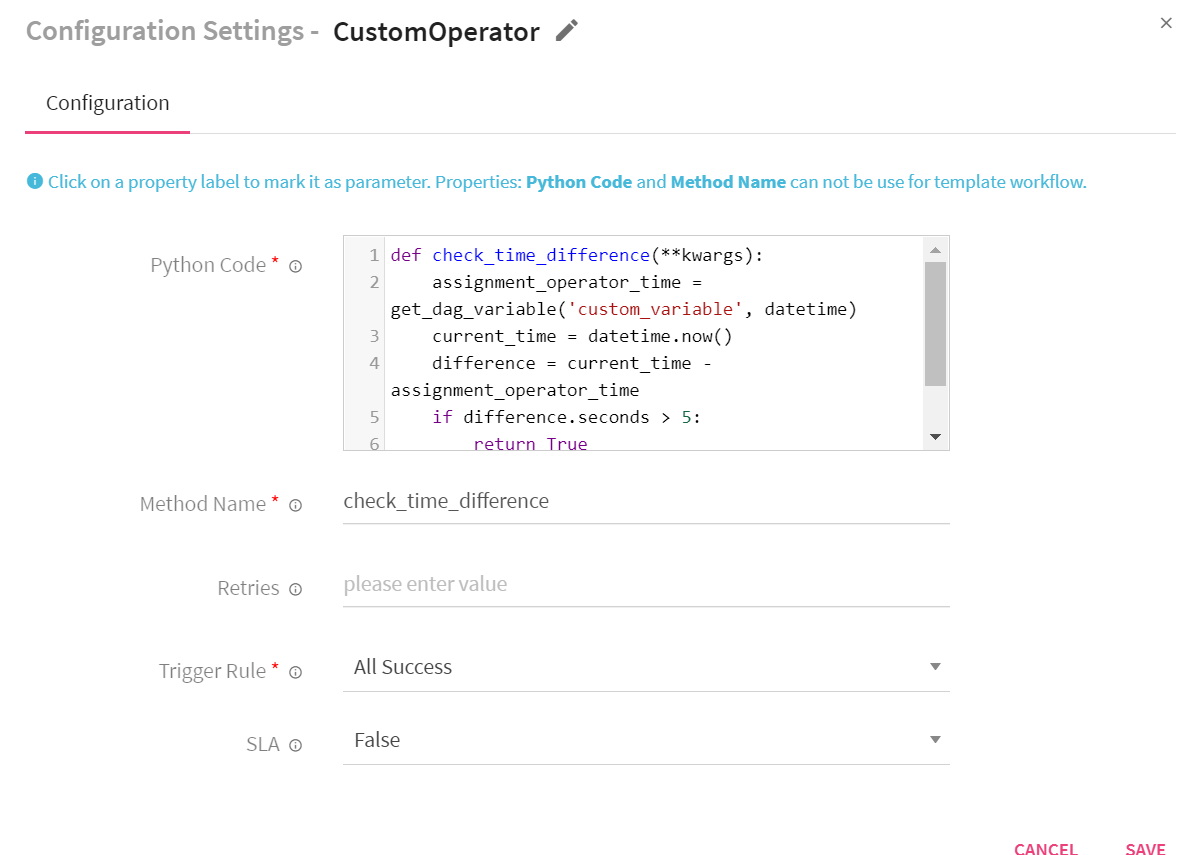
|
Field |
Description |
|
Python Code |
Write the custom Python code. |
|
Method Name |
Provide method name that would be invoke by workflow to execute custom code. Method should only take keyword arguments. |
|
Retries |
Number of times workflow tries to run this task in case of failure. |
|
Rule to define trigger condition of this node. |
|
|
Provide SLA related details (if required). |
This operator is used for transferring files from remote host to local or vice a versa

|
Field |
Description |
|
Select connection ID from drop down which is defined in airflow to connect with required SFTP sever. |
|
|
Local File Path |
Local file path to GET or PUT. |
|
Remote File Path |
Remote file path to GET or PUT. |
|
Operation |
Specify operation ‘get’ or ‘put’, defaults is put. |
|
Create |
Select as True to create intermediate directories. |
|
Retries |
Number of times workflow tries to run this task in case of failure. |
|
Rule to define trigger condition of this node. |
|
|
Provide SLA related details (if required). |
SFTP Sensor is used to check if a given location (file or folder path) is landed on SFTP or not. If sensor finds given location on SFTP in the given interval, then it will considered successful, otherwise failed.
|
Field |
Description |
|
Select connection ID from drop down which is defined in airflow to connect with required SFTP. |
|
|
Time Out Interval |
Maximum time for which the sensor will check the given location (in seconds) once triggered. |
|
Poke Interval |
Time interval, that sensor will wait between each tries (in seconds) |
|
Directory or File Path |
SFTP location. It can be a directory or file. |
|
Retries |
Number of times workflow tries to run this task in case of failure. |
|
Rules to define trigger conditions of this node. |
|
|
Provide SLA related details (if required). |
SQLSensor runs the SQL statement until first cell is in (0,’0’,’’).
It runs the SQL statement after each poke interval until Time-Out interval.
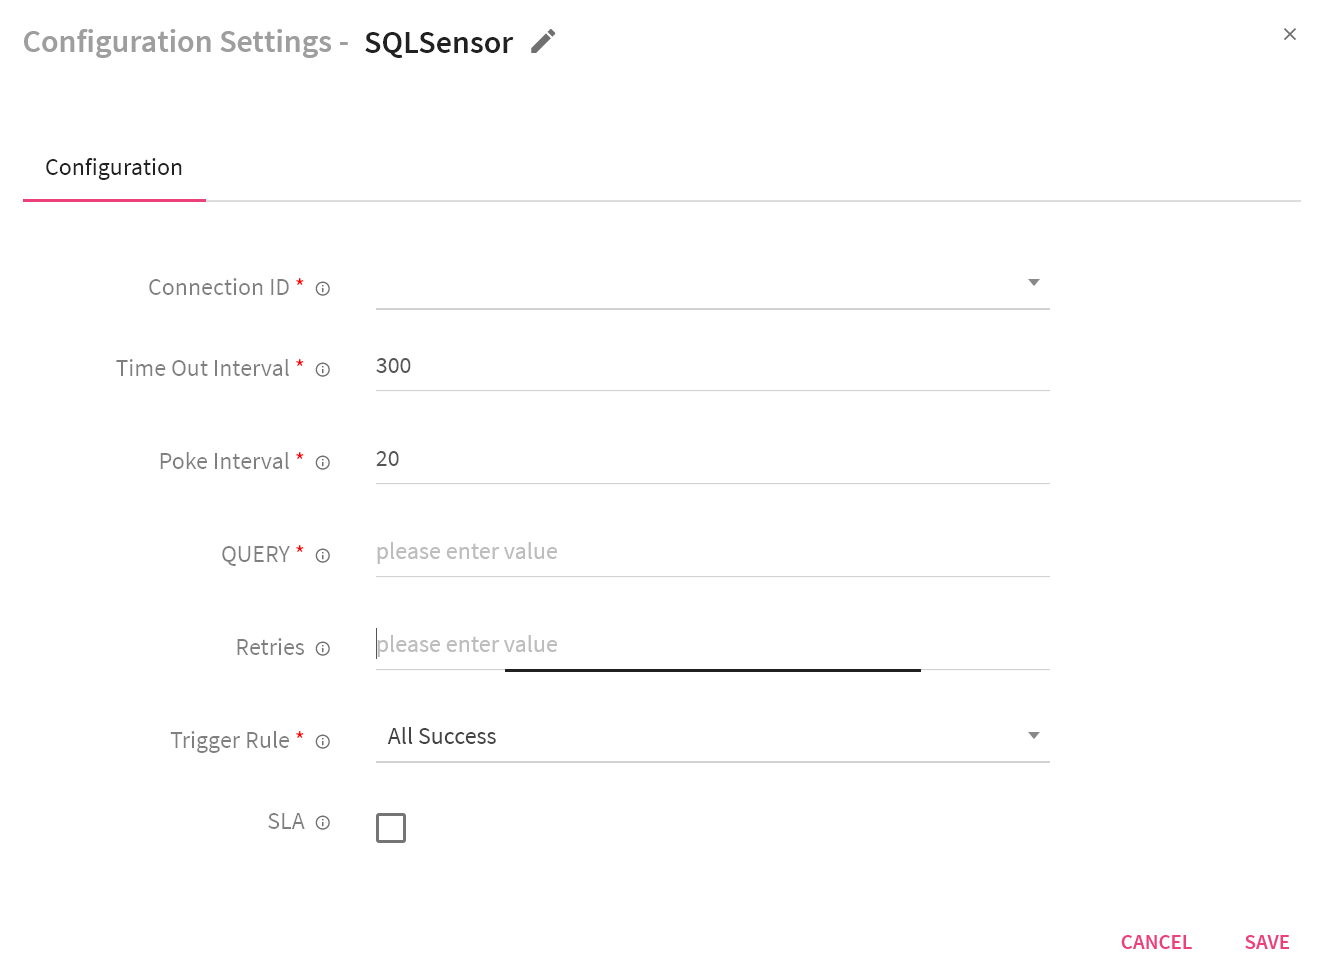
|
Field |
Description |
|
Select Connection ID from drop down which is defined in airflow to connect with required SQL. |
|
|
Time Out Interval |
Maximum time for which the sensor will check the given location (in seconds) once triggered. |
|
Poke Interval |
Time interval, that sensor will wait between each tries (in seconds). |
|
Directory or File Path |
SFTP location. It can be a directory or a file. |
|
Retries |
Number of times the workflow tries to run this task in case of failure. |
|
Rules to define trigger conditions of this node. |
|
|
Provide SLA related details (if required). |
Waits for a given amount of time before succeeding. User needs to provide configurations.
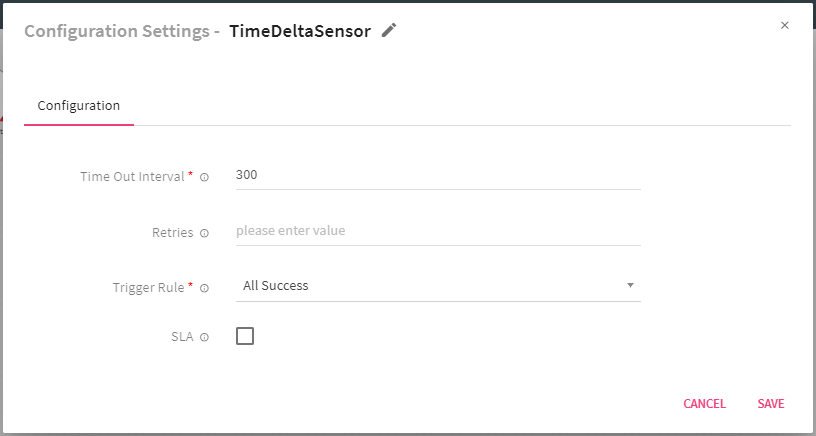
|
Field |
Description |
|
Time Out Interval |
Maximum time till when sensor will wait. |
|
Retries |
Number of times workflow tries to run this task in case of failure. |
|
Rules to define trigger conditions of this node. |
|
|
Provide SLA related details (if required). |
This operator is used to execute SQL statement on a Vertica database.
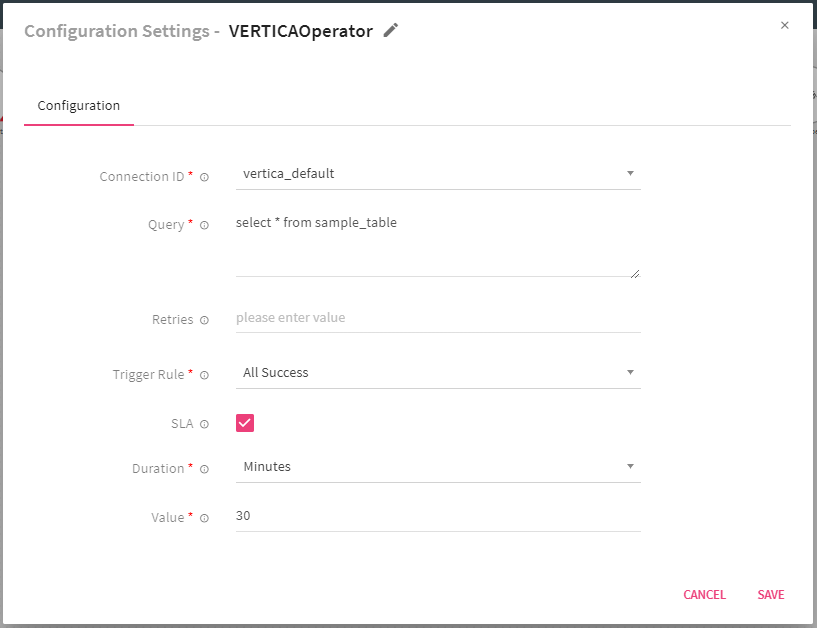
|
Field |
Description |
|
Connection ID |
Select connection ID from drop-down which is defined in airflow to connect with required Vertica database. |
|
Query |
SQL Query that is used to perform operation. |
|
Retries |
Number of times workflow tries to run this task in case of failure. |
|
Rules to define trigger conditions of this node. |
|
|
Provide SLA related details (if required). |
Kafka alert operator is use to send alert/message to a Kafka topic.
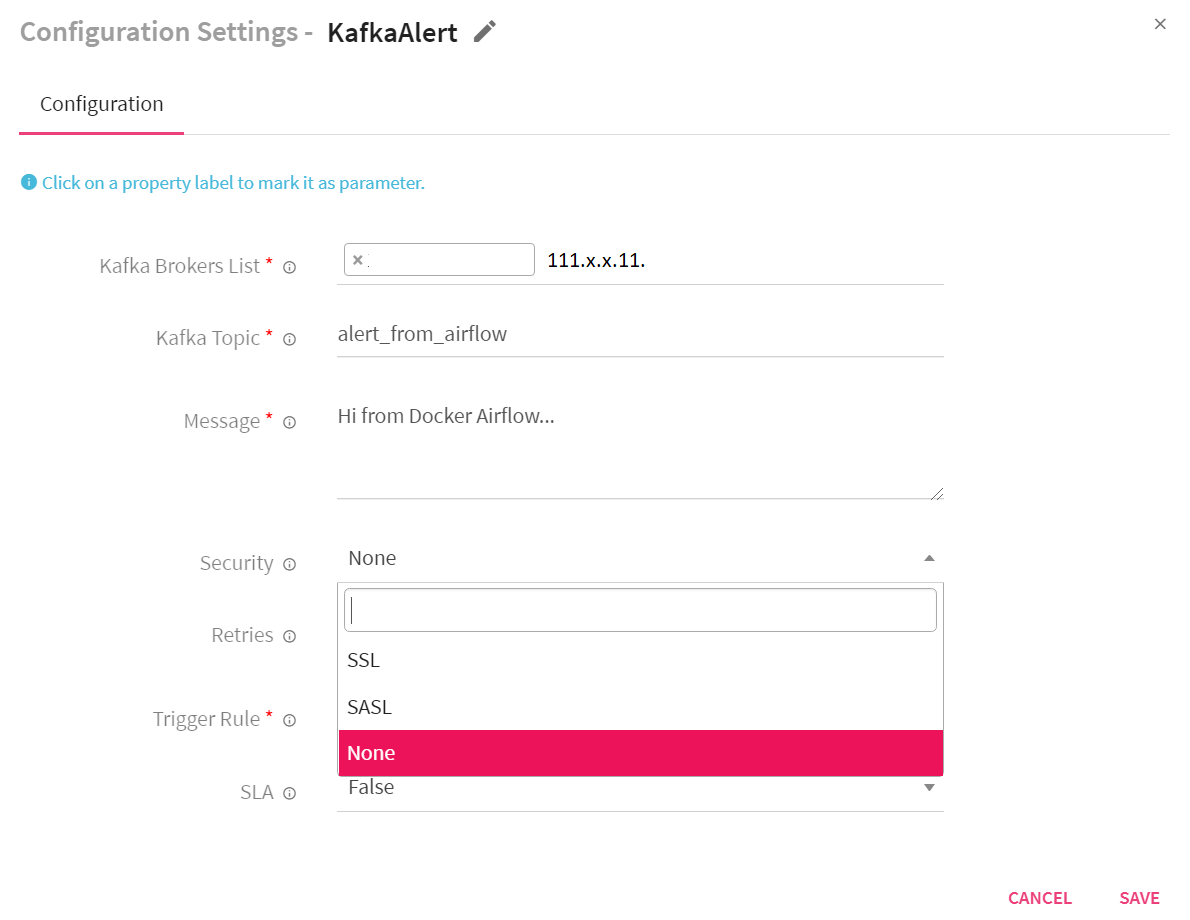
|
Field |
Description |
|
Kafka Brokers |
Enter the list of Kafka brokers along with port. |
|
Kafka Topic |
Enter a kafka topic on which alert/message should be sent. |
|
Message |
Enter the message that needs to be sent. |
|
Security |
Select the Kafka security protocol from SASL and SSL.
If SSL is selected, additional configuration: CA File, CERT file and Key File is required.
If SASL is selected, configuration from Username to SASL mechanism are populated, as shown below. |
|
CA File |
Filename of CA file to be used in certification verification. |
|
Cert File |
Filename of the file in pem format that contains the client certificate, as well as a CA certificate. |
|
Key File |
Filename that contains the client private key. |
|
Username |
Provide Kafka Username. |
|
Password |
Provide Kafka password. |
|
Security Protocol |
Provide SASL security protocol. |
|
SASL Mechanism |
Provide SASL mechanism. |
|
Retries |
Number of times workflow tries to run this task in case of failure. |
|
Rules to define trigger conditions of this node. |
|
|
Provide SLA related details (if required). |
Time window operator is use to check if current execution is in given time window or not. It also checks if current execution date is in calendar holiday or not. If current execution time is not in given time window or current execution date is in calendar holiday then operator returns False and consider as failed.
|
Field |
Description |
|
From Time |
Provide from time of time window in format HH:MM:SS |
|
To Time |
Provide from time of time window in format HH:MM:SS |
|
Check For Holiday |
Select as True to check, if current execution date is in calendar holiday. When you select TRUE, additional configuration is populated. |
|
Calendar |
Select a calender for holidays. These are the calendars created from Register Entities < Calendar section. |
|
Include Weekend |
Select as True if you want to include weekend in holidays. |
|
Retries |
Number of times workflow tries to run this task in case of failure. |
|
Rules to define trigger conditions of this node. |
|
|
Provide SLA related details (if required). |

SSH operator is use to run commands over remote machine. For that user need to provide following.
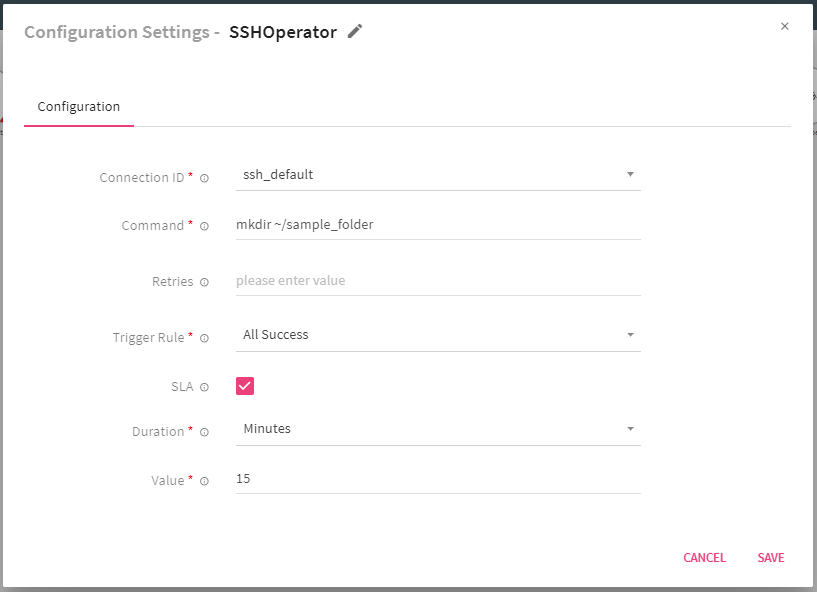
|
Field |
Description |
|
Connection ID |
Select connection ID from the drop-down which is defined in airflow to connect with required remote machine. |
|
Command |
Command, set of commands or reference to bash script that to be execute |
|
Retries |
Number of times workflow tries to run this task in case of failure. |
|
Rules to define trigger conditions of this node. |
|
|
SLA |
Provide SLA related details (if required). |
All the Workflows that are created in StreamAnalytix for the logged in user are listed on the Workflow home page.
You can add workflow as an operator inside a workflow (similar to pipeline). This workflow will be act as sub-workflow and a separate instance of workflow and will be executed as sub-workflow.
Once a workflow is defined, provide a workflow name and click on Save Workflow button to create a workflow using another workflow. (Workflow Tile).
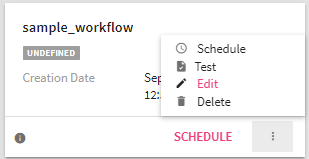
Once you have defined and created a workflow, following operations user can perform on workflow:
You can edit a workflow, however not when it is active.
A workflow can have another workflow in it. This enables the Parent Child marker in the workflows.
A Parent Marker will be shown with a Parent Workflow marker icon on the workflow, similarly for a Child Workflow marker.
On every tile, a count of no. of pipelines and subworkflow is shown upto level 1.
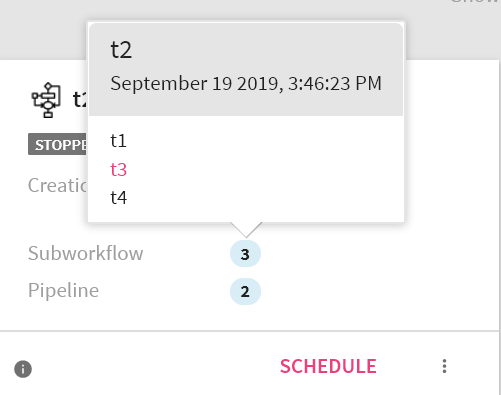
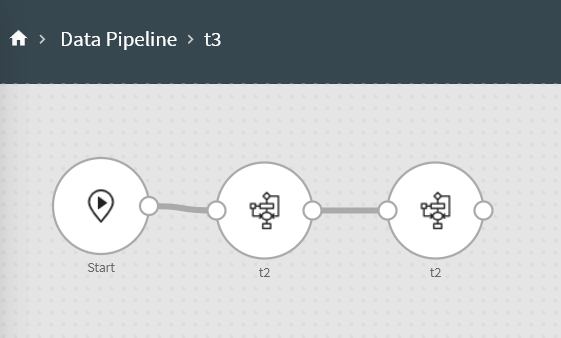
Which means, that if a Workflow has a 2 subworkflows, you will be able to see their names on the tiles. However, if there are more subworkflows in it or pipelines, then you will have to keep clicking and expand them on the workflow definition page. For example, you can view the three subworkflows under t2, but to check the t3, you need to click on it and view the edit mode of the subworkflow, show below:
When a user clicks on the pipeline/workflow count, the pipeline names and creation date appear on the popup. On clicking on an individual pipeline/workflow you will be redirected to its edit view.
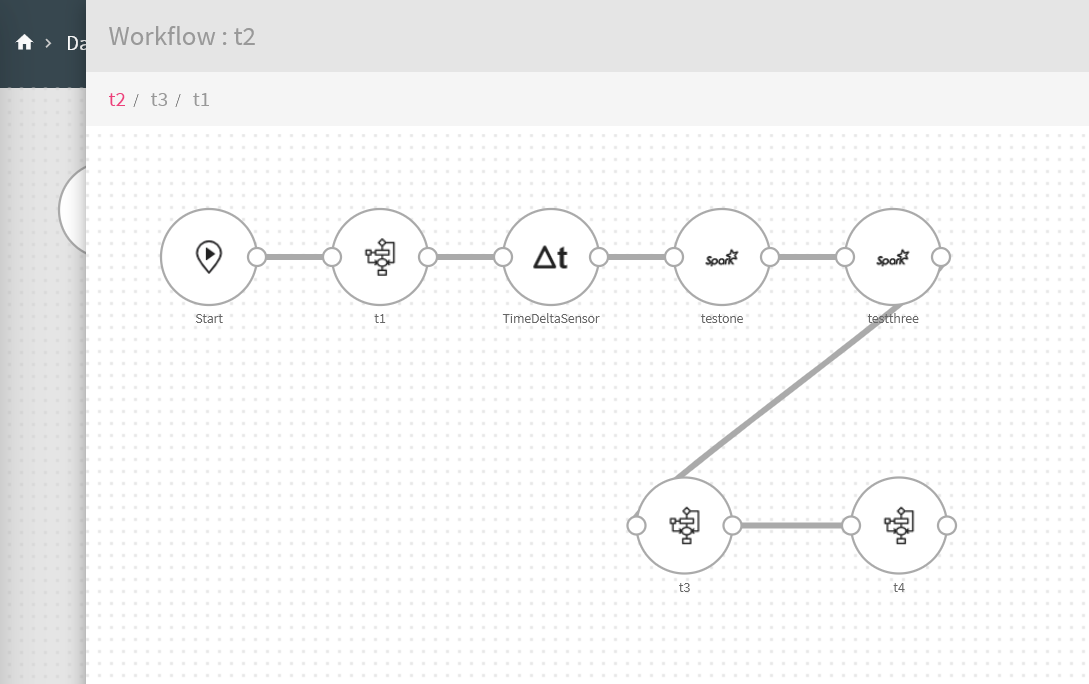
In the edit view, you will be able to drill down every workflow till its last level. Double click on any workflow to view the window shown below:
Note: Workflow component apart from pipeline and workflow type are not available for drill down, which includes an individual operator.
Once workflow is created, deploy the workflow to Airflow by clicking on SCHEDULE button. Set your workflow scheduling configuration as defined below:
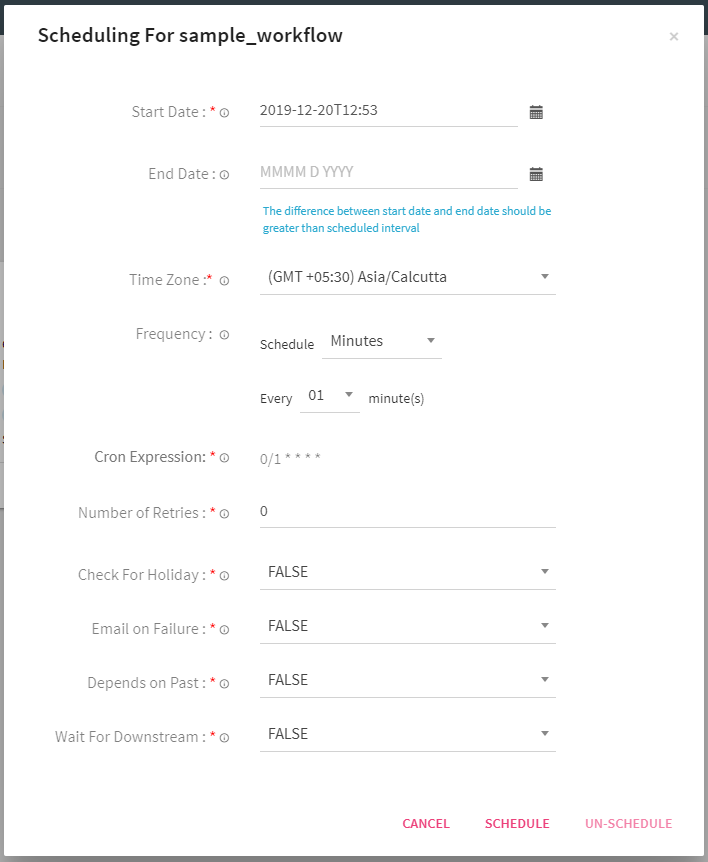
|
Field |
Description |
|
Start Date |
Date from which workflow starts. |
|
End Date |
Date on which workflow ends. (not mandatory) |
|
Time Zone |
Time Zone in which workflow should be scheduled. |
|
Frequency |
Runs workflow after this interval. You can select a predefined intervals. |
|
Cron Expression |
Cron expression is generated based on frequency. |
|
Check For Holidays |
Select as True to check, if current execution date of workflow is in given calendar holiday. If current execution date is in calendar holiday then that execution of workflow will not happen. If selected as True then following additional configurations are populated: Calendar and Include Weekend. |
|
Calendar |
Select the calendar that you created in the Calendar section. |
|
Include Weekend |
Select True or False, if you want to include the weekend as a holiday or not. |
|
Number of Retries |
Number of times Airflow restarts workflow (in case of failure) Retry Delay: If number of retries is greater than 1 or above, then provide a value in Retry Delay (in seconds), which enables the workflow to try restarting, after a certain time of delay. Email on Retry: You can send an email if the workflow retry is attempted, by setting its value to True or not by using False. |
|
Email on Failure |
An email will be sent on failure of the workflow, if the value is set to True. the default value is False. |
|
|
Provide mail ids. If Email on Retry or Email on Failure is set to True, it sends an email to a given mail id. If the workflow fails, Airflow will retry to run workflow and accordingly the mail will be sent. |
|
Depends on Past |
Set to True, if current run of workflow depends upon its last run. Default is False |
|
Wait For Downstream |
In case of True: A scheduled run will only be executed if a previously scheduled downstream task is complete. In case the downstream task has failed the scheduled task will wait unless the downstream task is complete. In case of False: The scheduled task will run irrespective of the downstream task. |
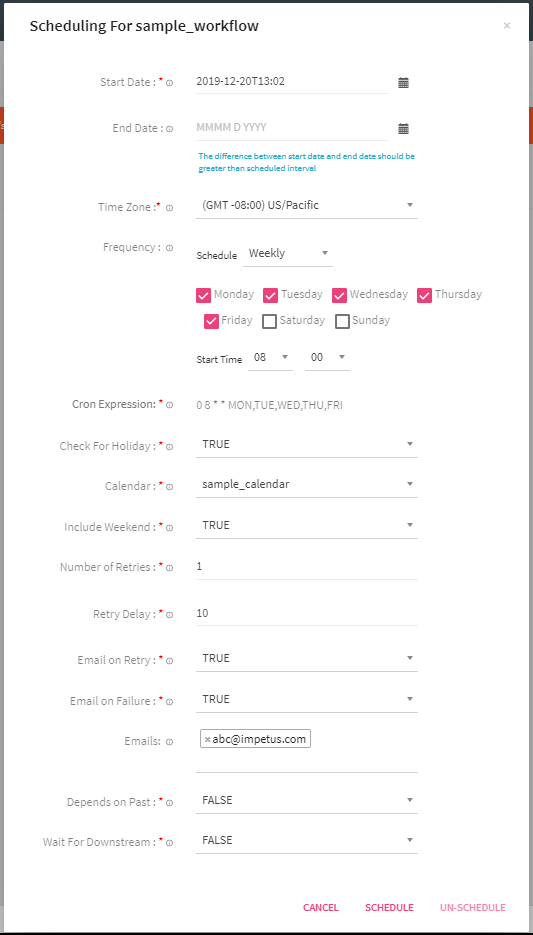
In the above example, Workflow is scheduled in US/Pacific time zone. It starts at 20 December 2019 and ends at 31 December 2019. Workflow will run at 8 AM on each day from Monday to Friday. Here Check if Holiday is selected as True and holiday calendar sample_calendar is provided to check for holiday.
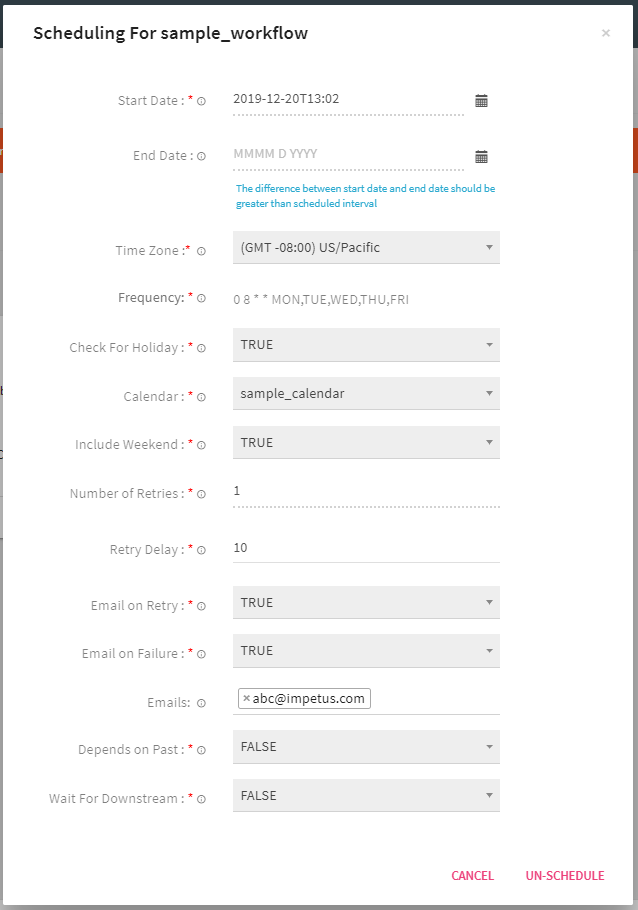
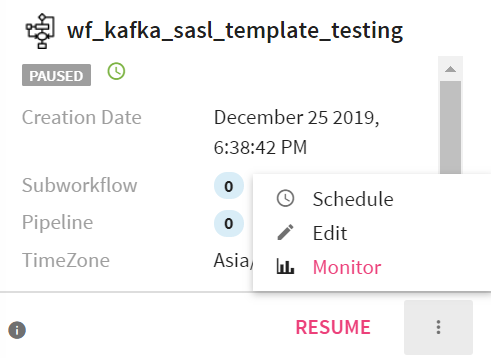
To remove a workflow from a schedule, click on the SCHEDULING option. This option is available on the Workflow tile under the menu button.
A new window will pop up and you can un-schedule the workflow.
You can always Reschedule the workflow, using the same steps.
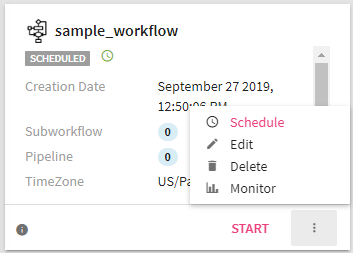
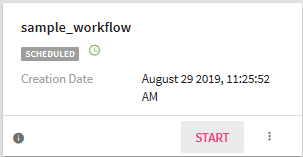
After scheduling workflow, status of the workflow will change to SCHEDULED. Now, you can start the workflow by clicking on START button. If the workflow starts successfully, the status will change to ACTIVE.
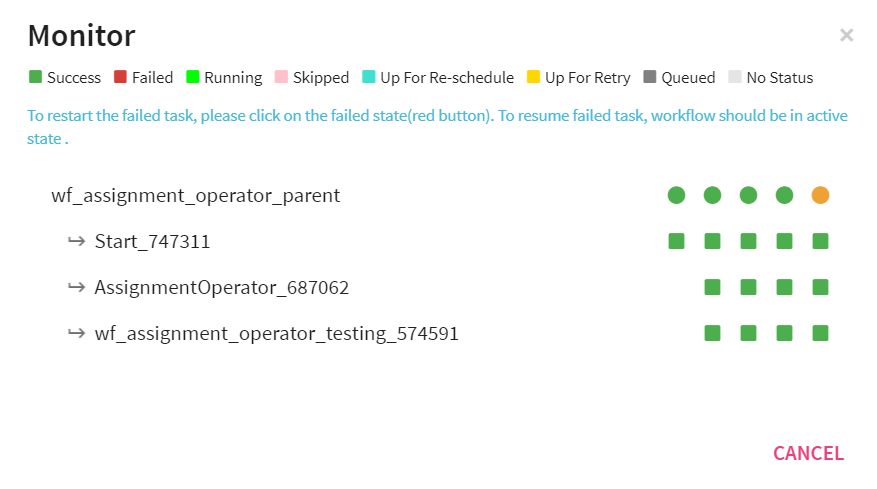
To monitor a workflow, the workflow should have had at least one run at the scheduled time.
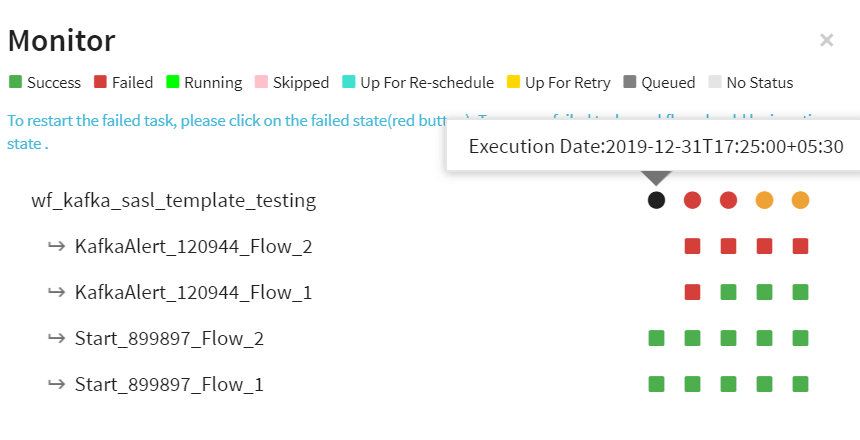
The monitor window will show you the status of last 5 runs. If the last 5 runs were all successful, the monitor window will look something like shown below:
If the workflow failed, monitor window will help you resume and run the workflow from the failed stage. Shown below is a Monitor window with a failed task. a
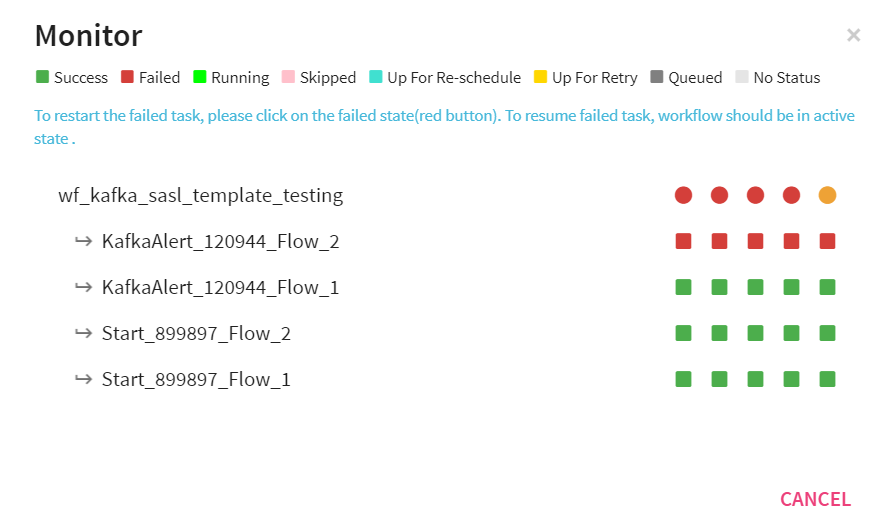
As you click on the Failed task, it will prompt you for resuming the workflow.
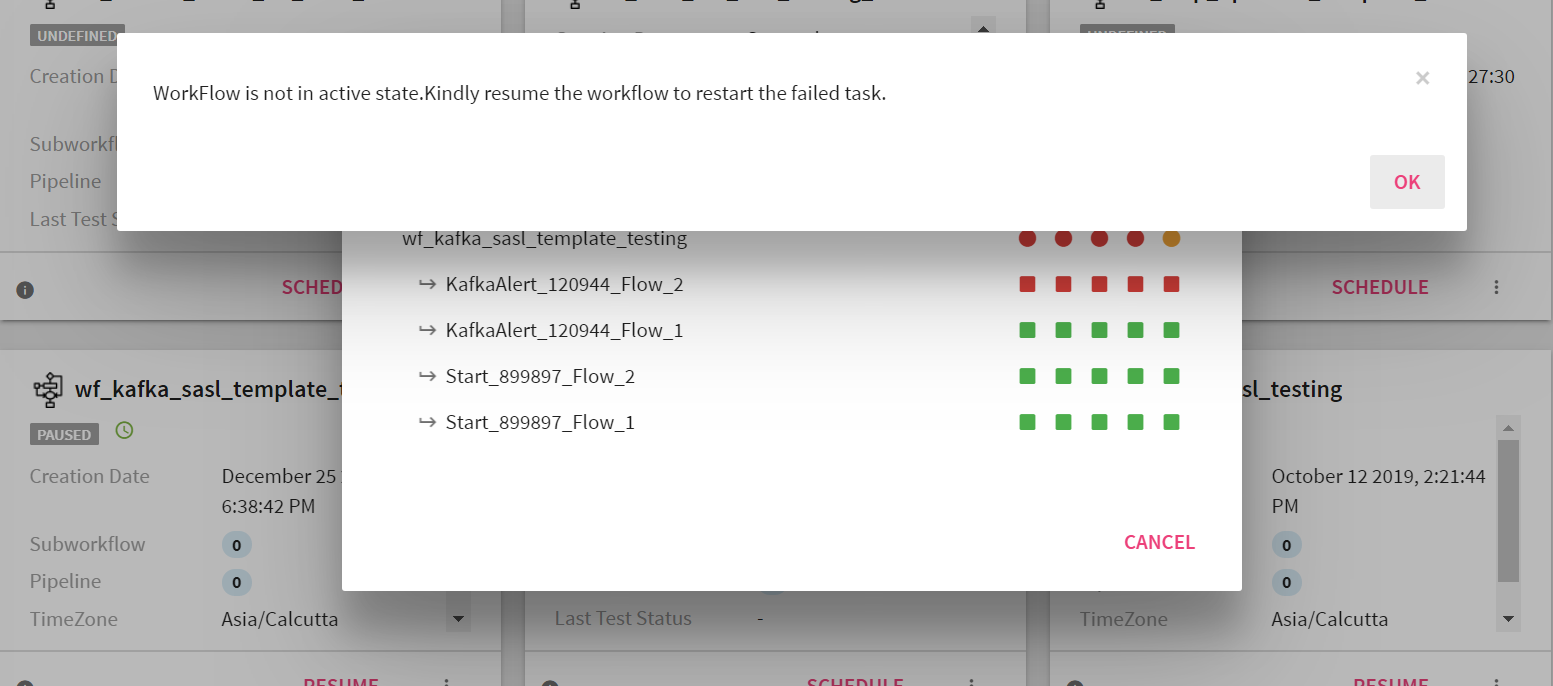
Click okay, and Resume the workflow, this will begin the workflow from the failed state.
When you hover the mouse on the red or green dots next to the Workflow name, the details of the run are shown:
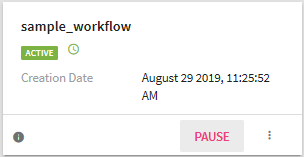
Once the workflow is in ACTIVE state, you can PAUSE the workflow.
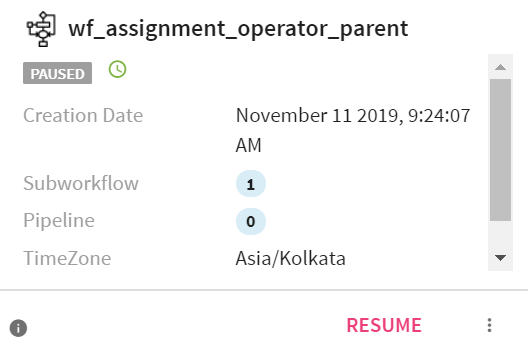
You can RESUME a paused workflow.
Click on Delete button, to delete the workflow.
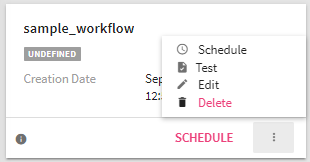
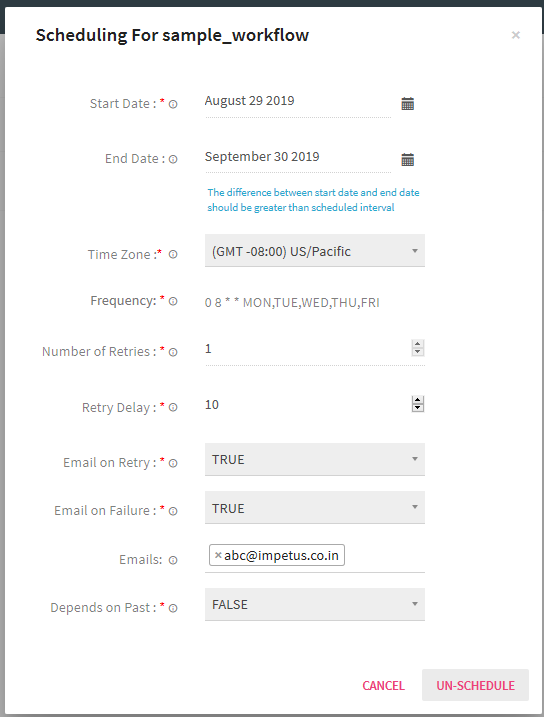
You can test the workflow before it is scheduled.
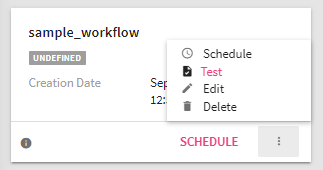
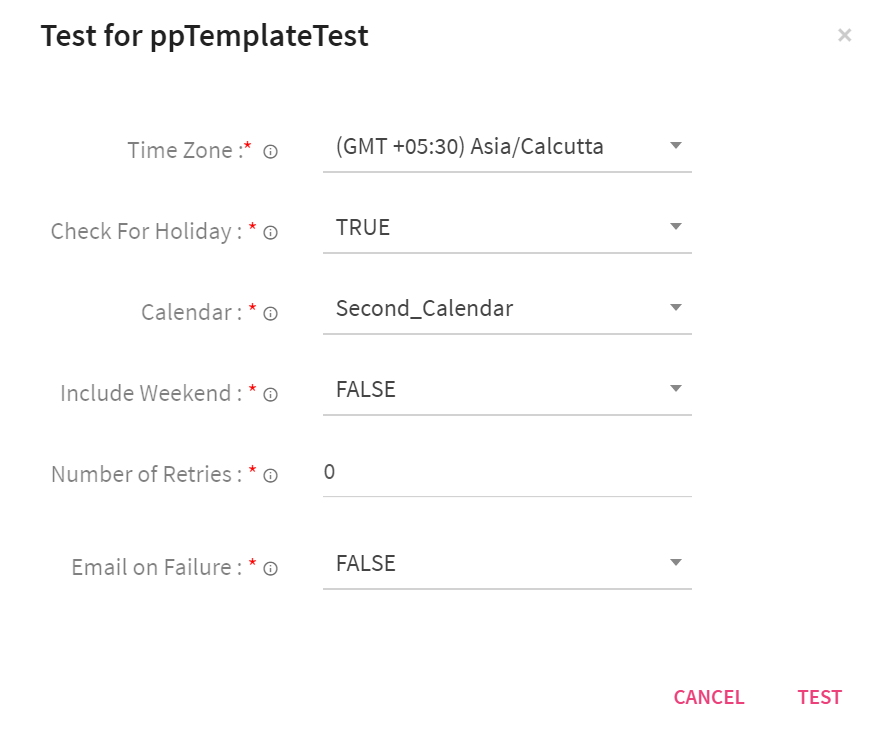
Once you click on the Test button as shown below, a pop-up with testing configuration will appear. Details of each field is explained below:
|
Field |
Description |
|
Time Zone |
Time zone in which workflow will be scheduled. |
|
Check For Holiday |
Check if the test is scheduled on a holiday or not. |
|
Calendar |
Select the calendar as per which the Holiday schedule will be verified. |
|
Include Weekend |
If you want to include weekend as holidays or not. |
|
Number of Retries |
Number of times Airflow should try to start workflow (if fails). |
|
Retry Delay |
If the number of retries is greater than 0, for example, 10 second; Airflow will restart the workflow. |
|
Email on Retry |
If the value is set to True, an email is sent as soon as the workflow starts. The default value is false. |
|
Email on Failure |
If the value is set to True, an email is sent as soon as the workflow starts and fails. The default value is false. |
|
|
Provide mail ids, if email on retry or email on failure set to true. It will send mail to given mail ids if workflow is failed or Airflow retry to run workflow |
Here workflow will consider current date/time (of given time zone) as start date. Once you click on Test button, workflow will be deployed and is instantly scheduled to start. Its status will be changed to Testing (Testing Status).
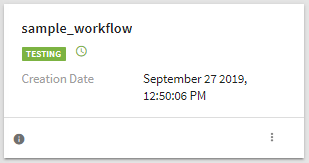
During testing, Workflow runs only once. You will not be able to perform other operations like Start/Stop/Schedule/Resume. Once workflow testing is complete, the workflow will be ready to be Scheduled.
Once testing is done, test status will be visible on Workflow Tile. It shows whether workflow is succeed or failed.
You can create connections in Airflow from StreamAnalytix. After clicking on + sign in workflow creation page (Create Connection Icon), a pop-up will appear (Create Connection). Provide information required to create a connection in this tile.
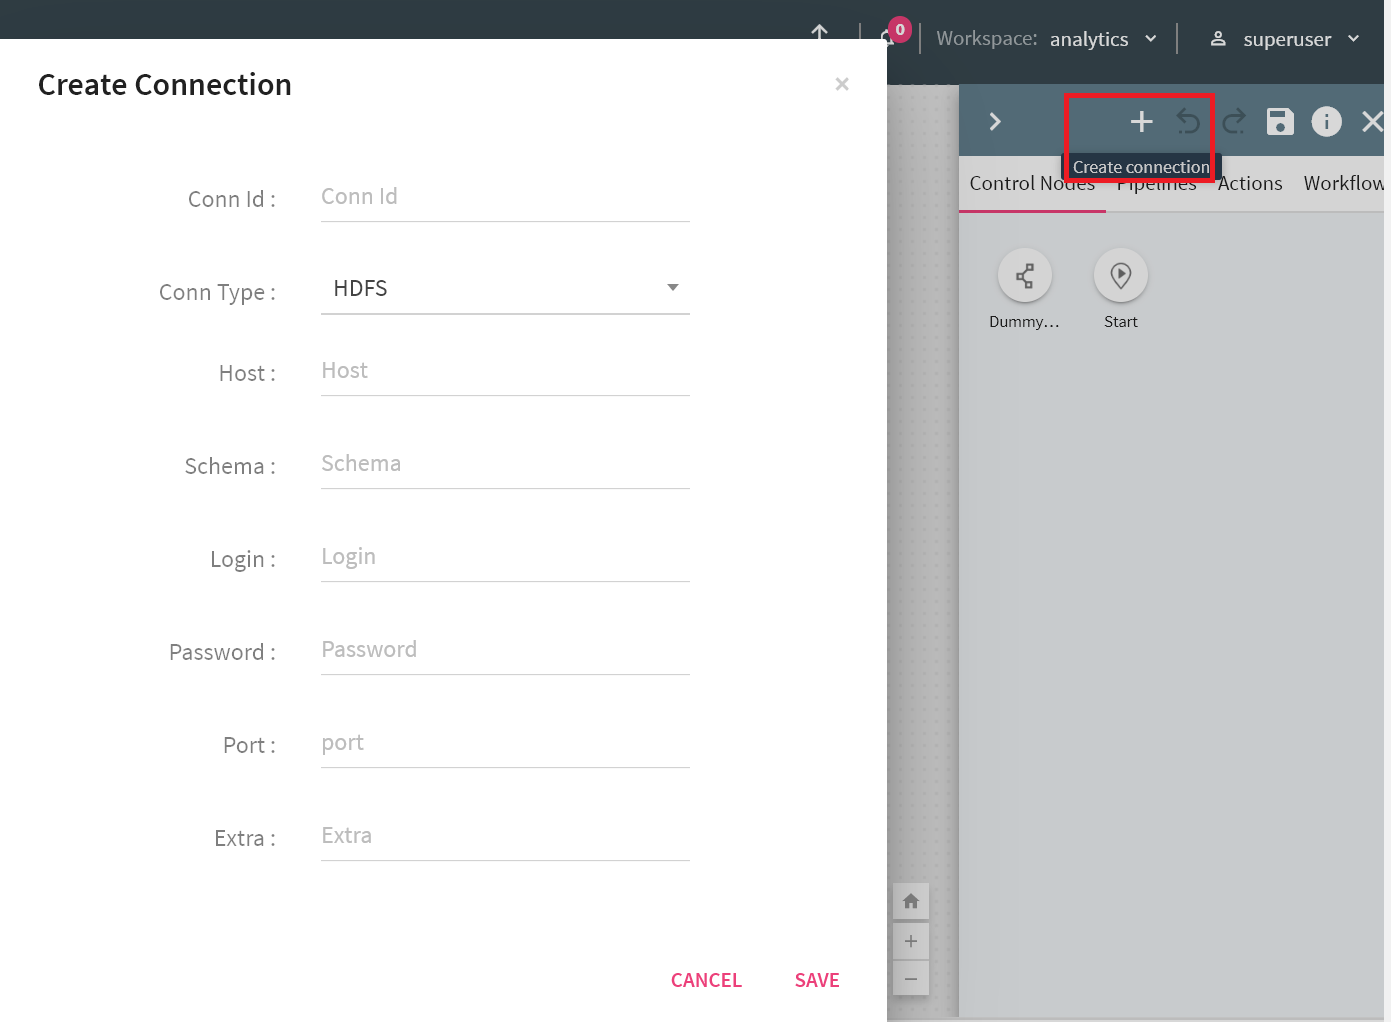
Following types of connection can be created:
l HDFS
l MSSQL
l MySQL
l Postgres
l SFTP
l SSH
l Vertica
You can create a workflow that has multiple executions of the same flow with different configurations.
You can convert any configuration property as a placeholder in each operator. This will allow you to provide different configurations for different executions. Once all operators are configured and the flow is defined, you will able to provide different values for each placeholder either by entering data in data grid or by uploading a csv file.
You will have following options:
You can convert any configuration property as a placeholder by clicking on it. Once clicked, its color will change and '$$' will be append as prefix. Value that user provided for this configuration will considered as placeholder key.
If at least any one of the property is selected as placeholder in any of the operator, workflow will be converted into a template workflow and data grid option will be enable to provide configurations
On the top right corner of the pipeline canvas, a grid icon is placed. This is the template icon. Once you click on it, it opens the template window beneath the pipeline.
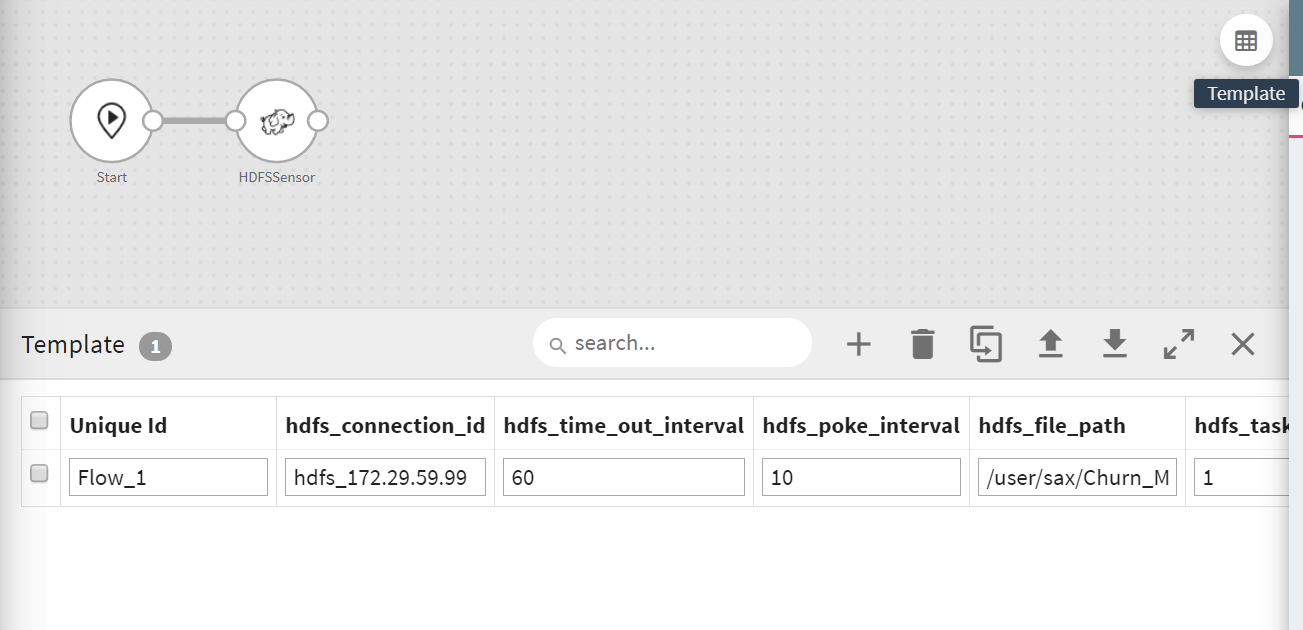
In the Data grid, all placeholder keys are listed as header and you can provide their values for each execution. Each row will consider as one execution. A column with ‘unique_id’ is appended by default to identify each execution.
The Template window configuration properties are explained below:
|
Field |
Description |
|
Add New Row |
To add a new row, select the + icon. This icon will allow you to create a new entry. |
|
Remove Selected Rows |
To remove the selected rows, select the checkbox in from of each row and select Remove. |
|
Clone Selected Rows |
To clone the selected rows, select the checkbox in from of each row and click on the Clone icon. |
|
Upload |
With Upload option you will able to upload the configurations file that has multiple rows for each placeholder properties. Note: NOTE: A sample CSV file can be downloaded from the Download option, follow the template and configuration of this file to upload your new template file. |
|
Download |
With download option, you will able to download a csv file contains the all the data which has been provided (along with placeholders as headers. |
|
Maximize |
To maximize the template window. |
|
Close |
To close the template window. |
Note:
•It is not allowed to convert any configuration property, in Pipeline, Control and Workflow node as a placeholder.
•Make sure the placeholder name and property names are not similar, the should be different. For example, if your property is Connection_ID, make sure the placeholder name is not Connection_ID too.
Below mentioned are certain terminologies which are used in the workflow:
Id used to create a connection in Airflow. Connection ID provided in workflow component should be same as ID given in airflow for connection
It is the rule by which current node or the task is triggered. The trigger rule is based on current state of all the parent nodes/ upstream tasks. Default value of trigger rule is ALL Success, which means, current node/task will only trigger, if all the parent nodes/upstream tasks have run successfully. Following can be the value of trigger rule.
|
Field |
Description |
|
All Success |
Trigger when all parent nodes have been succeeded |
|
All Failed |
Trigger when all parent nodes have been failed |
|
All Done |
Trigger when all parent nodes have been executed (irrespective of success or failed) |
|
One Success |
Trigger as soon as one parent node has been succeeded |
|
On Failed |
Trigger as soon as one parent node has been failed |
|
Dummy |
Just trigger node |
Service Level Agreement is the time by which a task should have succeeded.
If the task does not succeed within the given SLA, an alert email is sent on the configured mail id with details of task. SLA time has two properties, Duration and Value.
|
Field |
Description |
|
Duration |
The duration in which the service is agreed to be delilvered. It is the unit of time. Following are the units: l Microsecond l Milliseconds l Seconds l Minutes l Hours l Days l Weeks |
|
Value |
The value of the duartion as a numeric number. |
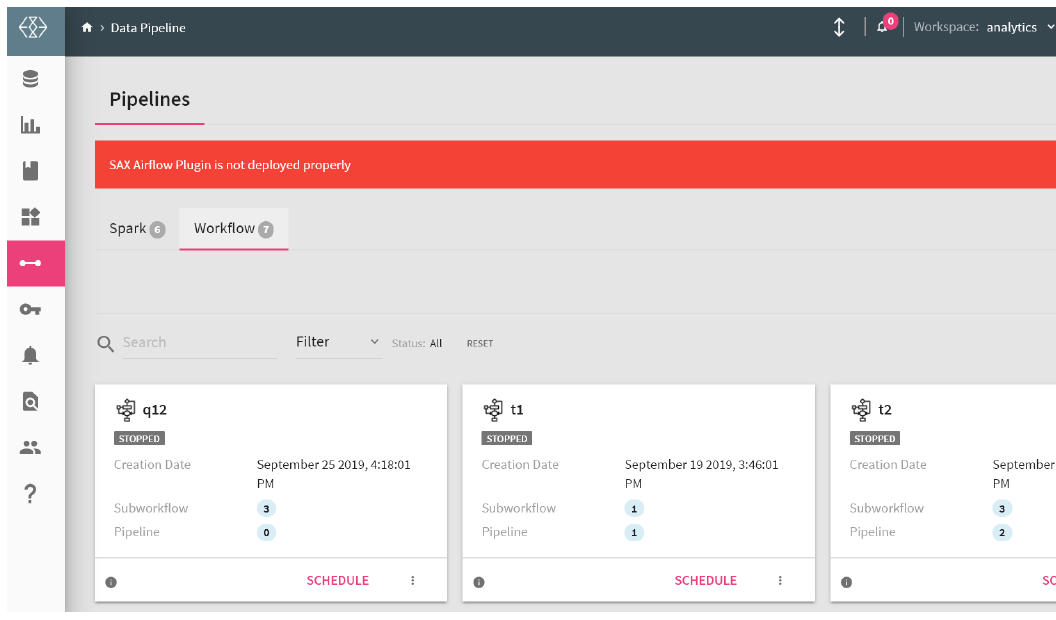
A message will be displayed on thed workflow homepage for following scenarios:
l If Airflow is not configured properly or Airflow webserver is down.
l If Airflow scheduler is down.
l If SAX Airflow Plugin is not deployed properly.
Below is example of first scenario: