A Data Source represents the source for a data pipeline in StreamAnalytix.
Typically, you start creating a pipeline by selecting a Data Source for reading data. Data Source can also help you to infer schema from Schema Type, which can directly from the selected source or by uploading a sample data file.
StreamAnalytix Data Sources are built-in drag and drop operators. The incoming data can be in any form such as message queues, transactional databases, log files and many more.
StreamAnalytix runs on the computation system: Spark.
Within Spark, we have two types of Data Source’s behavior:
• Streaming Data Sources
• Batch Data Sources
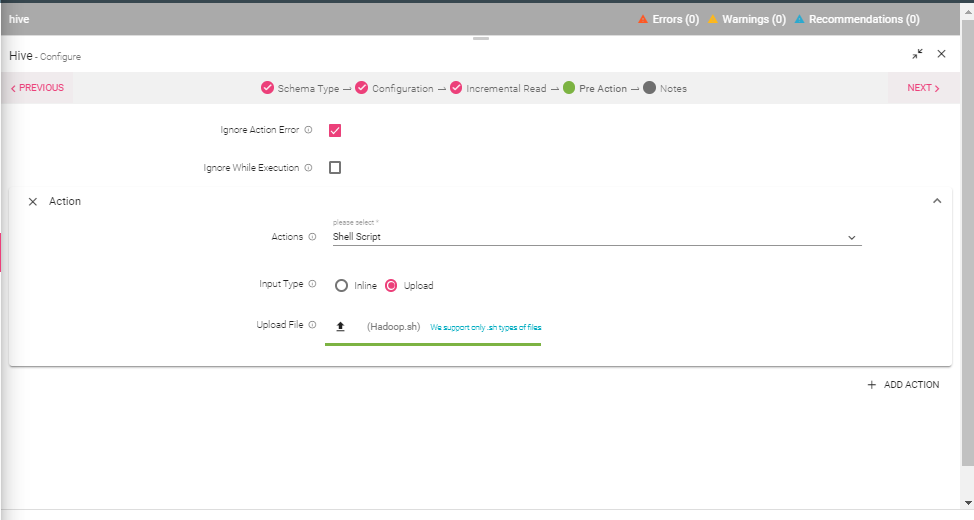
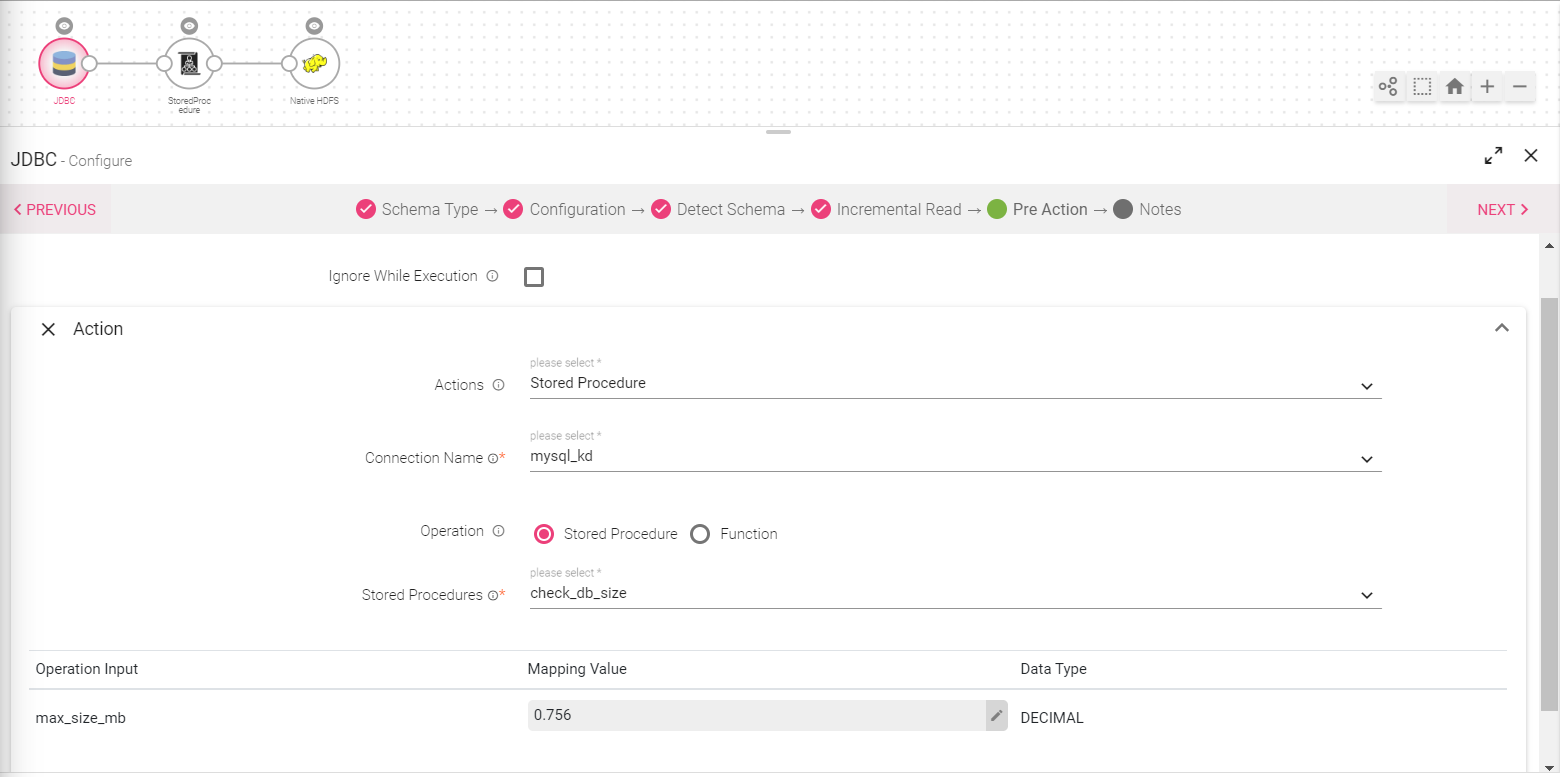
The user may want to perform certain actions before the execution of source components. A Pre-Action tab is available at the source.
These actions could be performed on the Source:
|
Field |
Description |
|---|---|
|
SQL |
The user can execute SQL from the actions option by selecting the connection at which he wants to execute the SQL and provide the query which he wants to execute. |
|
Shell Script |
The user can invoke a Shell Script as an Action. To invoke the shell script there are two ways to provide the input: - Writing the shell script in the inline editor - The user can upload the shell script file to execute it. |
|
Stored Procedure |
With this option user can execute a stored procedure or function stored in a database. To do so, the user has to select an appropriate JDBC connection. Further he would be required to select the relevant stored procedure appearing in the drop-down menu. |
Note:
- If for some reason the action configured fails to execute, the user has an option to check mark the ‘Ignore Action Error’ option so that the pipeline runs without getting impacted.
- By check marking the ‘Ignore while execution’ option, the configuration will remain intact in the pipeline, but the configured action will not get executed.
- The user can also configure multiple actions by clicking at the Add Action button.

This feature helps define the schema while loading the data; with Auto Schema feature, first load data from a source then infer schema, modify data types and determine the schema on the go.
This feature helps design the pipeline interactively. When you configure a data source, below shown is the window that open with features explained below:
Data can be loaded in the form of CSV/TEXT/JSON/XML/Fixed Length and Parquet file or you can fetch data from sources such as Kafka, JDBC and Hive. Auto schema enables creation of schema within the pre-built operators and identifies columns in CSV/JSON/TEXT/XML/Fixed Length and Parquet.
StreamAnalytix starts the inference by ingesting data from data source. As each component processes data, schema is updated (as per the configuration and the logic applied). During the process, StreamAnalytix examines each field and attempts to assign a data type to that field based on the values in the data.
All our components (source) have auto schema enabled. Below mentioned are the common configuration of Auto schema for every Data Source.
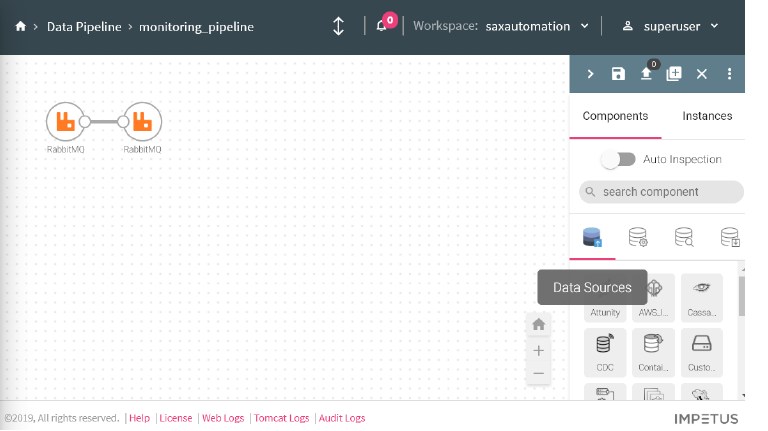
To add a Data Source to your pipeline, drag the Data Source to the canvas and right click on it to configure.
There are three tabs for configuring a component.
1.Schema Type
2.Configuration
3.Add Notes
Note: An additional tab is reflected after data is extracted (or uploaded) by schema in the form of Schema.
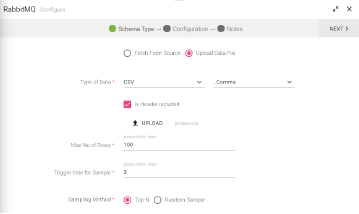
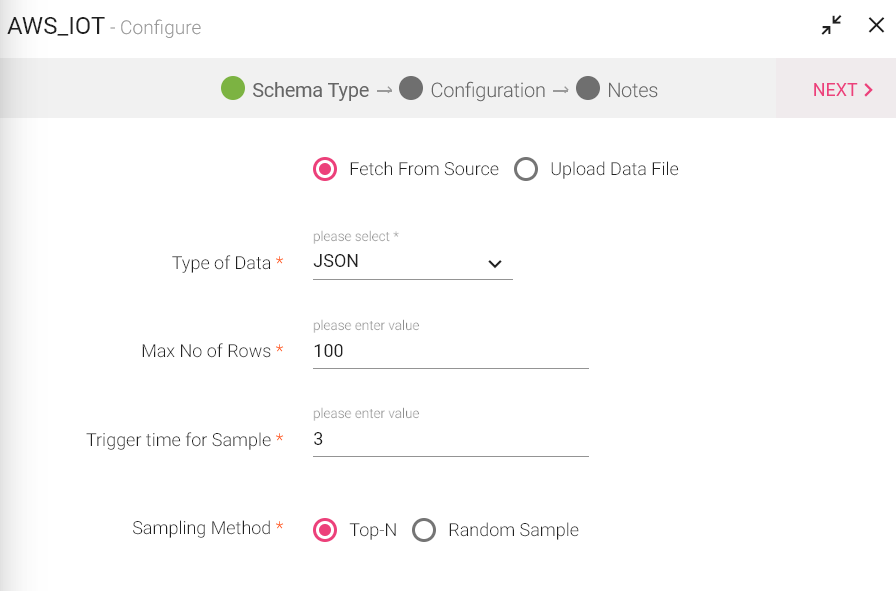
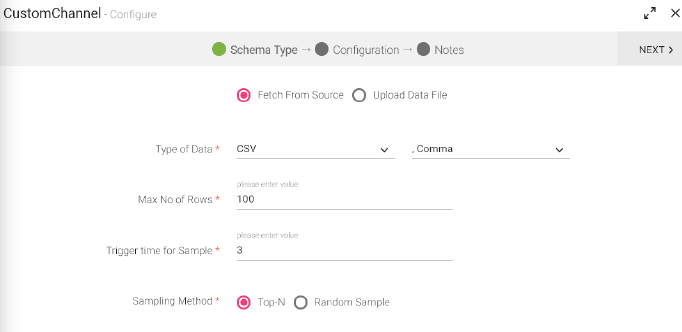
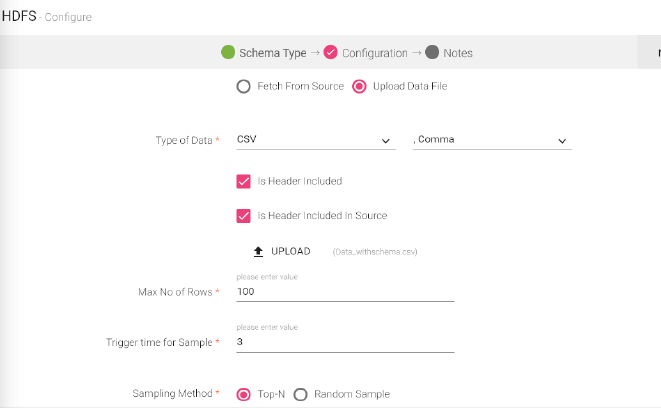
Schema Type allows you to create a schema and the fields. On the Schema Type tab, select either of the below mentioned options:
• Fetch from Source
• Upload Data File
• Use Existing Schema
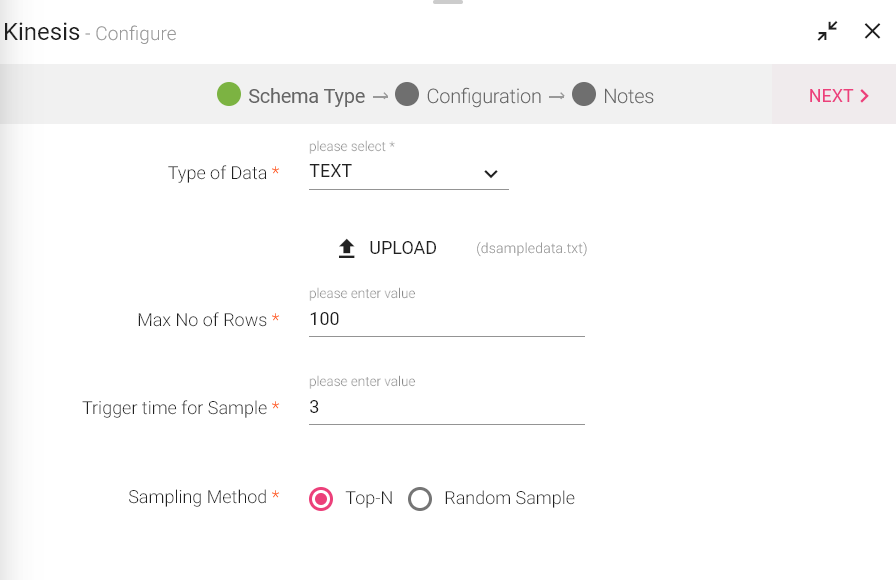
Whether the data is fetched from the source or uploaded, the following configuration properties remain the same:
|
Field |
Description |
|---|---|
|
Type Of Data |
Input format of Data. |
|
Max no. of Rows |
Maximum no. of the rows. Sample to pull from Streaming Source. |
|
Trigger time for Sample |
Minimum wait time before system fires a query to fetch data. Example: If it is 15 Secs, then system will first wait for 15 secs and will fetch all the rows available and create dataset out of it. |
|
Sampling Method |
Dictates how to extract sample records from the complete data fetched from the source. Following are the ways: -Top N: Extract top n records using limit() on dataset. -Random Sample: Extract Random Sample records applying sample transformation and then limit to max number of rows in dataset. |
Note: In case of ClickStream Data Source, you can also choose from an existing schema.
Fetch data from any data source.
Depending on the type of data, determine the Data Source you want to use, then recognize the type of data (or data format) and its corresponding delimiters.
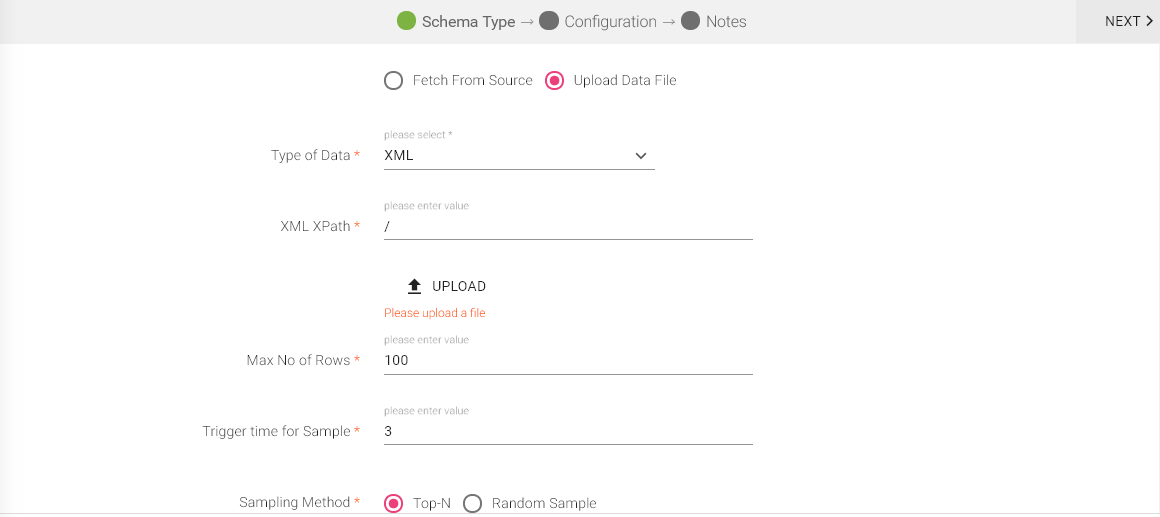
These are four types of data formats supported by StreamAnalytix to extract schema from them; CSV, JSON, TEXT, XML, Fixed Length and Parquet.
Once you choose a data type, you can edit the schema and then configure the component as per your requirement.
Note: Whenever Fetch from Source is chosen, the sequence of tabs will be as follows:
Fetch from Source< Configuration<Schema<Add Notes.
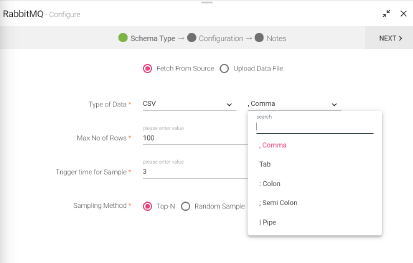
The data that is being fetched from the source is in CSV format. From within the CSV, the data columns that will be parsed, will be accepting the following delimiters.
• Tab
• , Comma
• : Colon
• ; Semi Colon
• | Pipe
The default delimiter is comma (,).
If the data is fetched from the source, after uploading a CSV/TEXT/JSON/Parquet, next tab is the Configuration, where the Data Sources are configured and accordingly the schema is generated. Then you can add notes, and save the Data Source’s configuration.
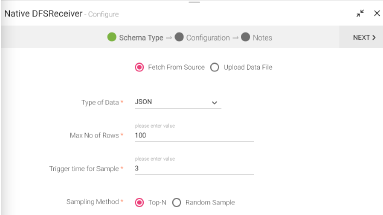
Select JSON as your Type of Data. The data that is being fetched from the source is in JSON format. The source will read the data in the format it is available.
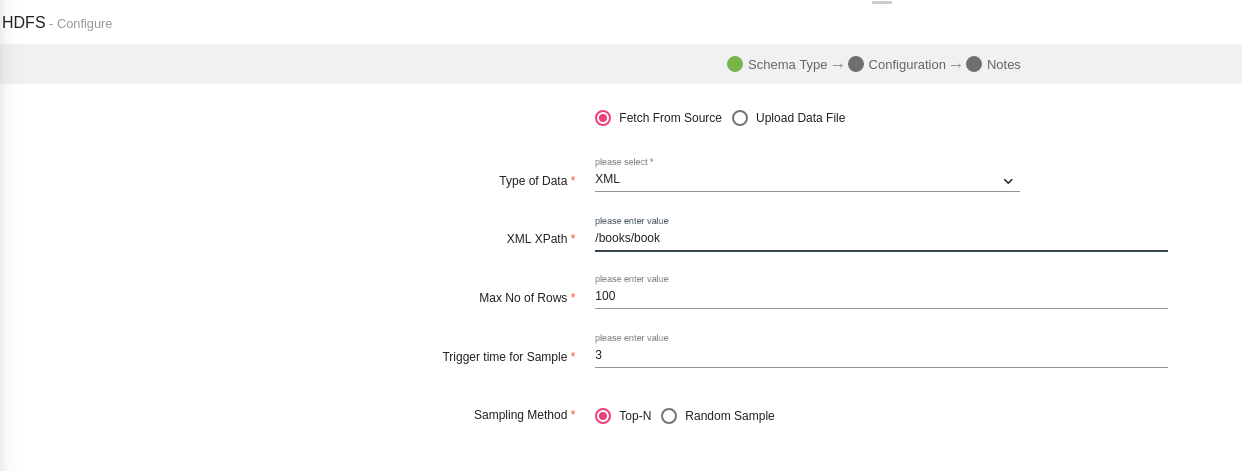
System will fetch the incoming XML data from the source.
Select XML as your Type of Data and provide the XML XPath value.
XML XPath - It is the path of the tag of your XML data to treat as a row. For example, in this XML <books> <book><book> ...</books>, the appropriate XML Xpath value for book would be /books/book.
Default value of XML XPath is '/' which will parse the whole XML data.
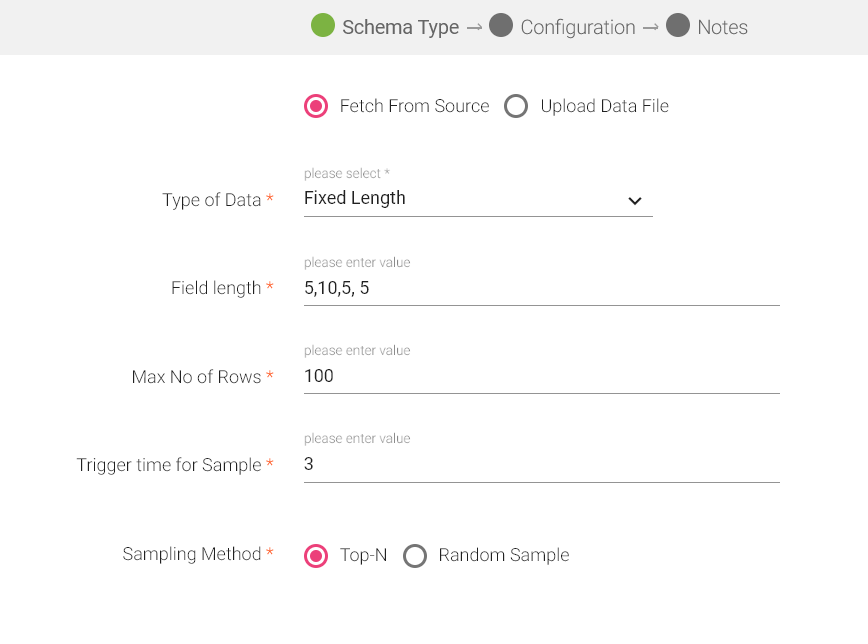
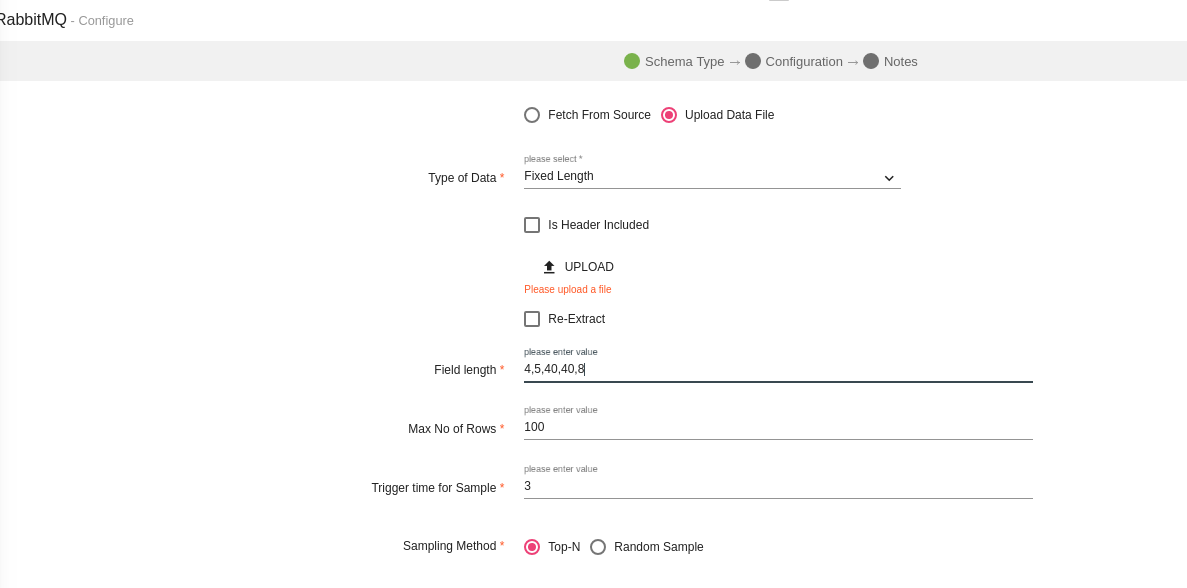
System will parse the incoming fixed length data. Select 'Fixed Length' as your Type of Data and Field Length value.
Field length value is a comma separated length of each field.
For example:
We have 3 fields f1,f2,f3 and their max length is 4,10 & 6 respectively.Then the field length value for this data would be 4,10,6.
Select Parquet as your Type of data. The file that is being fetched from the source is in parquet format. The source will read the data in the format it is available.
Select Parquet as your Type of Data.
Text message parser is used to read data in any format from the source, which is not allowed when csv, json etc. parsers are selected in configuration. Data is read as text, a single column dataset.
When you select the TEXT as “Type of Data” in configuration, data from the source is read by StreamAnalytix in a single column dataset.
To parse the data into fields append the Data Source with a Custom Processor where custom logic for data parsing can be added
Upload your data either by using a CSV, TEXT, JSON, XML, Fixed Length or a Parquet file.
Once you choose either data type, you can edit the schema and then configure the component as per your requirement:
Note: Whenever you choose Upload Data File, the sequence of tabs will be as follows:
Upload Data File< Detect Schema< Configuration< Add Notes.
You can choose the data type as CSV and the data formats are as follows:
• Comma
• Tab
• : Colon
• ; Semi Colon
• | Pipe
Once you choose the CSV, the schema is uploaded as show below:
After CSV/TEXT/JSON/XML/Fixed Length is uploaded, next tab is the Detect Schema, which can be edited as per requirements. Next is, the Configuration tab, where the Data Sources are configured as per the schema, then you can add notes, and save the Data Source’s configuration.
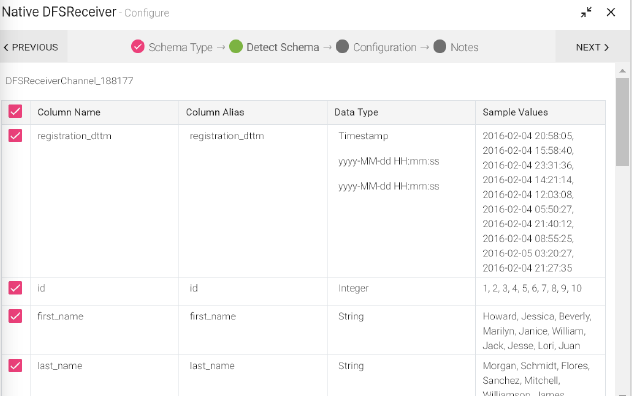
Following fields in the schema are editable:
Note: Nested JSON cannot be edited.

• Schema name: Name of the Schema can be changed.
• Column Name: Columns can be renamed.
• Date and Timestamp: Formats of dates and timestamps can be changed.
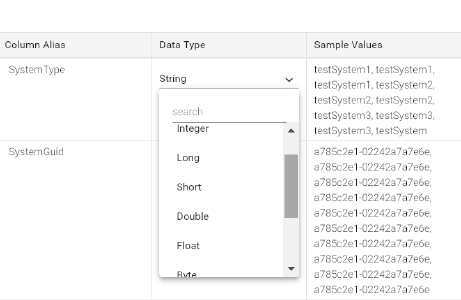
• Data Type: Field type can be any one of the following and they are editable:
• String
• Integer
• Long
• Short
• Double
• Float
• Byte
• Boolean
When you select JSON as your type of data, the JSON is uploaded in the Detect Schema tab, where you can edit the Key-Value pair, as shown below:
After the schema is finalized, the next tab is configuration of Data Source (Below mentioned are the configurations of every Data Source).
Note: In case of Hive and JDBC, the configuration tab appears before the Dtect schema tab.
Text files can be uploaded to a source when the data available requires customized parsing. Text message parser is used to read data in any format from the source, which is not allowed when CSV, JSON, etc. parsers are selected in configuration.
To parse the data into fields append the Data Source with a Custom Processor where custom logic for data parsing can be added.
System will parse the incoming XML data from the uploaded file.
Select XML as your Type of Data and provide the XML XPath of the XML tag. These tags of your XML files are reflected as a row.
For example, in this XML <books> <book><book> ...</books>, the output value would be /books/book
You can also provide / in XML X path. It is generated by default.
‘/’ will parse the whole XML.
System will parse the incoming fixed length data. If the field has data in continuation without delimiters, you can separate the data using Fixed Length data type.
Separate the field length (numeric unit) by comma in the field length.
When Parquet is selected as the type of data, the file is uploaded in the schema and the fields are editable.
Note: Parquet is only available in HDFS and Native DFS Receiver.

Auto schema infers headers by comparing the first row of the file with other rows in the data set. If the first line contains only strings, and the other lines do not, auto schema assumes that the first row is a header row.
After the Schema is finalized, the next tab is configuration. Once you configure the Data Source, you can add notes and save the Data Source’s configuration.
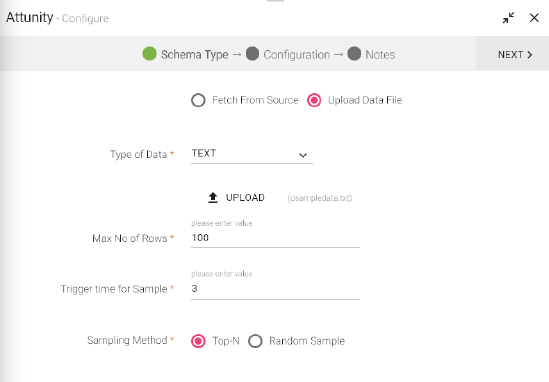
Configuring an Attunity Data Source
To add an Attunity Data Source into your pipeline, drag the Data Source to the canvas and right click on it to configure.
Under the Schema Type tab, select Fetch From Source or Upload Data File. Edit the schema if required and click next to Configure Attunity.
Configuring Attunity
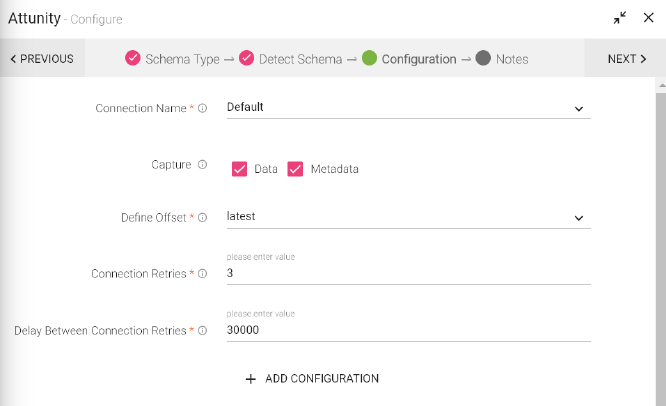
Configuration tab
|
Field |
Description |
|---|---|
|
Connection Name |
Connections are the Service identifiers. Select the connection name from the available list of connections, from where you would like to read the data. |
|
Capture |
Data: Flag to capture data Metadata: Flag to capture Metadata. You can select both the options too. |
|
Define Offset |
This configurations is similar to what is used for Kafka offset. • Latest: The starting point of the query is just from the latest offset. • Earliest: The starting point of the query is from the starting /first offset. |
|
Connection Retries |
The number of retries for component connection. Possible values are -1, 0 or any positive number. If the value were -1 then there would be infinite retries for infinite connection. |
|
Delay Between Connection Retries |
Retry delay interval for component connection. (In milliseconds.) |
|
Add Configuration |
To add additional custom Kafka properties in key-value pairs. |
Click on the add notes tab. Enter the notes in the space provided.
Configuring Data Topics and Metadata Topic tab.
Choose the topic names and their fields are populated which are editable. You can choose as many topics.
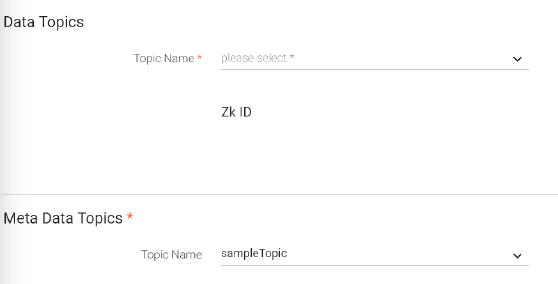
Choose the metadata topic and the topics’ fields are populated which are editable. You can only choose metadata of one Topic.
|
Field |
Description |
|---|---|
|
Topic Name |
Topic name from where consumer will read the messages. |
|
ZK ID |
Zookeeper path to store the offset value at per-consumer basis. An offset is the position of the consumer in the log. |
Click Done to save the configuration.
AWS-IoT and StreamAnalytix allows collecting telemetry data from multiple devices and process the data.
Note: Every action we perform on StreamAnalytix is reflected on AWS-IoT Wizard and vice versa.
Configuring AWS IoT
To add an IoT channel into your pipeline, drag the channel to the canvas and right click on it to configure.
Schema Type
Under the Schema Type tab, select Fetch From Source or Upload Data File.
Fetch from source takes you to Configuration of AWSIoT.
Upload Data File will take you to Detect Schema page.
Click on the add notes tab. Enter the notes in the space provided.
An Azure Blob Batch channel reads different formats of data in batch (json, csv, orc, parquet) from container. It can omit data into any emitter.
Configuring an Azure Blob Data Source
To add an Azure Blob Data Source into your pipeline, drag the Data Source to the canvas and right click on it to configure.
Under the Schema Type tab, you can Upload Data File and Fetch From Source.
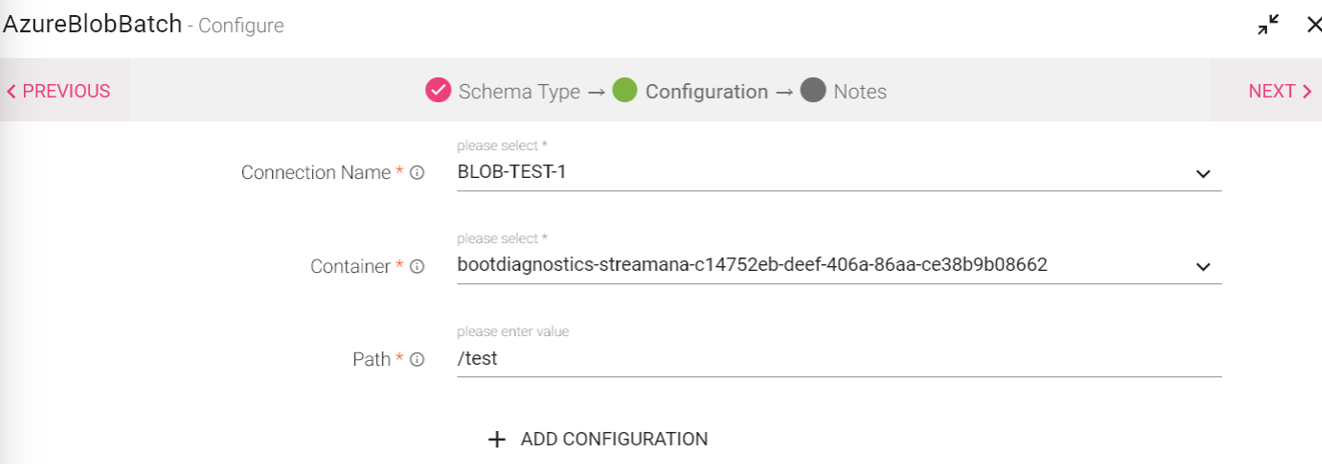
Configuration Tab:
|
Field |
Description |
|---|---|
|
Connection Name |
Select the connection name from the available list of connections, from where you would like to read the data. |
|
Container |
Container name in Azure Blob. |
|
Path |
End path with * in case of directory. For example :- outdir.*. For Absolute path :- outdir/filename |
|
Add Configuration |
To add additional custom properties in key-value pairs. |
Configure Pre-Action in Source
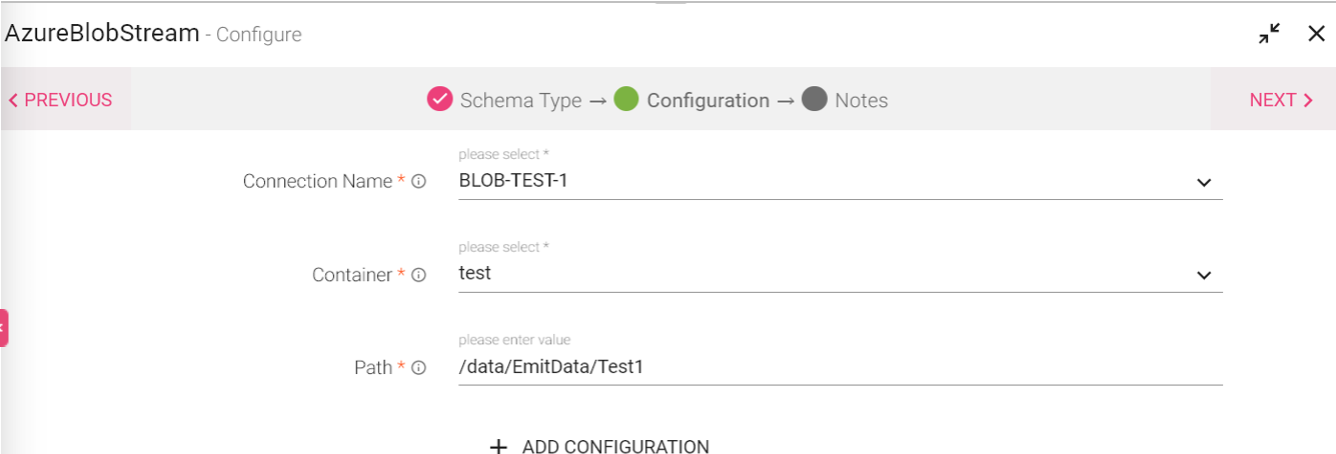
An Azure Blob Stream channel reads different formats of streaming data (json, csv, orc, parquet) from container and emit data into different containers.
Configuring an Azure Blob Data Source
To add an Azure Blob Data Source into your pipeline, drag the Data Source to the canvas and right click on it to configure.
Under the Schema Type tab, you can Upload Data File and Fetch From Source.
|
Field |
Description |
|---|---|
|
Connection Name |
Select the connection name from the available list of connections, from where you would like to read the data. |
|
Container |
Container name in Azure Blob. |
|
Path |
End path with * in case of directory. For example :- outdir/* Expecting any specific format in directory Path :- outdir/*.csv |
|
Add Configuration |
To add additional custom properties in key-value pairs. |
Configuration Tab:
Cosmos Channel can read data in Batches and emit data into an emitter.
On Cosmos Channel, you will be able to read from selected container of a Database in Batches. Also you would be able to read updated documents by specifying change-feed directory and using its options.
You can use custom query in case of Batch Channel without Change-feed.
NOTE: Both BatchCosmos and StreamCosmos works with Local Session and Job Submit mode as Spark-Submit does not work in case of Inspect Session as Livy and job submit mode as Livy. BatchCosmos, without Change-feed will only work with Inspect Session as Livy and Job Submit mode as Livy. Also, change-feed works during pipeline run.
Configuring a Batch Cosmos Data Source
To add a Batch Cosmos Data Source into your pipeline, drag the Data Source to the canvas and right click on it to configure.
Under the Schema Type tab, you can Upload Data File and Fetch From Source.
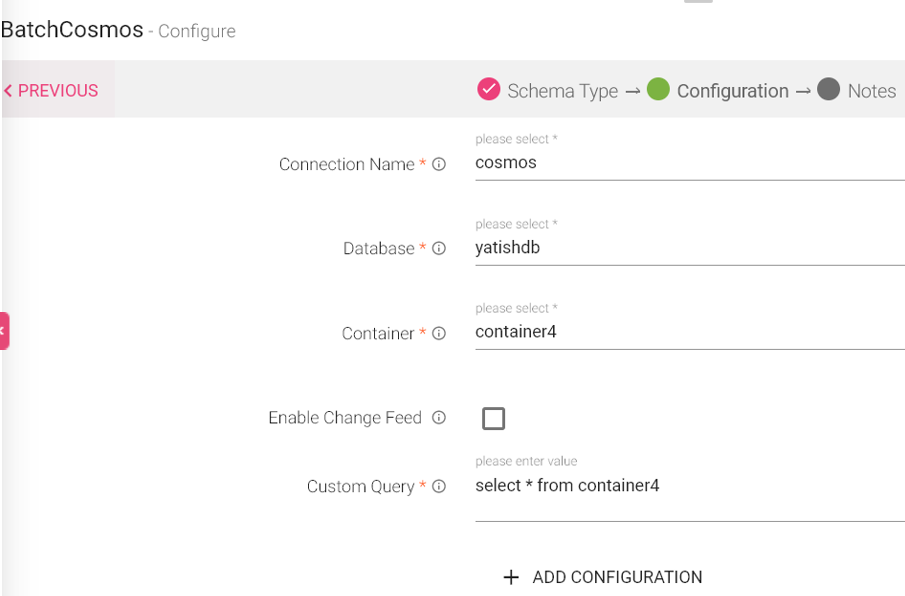
Configuration Tab:
|
Field |
Description |
|---|---|
|
Connection Name |
Select the connection name from the available list of connections, from where you would like to read the data. |
|
Database |
Cosmos Database. |
|
Container |
Container name in Cosmos. |
|
Enable Change Feed |
Change feed enables to read the latest records or changed records. Effect comes only during pipeline flow. |
|
Change Feed From Beginning |
If set to True, data will be read from beginning. |
|
CosmosDB Checkpoint Directory |
It is the file path where Cosmos stores the checkpoint data for Change feed. |
|
Add Configuration |
To add additional custom properties in key-value pairs. |
Configure Pre-Action in Source
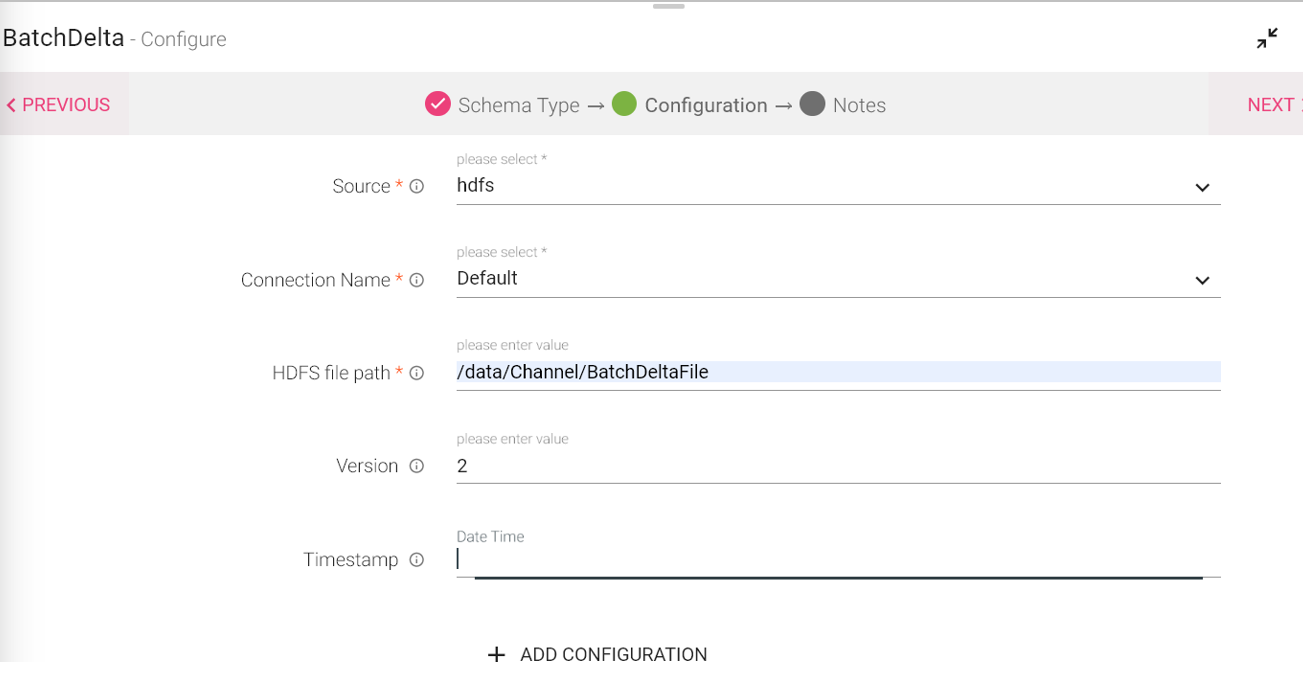
On Delta Lake Channel, you should be able to read data from delta lake table on S3, HDFS or DBFS. Delta Lake is an open-source storage layer that brings ACID transactions to Apache Spark™ and big data workloads. All data in Delta Lake is stored in Apache Parquet format. Delta Lake provides the ability to specify your schema and enforce it along with timestamps.
Configuring a Batch Delta Data Source
To add a Batch Delta Data Source into your pipeline, drag the Data Source to the canvas and right click on it to configure.
Under the Schema Type tab, you can Upload Data File and Fetch From Source.
Configuration Tab:
|
Field |
Description |
|---|---|
|
Source |
Source of the data. Options are HDFS, S3 and DBFS. |
|
Connection Name |
Select the connection name from the available list of connections, from where you would like to read the data. |
|
HDFS File Path |
File path of HDFS file system. |
|
Version |
The Delta Lake table enables you to keep track of the commit that took place in delta. This change get saved in .json file and if the changes committed are successful, it creates a version. That is the version you get to see here. Version input example : 1,2,( any integer) |
|
Timestamp |
Mention the date format as the following DD-MM-YYYY HH24:mm:ss |
|
Add Configuration |
To add additional custom properties in key-value pairs. |
Configure Pre-Action in Source
|
Field |
Description |
|---|---|
|
Type |
The type of thing you will register. |
|
Name |
Name of the thing. |
|
Attributes |
Attributes of associated thing type. |
Cassandra Data Source reads data from Cassandra cluster using specified keyspace name and table name.
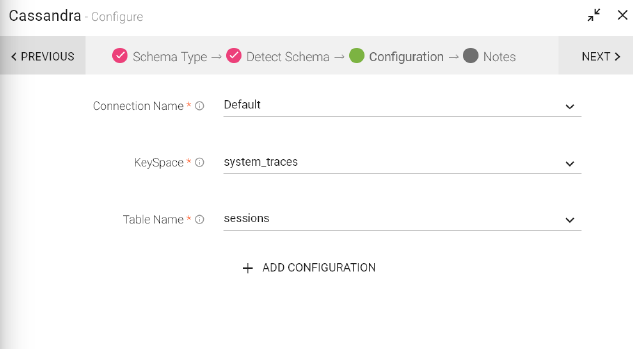
Configuring a Cassandra Data Source
To add a Cassandra Data Source into your pipeline, drag the Data Source to the canvas and right click on it to configure.
Under the Schema Type tab, you can Upload Data File and Fetch From Source.
Configuration Tab:
|
Field |
Description |
|---|---|
|
Connection Name |
Select the connection name from the available list of connections, from where you would like to read the data. |
|
Keyspace |
Cassandra keyspace name. |
|
Table Name |
Table name inside the keyspace from where we read data. |
|
Add configuration |
To add additional custom properties in key-value pairs. |
Note: Casandra keyspace name and table name should exist in the Cassandra cluster.
Configure Pre-Action in Source
The CDC Data Source processes Change Data Capture (CDC) information provided by Oracle LogMiner redo logs from Oracle 11g or 12c.
CDC Data Source processes data based on the commit number, in ascending order. To read the redo logs, CDC Data Source requires the LogMiner dictionary.
Follow the Oracle CDC Client Prerequisites, before configuring the CDC Data Source.
Oracle CDC Client Prerequisites
Before using the Oracle CDC Client Data Source, complete the following tasks:
1.Enable LogMiner.
2.Enable supplemental logging for the database or tables.
3.Create a user account with the required roles and privileges.
4.To use the dictionary in redo logs, extract the Log Miner dictionary.
5.Install the Oracle JDBC driver.
LogMiner provides redo logs that summarize database activity. The Data Source uses these logs to generate records.
LogMiner requires an open database in ARCHIVELOG mode with archiving enabled. To determine the status of the database and enable LogMiner, use the following steps:
1. Log into the database as a user with DBA privileges.
2. Check the database logging mode:
|
select log_mode from v$database; |
If the command returns ARCHIVELOG, you can skip to Task 2.
If the command returns NOARCHIVELOG, continue with the following steps:
3. Shut down the database.
|
shutdown immediate; |
4. Start up and mount the database:
|
startup mount; |
5. Configure enable archiving and open the database:
|
alter database archivelog;
alter database open; |
Task 2. Enable Supplemental Logging
To retrieve data from redo logs, LogMiner requires supplemental logging for the database or tables.
1.To verify if supplemental logging is enabled for the database, run the following command:
|
SELECT supplemental_log_data_min, supplemental_log_data_pk, supplemental_log_data_all FROM v$database; |
For 12c multi-tenant databases, best practice is to enable logging for the container for the tables, rather than the entire database. You can use the following command first to apply the changes to just the container:
|
ALTER SESSION SET CONTAINER=<pdb>; |
You can enable identification key or full supplemental logging to retrieve data from redo logs. You do not need to enable both:
To enable identification key logging
You can enable identification key logging for individual tables or all tables in the database:
• For individual tables
Use the following commands to enable minimal supplemental logging for the database, and then enable identification key logging for each table that you want to use:
|
ALTER DATABASE ADD SUPPLEMENTAL LOG DATA; ALTER TABLE <schema name>.<table name> ADD SUPPLEMENTAL LOG DATA (PRIMARY KEY) COLUMNS; |
• For all tables
Use the following command to enable identification key logging for the entire database:
To enable full supplemental logging
You can enable full supplemental logging for individual tables or all tables in the database:
• For individual tables
Use the following commands to enable minimal supplemental logging for the database, and then enable full supplemental logging for each table that you want to use:
|
ALTER DATABASE ADD SUPPLEMENTAL LOG DATA; ALTER TABLE <schema name>.<table name> ADD SUPPLEMENTAL LOG DATA (ALL) COLUMNS; |
• For all tables
Use the following command to enable full supplemental logging for the entire database:
|
ALTER DATABASE ADD SUPPLEMENTAL LOG DATA (ALL) COLUMNS; |
To submit the changes
|
ALTER SYSTEM SWITCH LOGFILE; |
Create a user account to use with the Oracle CDC Client Data Source. You need the account to access the database through JDBC.
Create accounts differently based on the Oracle version that you use:
Oracle 12c multi-tenant databases
For multi-tenant Oracle 12c databases, create a common user account. Common user accounts are created in cdb$root and must use the convention: c##<name>.
1.Log into the database as a user with DBA privileges.
2.Create the common user account:
|
ALTER SESSION SET CONTAINER=cdb$root;
CREATE USER <user name> IDENTIFIED BY <password> CONTAINER=all;
GRANT create session, alter session, set container, select any dictionary, logmining, execute_catalog_role TO <username> CONTAINER=all;
ALTER SESSION SET CONTAINER=<pdb>;
GRANT select on <db>.<table> TO <user name>; |
Repeat the final command for each table that you want to use.
When you configure the origin, use this user account for the JDBC credentials. Use the entire user name, including the "c##", as the JDBC user name.
Oracle 12c standard databases
For standard Oracle 12c databases, create a user account with the necessary privileges:
1.Log into the database as a user with DBA privileges.
2.Create the user account:
|
CREATE USER <user name> IDENTIFIED BY <password>;
GRANT create session, alter session, select any dictionary, logmining, execute_catalog_role TO <user name>;
GRANT select on <db>.<table> TO <user name>; |
Repeat the last command for each table that you want to use.
When you configure the Data Source, use this user account for the JDBC credentials.
Oracle 11g databases
For Oracle 11g databases, create a user account with the necessary privileges:
1.Log into the database as a user with DBA privileges.
2.Create the user account:
|
CREATE USER <user name> IDENTIFIED BY <password>;
GRANT create session, alter session, select any dictionary, logmining, execute_catalog_role TO <user name>; GRANT select on <db>.<table> TO <user name>; |
|
GRANT select on v$logmnr_parameters to <user name>;
GRANT select on v$archived_log to <user name>;
GRANT select on <db>.<table> TO <user name>; |
Repeat the final command for each table that you want to use.
When you configure the origin, use this user account for the JDBC credentials.
Task 4. Extract a Log Miner Dictionary (Redo Logs)
When using redo logs as the dictionary source, you must extract the Log Miner dictionary to the redo logs before you start the pipeline. Repeat this step periodically to ensure that the redo logs that contain the dictionary are still available.
Oracle recommends that you extract the dictionary only at off-peak hours since the extraction can consume database resources.
To extract the dictionary for Oracle 11g or 12c databases, run the following command:
|
EXECUTE DBMS_LOGMNR_D.BUILD(OPTIONS=> DBMS_LOGMNR_D.STORE_IN_REDO_LOGS); |
To extract the dictionary for Oracle 12c multi-tenant databases, run the following commands:
|
ALTER SESSION SET CONTAINER=cdb$root;
EXECUTE DBMS_LOGMNR_D.BUILD(OPTIONS=> DBMS_LOGMNR_D.STORE_IN_REDO_LOGS); |
The Oracle CDC Client origin connects to Oracle through JDBC. You cannot access the database until you install the required driver.
Note: JDBC Jar is mandatory for StreamAnalytix Installation and is stored in Tomcat Lib and StreamAnalytix third party folder.
The CDC Data Source processes Change Data Capture (CDC) information provided by Oracle LogMiner redo logs from Oracle 11g or 12c.
CDC Data Source processes data based on the commit number, in ascending order. To read the redo logs, CDC Data Source requires the LogMiner dictionary.
The Data Source can create records for the INSERT, UPDATE and DELETE operations for one or more tables in a database
To add a CDC Data Source into your pipeline, drag the processor to the canvas and right click on it to configure.
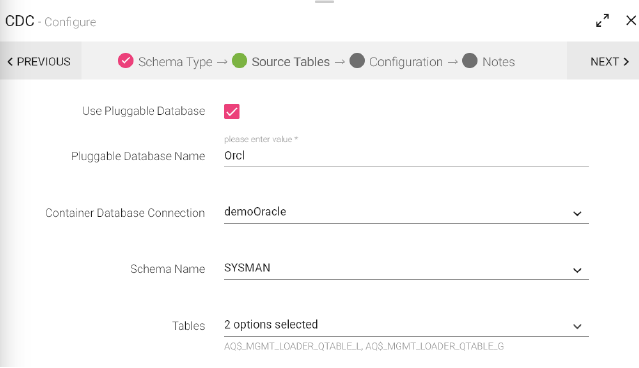
Source Tables:
To configure your schema, you can either use configured pluggable database or non-pluggable.
|
Field |
Description |
|---|---|
|
Use Pluggable Database |
Select the option for 12c multi-tenant databases. |
|
Pluggable Database Name |
Name of the pluggable database that contains the schema you want to use. Use only when the schema was created in a pluggable database. |
|
Container Database Connection |
Use the user account created for the Data Source. Common user accounts for Oracle. |
|
Schema Name |
Provide the schema name. |
|
Tables |
Tables on which data will be processed. |

|
Field |
Description |
|---|---|
|
Operations |
Operations for creating records. • INSERT • DELETE • UPDATE |
|
Database Time Zone |
Time zone of the database. When the database operates in a different time zone from Data Collector. |
|
Maximum Transaction Time |
Time in seconds to wait for changes for a transaction. Enter the longest period that you expect a transaction to require. Default is 60 seconds. |
|
LogMiner Session Window |
Time in seconds to keep a LogMiner session open. Set to larger than the maximum transaction length. Reduce when not using local buffering to reduce LogMiner resource use. Default is 7200 seconds. |
|
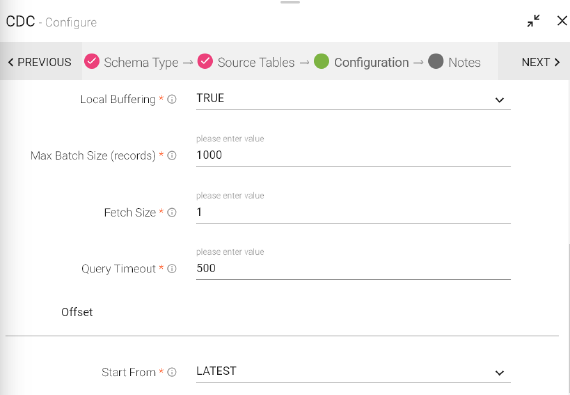
Local Buffering |
TRUE:- Using local buffers, the Data Source requests the transactions for the relevant tables and period. The Data Source buffers the resulting LogMiner redo SQL statements until it verifies a commit for a transaction. After seeing a commit, it parses and processes the committed data. The Data Source can buffer the redo SQL statements completely in memory. FALSE:- When using Oracle LogMiner buffers, the Data Source requests data from Oracle LogMiner for a particular period. LogMiner then buffers all transactions for that period for all tables in the database, rather than only the tables needed by the origin. |
|
Max Batch Size (records) |
Maximum number of records processed at one time. Keep values up to the Data Collector maximum batch size. Default is 1000. |
|
LogMiner Fetch Size |
Minimum number of records to fetch before passing a batch to the pipeline. Keep this value low to allow the origin to pass records to the pipeline as soon as possible, rather than waiting for a larger number of records to become available. Lower values can increase throughput when writes to the destination system are slow. Default is 1. |
|
Query Timeout |
Time to wait before timing out a LogMiner query. Default is 300 seconds. |
|
Start From |
Start from is the point in the LogMiner redo logs where you want to start processing. When you start the pipeline, Oracle CDC Client starts processing from the specified initial change and continues until you stop the pipeline. 1. From the latest change The origin processes all changes that occur after you start the pipeline.
2. From a specified datetime: The origin processes all changes that occurred at the specified datetime and later. Use the following format: DD-MM-YYYY HH24:mm:ss.
3. From a specified system change number (SCN) The origin processes all changes that occurred in the specified SCN and later. When using the specified SCN, the origin starts processing with the timestamps associated with the SCN. If the SCN cannot be found in the redo logs, the origin continues reading from the next higher SCN that is available in the redo logs. |
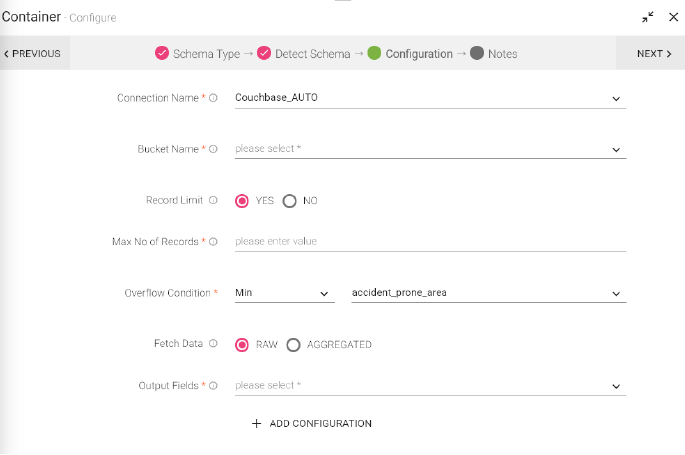
The container Data Source is used to read the data from Couchbase. This Data Source is used as a caching container which read both the aggregated data and raw data from the bucket.
Configuring a Container Data Source
To add a Container Data Source into your pipeline, drag the Data Source to the canvas and right click on it to configure.
Under the Schema tab, you can Upload Data File and Fetch From Source.
Configuration Tab:
|
Field |
Description |
|---|---|
|
Load From Template |
Select the template from the list. Only those templates will be visible in the drop down list that are created globally or within that workspace. |
|
Sync With Source Template |
When a template is saved and is edited, this tab is reflected. If any change is made in source template, corresponding changes will reflect in Container’s configuration. |
|
Connection Name |
Name of the connection |
|
Bucket Name |
Couchbase Bucket name. Select the Couchbase bucket that gets generated with the Couchbase connection. You can also create a bucket and fetch details in the fields. |
|
Bucket password |
Couchbase Bucket password |
|
Memory Quota |
Memory Quota in megabytes per server node. Memory Quota cannot be less than 100 MB. |
|
Replicate view indexes |
By checking the Replicate view indexes checkbox, you ensure that view indexes, as well as data are replicated |
|
Flush |
When flushed, all items in the bucket are removed as soon as possible. Note: This does not immediately show in item count statistics with memcached buckets. |
|
Record Limit |
Enable the limit to fetch the number of records from Couchbase. If you select it as Yes, the following tabs are populated, else, you can move to Fetch Data. |
|
Max no. of Records |
Maximum number of records to be fetched from the Couchbase bucket |
|
Overflow Condition |
Fetch the records based on order for the selected column. (Fetch minimum records for ascending order and fetch maximum records for descending order) Note: With aggregation, select the grouping field in the Overflow condition. |
|
Fetch Data |
Raw Data: Fetch the raw data from the Couchbase bucket. Aggregated Data: Fetch the aggregated data from the Couchbase. A new field is populated, where you can group the fields from the schema. |
|
Grouping Fields |
Field of selected message on which group by is applied. |
|
Fields |
Apply functions on the input and output fields. |
Click on the NEXT button. An option to Save as Template will be available. Add notes in the space provided and click on Save as Template
Choose the scope of the Template (Global or Workspace) and Click Done for saving the Template and configuration details.
Configure Pre-Action in Source
Custom Data Source allows you to read data from any data source.
You can write your own custom code to ingest data from any data source and build it as a custom Data Source. You can use it in your pipelines or share it with other workspace users.
Create a jar file of your custom code and upload it in a pipeline or as a registered component utility.
To write a custom code for your custom Data Source, follow these steps:
2. Download the Sample Project. (Available on the home page of Data Pipeline).
Import the downloaded Sample project as a maven project in Eclipse. Ensure that Apache Maven is installed on your machine and that the PATH for the same is set on the machine.
3.Implement your custom code and build the project. To create a jar file of your code, use the following command: mvn clean install –DskipTests.

For a Custom Data Source, add your custom logic in the implemented methods of the classes as mentioned below:
High-level abstraction
If you want high level, abstraction using only Java code, then extend BaseSource as shown in SampleCustomData Source class
com.yourcompany.component.ss.Data Source.SampleCustomData Source which extends BaseSource
Methods to implement:
• public void init(Map<String, Object> conf)
• public List<String> receive()
• public void cleanup()
Low-level abstraction
If you want low-level implementation using spark API, then extend AbstractData Source as shown in SampleSparkSourceData Source class.
com.yourcompany.component.ss.Data Source.SampleSparkSourceData Source extends AbstractData Source
Methods to implement:
• public void init(Map<String, Object> conf)
• public Dataset<Row> getDataset(SparkSession spark)
• public void cleanup()
Configuring Custom Data Source
While uploading data you can also upload a Dataset in Custome Data Source
|
Field |
Description |
|---|---|
|
Data Source Plugin |
Fully qualified name of a custom code class. |
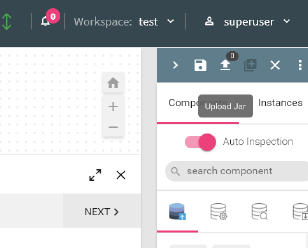
Upload the custom code jar from the Upload jar button from the pipeline designer page. You can use this Custom Data Source in any pipeline.
Step 4: Click Done to save the configuration.
Data Generator Data Source generates test data for testing your pipelines. Once the pipeline is tested with fields and their random data, you can replace the Data Generator Data Source.
Configuring Data Generator Data Source
To add a Data Generator Data Source into your pipeline, drag the Data Source to the canvas and right click on it to configure.
Under the Schema Type tab, you can only Upload Data File to this Data Source.
Configuration tab:
Upload Data:
You can upload a file, of either JSON or CSV format to test data.
Every row from the file is treated as single message.
Check the option repeat data, if you wish to continuously generate data from uploaded file.
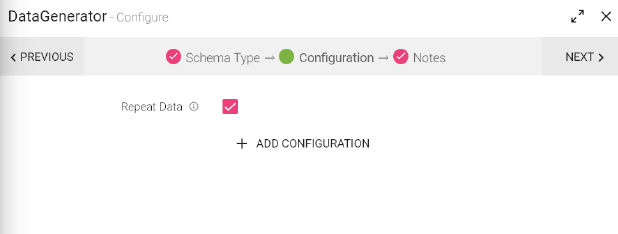
Click on the add notes tab. Enter the notes in the space provided. Click Done to save the configuration.
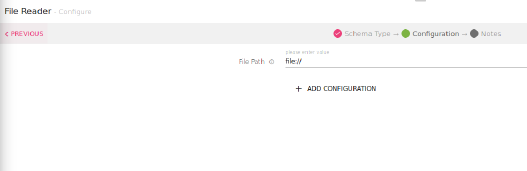
A local file data source allows you to read data from local file system. Local file System is File System where StreamAnalytix is deployed.
Note: File reader is for batch processing.
The Batch data can be fetched from source or you can upload the files.
Schema tab allows you to create a schema and the fields. On the Detect Schema tab, select a Data Source or Upload Data.
|
Field |
Description |
|---|---|
|
File Path |
The local file path from where the data will be read. |
Click NEXT to detect schema from the File Path file. Click Done to save the configuration.
Configure Pre-Action in Source
This is a Batch component.
To add a HDFS Data Source into your pipeline, drag the Data Source to the canvas and right click on it to configure.
Detect Schema tab allows you to create a schema and the fields. On the Detect Schema tab, select a Data Source or Upload Data.
For an HDFS Data Source, if data is fetched from the source, and the type of data is CSV, the schema has an added tab, Is Header Included in source
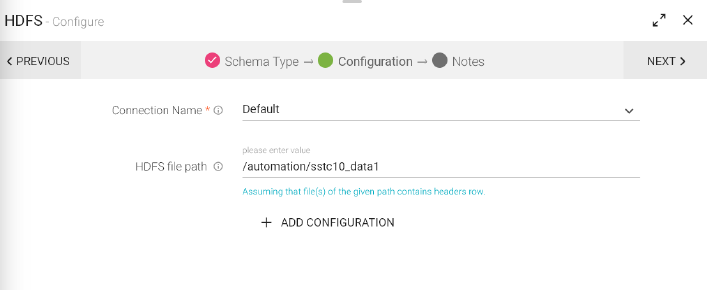
Configuration Tab
|
Field |
Description |
|---|---|
|
Connection Name |
Connections are the Service identifiers. Select the connection name from the available list of connections, from where you would like to read the data. |
|
HDFS file Path |
HDFS path from where data is read. For Parquet, provide .parquet file path. |
Click on the Add Notes tab. Enter the notes in the space provided.
Click Done to save the configuration.
Configure Pre-Action in Source
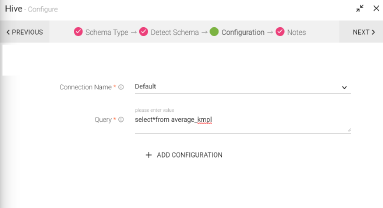
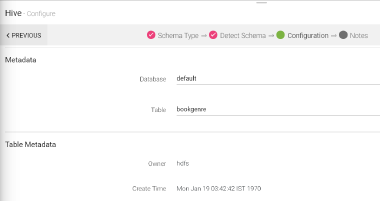
To use a Hive Data Source, select the connection and specify a warehouse directory path.
Note: This is a batch component.
To add a Hive Data Source into your pipeline, drag the Data Source to the canvas and right click on it to configure.
Under the Detect Schema Type tab, select Fetch From Source or Upload Data File.
Configuring Hive Data Source
|
Field |
Description |
|---|---|
|
Message Type |
Single: If only one type of message will arrive on the Data Source. Multi: If more than one type of message will arrive on the Data Source. |
|
Message Type |
Select the message you want to apply configuration on. |
|
Field |
Description |
|---|---|
|
Connection Name |
Connections are the Service identifiers. Select the connection name from the available list of connections, from where you would like to read the data. |
|
Query |
Write a custom query for Hive. |
|
Refresh Table Metadata |
Spark hive caches the parquet table metadata and partition information to increase performance. It allows you to have an option to refresh table cache, to get the latest information during inspect. Also, this feature helps the most when there are multiple update and fetch events, in the inspect session. Refresh Table option also repairs and sync partitioned values into Hive metastore. This allows to process the latest value while fetching data during inspect or run. |
|
Table Names |
User can specify single or multiple table names to be refreshed. |
After the query, Describe Table and corresponding Table Metadata, Partition Information, Serialize and Reserialize Information is populated.
Make sure that the query you run matches with the schema created with Upload data or Fetch from Source.
Click Done to save the configuration.
Configure Pre-Action in Source
Through HTTP Data Source, you can consume different URI and use that data as datasets in pipeline creation.
For example, there is a URL which returns the list of employees in JSON, TEXT or CSV format. You can consume this URL through HTTP Channel and use it as dataset for performing operations.
Configuring HTTP Data Source.
To add a HTTP into your pipeline, drag the Data Source to the canvas and right click on it to configure.
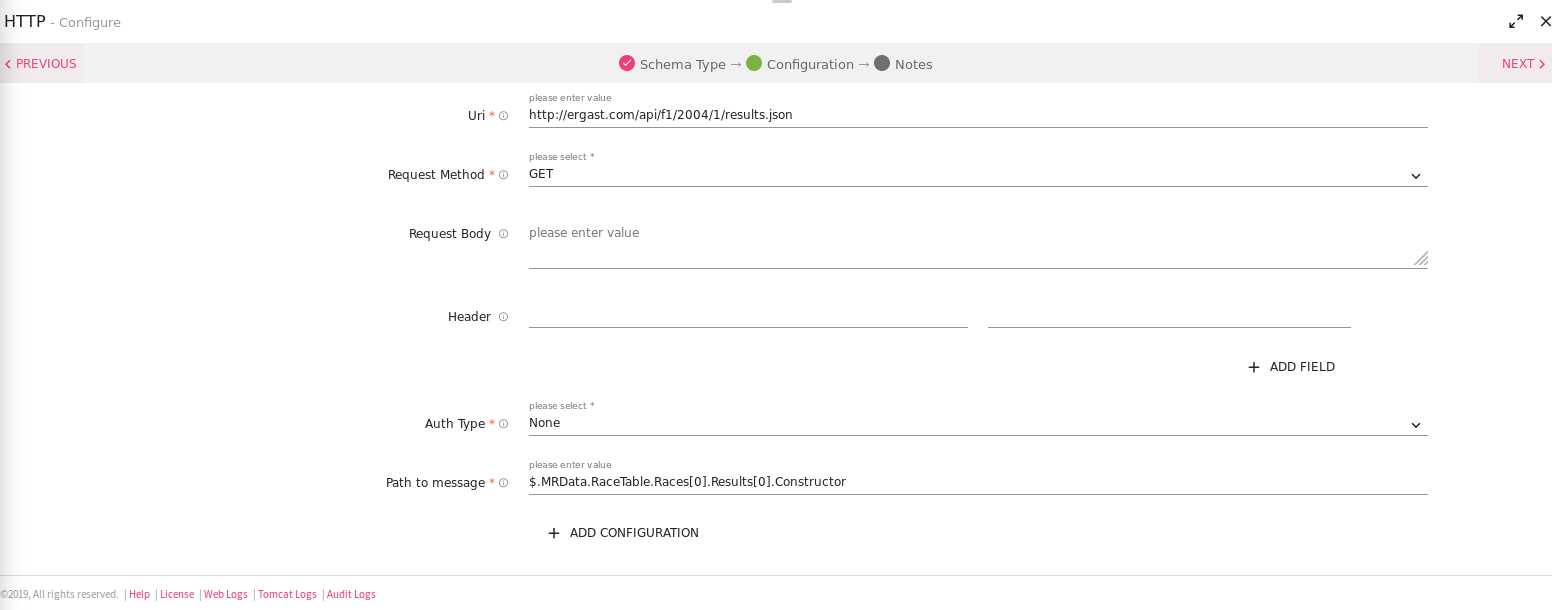
|
Field |
Description |
|---|---|
|
URI |
HTTP or HTTPS URL to fetch data. |
|
Request Method |
HTTP request method- GET, POST. |
|
Request Body |
Request body for method. |
|
Header |
Header’s parameter name and value. |
|
Accept Type |
Content type that URI accepts. For example: JSON, CSV and Text. |
|
Auth Type |
Used to specify the authorization type associated with the URL. Includes None, Basic, Token and Oauth2 as authorization types. All the types are explained below in detail. |
|
Path to message |
JSON path expression to be evaluated to get input data as per message.Works only for Fetch From source as Json |
1. None
This option specify that URL can be accessed without any authentication.
2. Basic
This option specify that accessing URL requires Basic Authorization. Provide user name and password for accessing the URL.
|
User name |
Enter the user name for accessing the URL. |
|
Password |
Enter the password for accessing the URl. |
3. Token Based
Token-based authentication is a security technique that authenticates the users who attempts to log in to a server, a network, or other secure system, using a security token provided by the server
|
Token ID |
Key with which token is referred in request. |
|
Token |
Token which is provided in order to access the URL. |
4. OAuth2
Oauth2 is an authentication technique in which application gets a token that authorizes access to the user's account.
|
AuthURL |
The endpoint for authorization server, which retrieves authorization code. |
|
ClientId |
Client ID identifier, given to client during application registration process |
|
Secret Key |
The secret key provided to the client during application registration process. |
|
Header |
Used to specify the headers associated with AuthUrl, through which authorization code is generated. |
Configure Pre-Action in Source
JDBC Channel supports Oracle, Postgres, MYSQL, MSSQL,DB2 connections. You can configure and test the connection with JDBC. This connection will allow you to extract the data from DB2 source into pipeline in batches after configuring JDBC channel.
Note: This is a batch component.
Prerequisite: Upload appropriate driver jar as per the RDBMS used in JDBC Data Source. Use the upload jar option.
For using DB2, create a successful DB2 Connection.
Configuring JDBC Data Source.
To add a JDBC into your pipeline, drag the Data Source to the canvas and right click on it to configure.
Under the Schema Type tab, select Fetch From Source or Upload Data File.
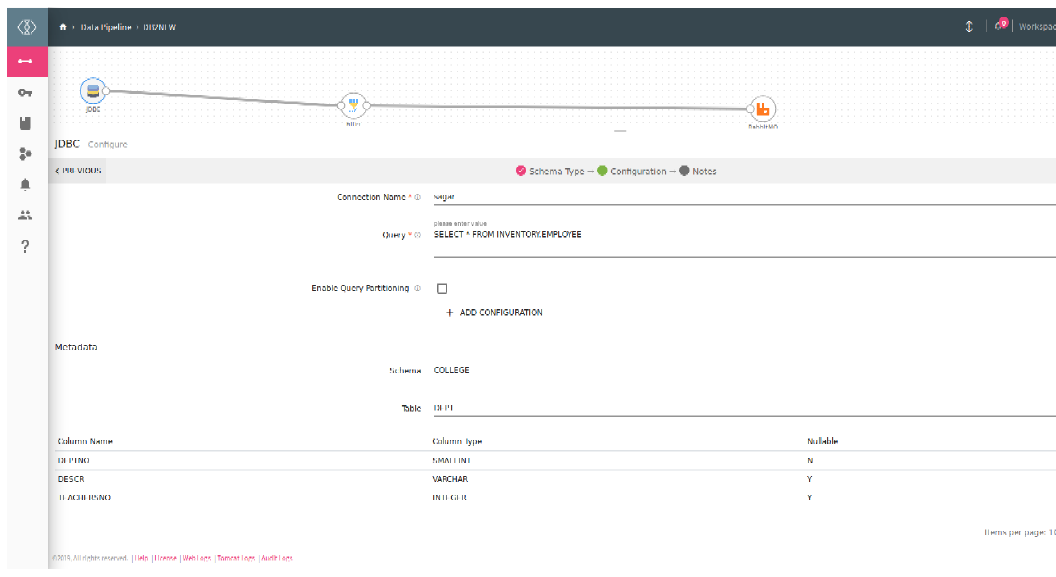
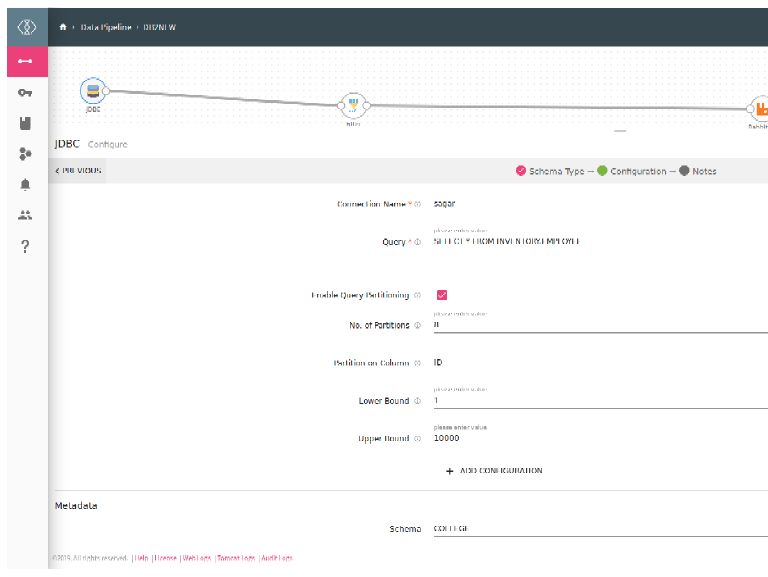
Configuration tab
|
Field |
Description |
|---|---|
|
Connection Name |
Connections are the Service identifiers. Select the connection name from the available list of connections for data ingestion. |
|
Query |
Write a custom query for JDBC |
|
Enable Query Partitioning |
Read parallel data from the running query. |
|
No. of Partitions |
Specifies no of parallel threads to be invoked to read from JDBC in spark. |
|
Partition on Column |
Partitioning column can be any column of type Integer, on which spark will perform partitioning to read data in parallel. |
|
Lower Bound/ Upper Bound |
Value of the lower bound for partitioning column/ Value of the upper bound for partitioning column |
Metadata
Enter the schema and select table. You can view Metadata of the tables.
|
Field |
Description |
|---|---|
|
Schema |
Schema name for which the list of table will be viewed. |
|
Table Name |
Select table of which you want to view Metadata. |
Once the Metadata is selected, Click Next and detect schema to generate the output with Sample Values.
Click Done to save the configuration.
Configure Pre-Action in Source
Under the Schema Type tab, select Fetch From Source or Upload Data File.
When fetch from source is chosen, the schema tab comes after the configuration, and when you upload data, the schema tab comes before configuration, as shown below:
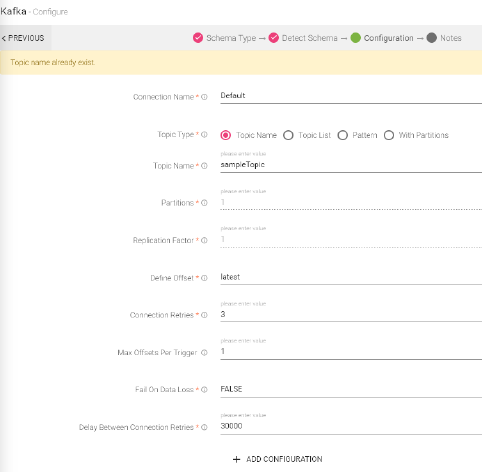
Configuring Kafka Data Source
|
Field |
Description |
|---|---|
|
Connection Name |
Connections are the Service identifiers. Select the connection name from the available list of connections, from where you would like to read the data. |
|
Topic Type |
Select one of the below option to fetch the records from Kafka topic(s) • Topic name: The topic name is used to subscribe a single topic • Topic list: The topic list is used to subscribe a comma-separated list of topics • Pattern: The pattern is used to subscribe to topic values as Java regex: • With Partitions80: The topic with partitions is used for specific topic(s) partitions to consume. i.e. json string {"topicA":[0,1],"topicB":[2,4]}
Schema must be same in case of Topic List/Pattern/With partition. |
|
Topic Name |
Topic in Kafka from where messages will be read. |
|
Topic List/ Pattern/ With partitions |
A topic is category or feed name to which messages will be published |
|
Partitions |
Number of partitions. Each partition is an ordered unchangeable sequence of message that is repeatedly added to a commit log. |
|
Replication Factor |
Number of replications. Replication provides stronger durability and higher availability. For example, a topic with replication factor N can tolerate up to N-1 server failures without losing any messages committed to the log. |
|
Define Offset |
Following configurations are used for Kafka offset. • Latest: The starting point of the query is just from the latest offset. • Earliest: The starting point of the query is from the starting /first offset. • Custom: A json string specifying a starting and ending offset for each partition. • startingOffsets: A JSON string specifying a starting offset for each partition i.e. {"topicA":{"0":23,"1":-1},"topicB":{"0":-1}} • endingOffsets: A JSON string specifying a ending offset for each partition. This is an optional property with default value “latest”.i.e. {"topicA":{"0":23,"1":-1},"topicB":{"0":-1 |
|
Connection Retries |
The number of retries for component connection. Possible values are -1, 0 or any positive number. If the value is -1 then there would be infinite retries for infinite connection. |
|
Max Offset Per Trigger |
Rate limit on maximum number of offsets processed per trigger interval. The specified total number of offsets will be proportionally split across topic Partitions of different volume. |
|
Fail on Data Loss |
Provides option of query failure in case of data loss. (For example, topics are deleted, or offsets are out of range). This may be a false alarm. You can disable it when it doesn't work as you expected. Batch queries will always fail, if it fails to read any data from the provided offsets due to data loss |
|
Delay Between Connection Retries |
Retry delay interval for component connection (in milliseconds). |
|
ADD CONFIGURATION |
To add additional custom Kafka properties in key-value pairs. |
Click on the Add Notes tab. Enter the notes in the space provided.
Click Done to save the configuration.
Kinesis Data Source allows you to fetch data from Amazon Kinesis stream.
Configuring Kinesis Data Source
Under the Schema Type tab, select Upload Data File.
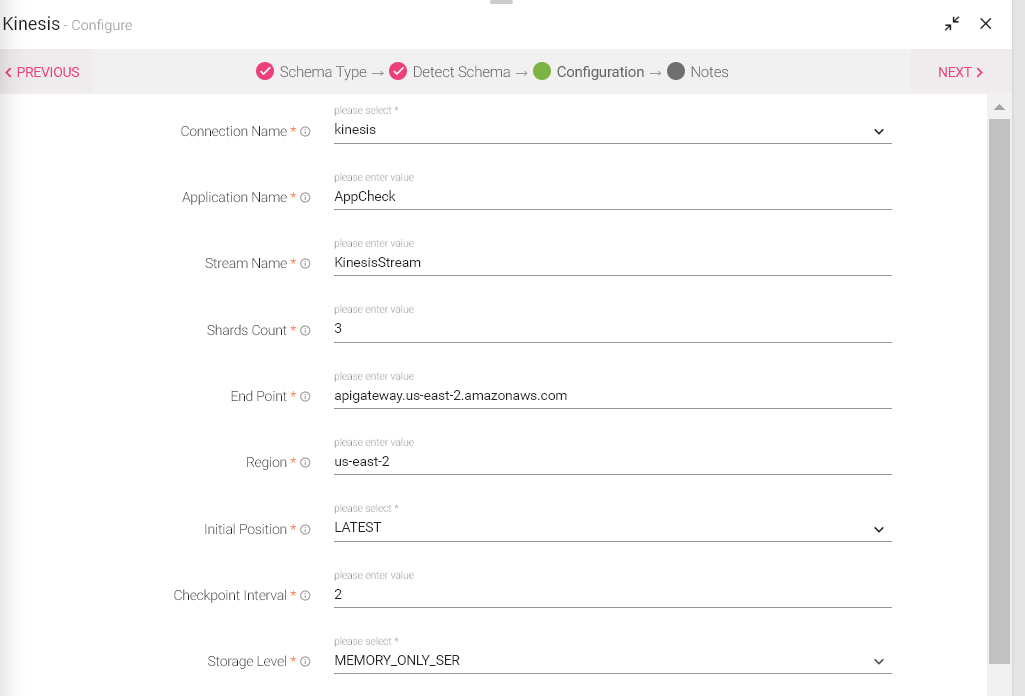
|
Field |
Description |
|---|---|
|
Connection Name |
Connections are the Service identifiers. Select the connection name from the available list of connections, from where you would like to read the data. |
|
Application Name |
Name of the application for check pointing. |
|
Stream Name |
Name of the Kinesis stream. |
|
Shards Count |
Number of shards required to create the stream, if the stream is not already present. |
|
EndPoint |
End point is a URL that is the entry point of Kinesis services. |
|
Region |
Name of the region. For example, us-west-2 |
|
Initial Position |
In the absence of Kinesis checkpoint, this is the workers initial starting position in the stream. • The values are either the beginning of stream per Kinesis limit of 24 hours or the tip of the stream. • TRIM_HORIZON: To read data from beginning of stream, use the command TRIM_HORIZON. • LATESOpenness To read latest or most recent records, use the command LATEST. |
|
Checkpoint Interval |
Checkpoint interval for Kinesis check pointing. This allows the system to recover from failures and continue processing where the Stream left off. |
|
Storage Level |
Flag for controlling the storage.
• MEMORY_ONLY • MEMORY_AND_DISK • MEMORY_ONLY_SER • MEMORY_AND_DISK_SER • MEMORY_ONLY_2 • MEMORY_AND_DISK_2 • DISK_ONLY • MEMORY_ONLY__SER_2 • DISK_ONLY_2 • MEMORY_AND_DISK_SER_2 |
|
Add configuration |
Additional properties can be added using Add Configuration link. |
Click on the Add Notes tab. Enter the notes in the space provided.
Click Done to save the configuration.
Apache Kudu is a column-oriented data store of the Apache Hadoop ecosystem. It enable fast analytics on fast (rapidly changing) data. The channel is engineered to take advantage of hardware and in-memory processing. It lowers query latency significantly from similar type of tools.
Configuring KUDU Data Source
To add a KUDU Data Source into your pipeline, drag the Data Source to the canvas and right click on it to configure.
Under the Schema Type tab, select Fetch From Source or Upload Data File.
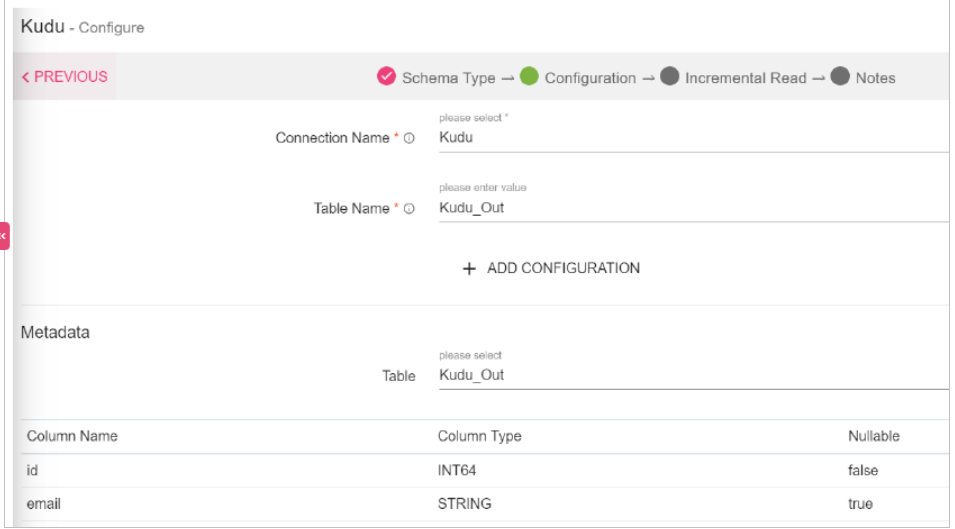
|
Field |
Description |
|---|---|
|
Connection Name |
Connections are the service identifiers. Select the connection name from the available list of connections, from where you would like to read the data. |
|
Table Name |
Name of the table. |
|
Add Configuration |
To add additional properties in key-value pairs. |
Metadata
Enter the schema and select table. You can view the Metadata of the tables.
|
Field |
Description |
|---|---|
|
Table |
Select table of which you want to view Metadata. |
|
Column Name |
Name of the column generated from the table. |
|
Column Type |
Type of the column, for example: Text, Int |
|
Nullable |
If the value of the column could be Nullable or not. |
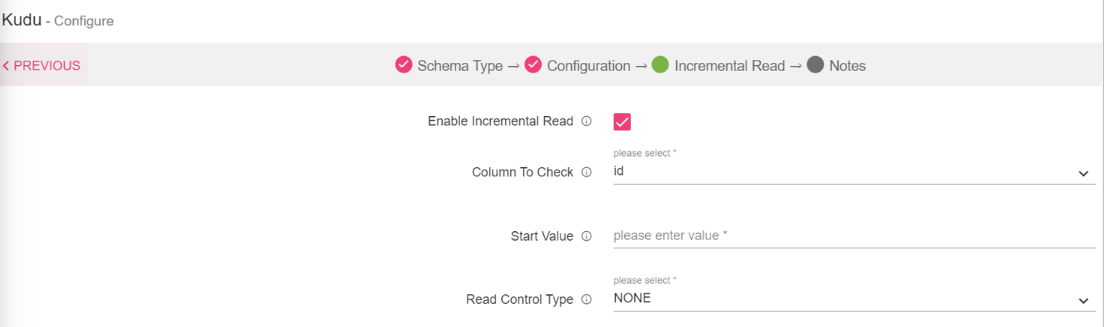
Once the Metadata is selected, Click Next and detect schema to generate the output with Sample Values. The next tab is Incremental Read.
Incremental Read
Enter the schema and select table. You can view the Metadata of the tables.
|
Field |
Description |
|---|---|
|
Enable Incremental Read |
Check this check-box to enable incremental read support. |
|
Column to Check |
Select a column on which incremental read will work. Displays the list of columns that has integer, long, date, timestamp, decimal types of values. |
|
Start Value |
Mention a value of the reference column, only the records whose value of the reference column is greater than this value will be read. |
|
Read Control Type |
Provides three options to control data to be fetched -None, Limit By Count, and Maximum Value. None: All the records with value of reference column greater than offset will be read. Limit By Count: Mentioned no. of records will be read with the value of reference column greater than offset will be read. Maximum Value: All the records with value of reference column greater than offset and less than Column Value field will be read. For None and Limit by count it is recommended that table should have data in sequential and sorted (increasing) order. |
Click on the Add Notes tab. Enter the notes in the space provided.
Click Done to save the configuration.
Configure Pre-Action in Source
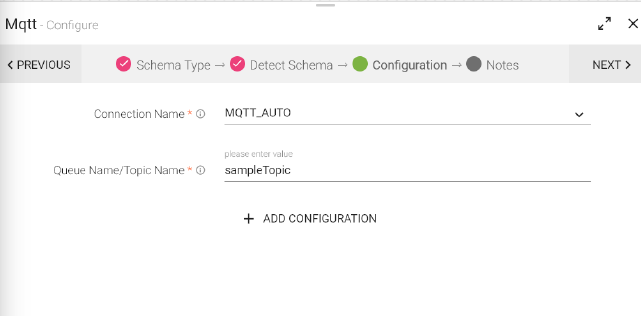
Mqtt Data Source reads data from Mqtt queue or topic.
Configuring Mqtt Data Source
To add a MQTT Data Source into your pipeline, drag the Data Source to the canvas and right click on it to configure.
Under the Schema Type tab, select Fetch From Source or Upload Data File.
|
Field |
Description |
|---|---|
|
Connection Name |
Connections are the service identifiers. Select the connection name from the available list of connections, from where you would like to read the data. |
|
QueueName/TopicName |
Queue/topic name from which messages will be read. |
|
Add Configuration |
To add additional properties in key-value pairs. |
Click on the Add Notes tab. Enter the notes in the space provided.
Click Done to save the configuration.
This Data Source enables you to read data from HDFS. This is a streaming component.
For a NativeDFS Receiver Data Source, if data is fetched from the source, and the type of data is CSV, the schema has an added tab, Is Header Included in source.
This is to signify if the data that is fetched from source has a header or not.
If Upload Data File is chosen, then there is an added tab, which is Is Header included in Source. This signifies if the data is uploaded is included in source or not.
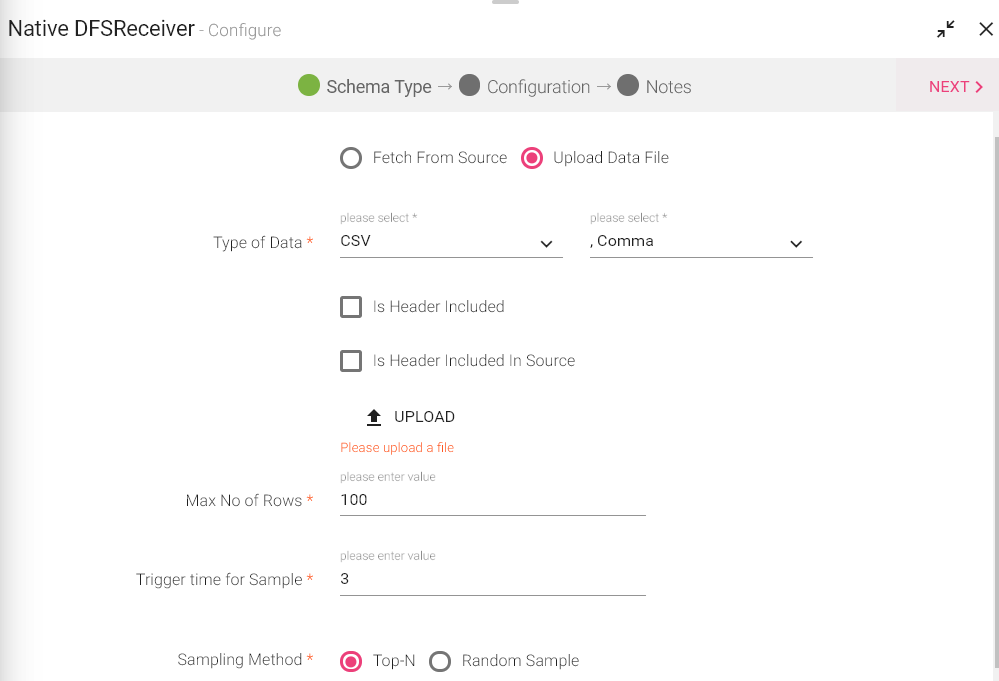
All the properties are same as HDFS.
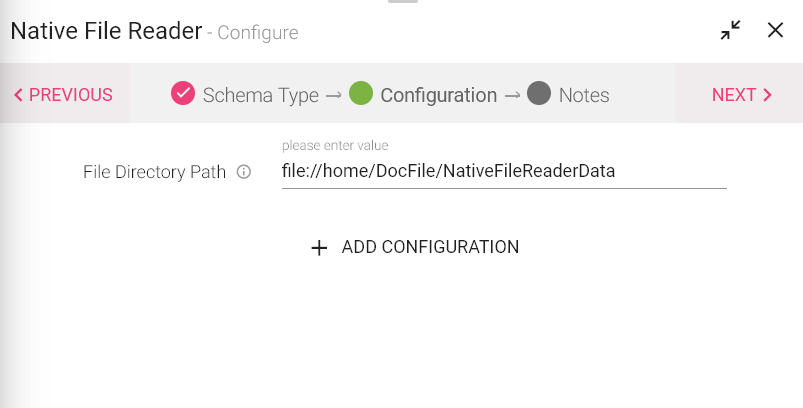
A Native File Reader Data Source allows you to read data from local file system. Local file System is the File System where StreamAnalytix is deployed.
Note: Native File reader is for Streaming processing.
Streaming data can be fetched from source or you can upload the files.
Detect Schema tab allows you to create a schema and the fields. On the Detect Schema tab, select a Data Source or Upload Data.
|
Field |
Description |
|---|---|
|
File Path |
The local file path from where the data will be read. |
Click NEXT to detect schema from the File Path file. Click Done to save the configuration.
OpenJMS is a messaging standard that allows application components to create, send, receive and read messages.
OpenJMS Data Source reads data from OpenJMS queue or topic.
The JMS (Java Message Service) supports two messaging models:
1. Point to Point: Point-to-Point message producers are called senders and consumers are called receivers. They exchange messages by means of a destination called a queue: senders produce messages to a queue; receivers consume messages from a queue. What distinguishes point-to-point messaging is that only one consumer can consume a message.
2. Publish and Subscribe: Each message is addressed to a specific queue, and the receiving clients extract messages from the queues established to hold their messages. If no consumers are registered to consume the messages, the queue holds them until a consumer registers to consume them.
Configuring OpenJMS Data Source
To add an OpenJMS Data Source into your pipeline, drag the Data Source to the canvas and right click on it to configure.
Under the Schema Type tab, select Fetch From Source or Upload Data File.

|
Field |
Description |
|---|---|
|
Connection Name |
Connections are the Service identifiers.Select the connection name from the available list of connections, from where you would like to read the data |
|
Queue Name |
Directory path of HDFS file system. |
Click on the add notes tab. Enter the notes in the space provided. Click Done to save the configuration.
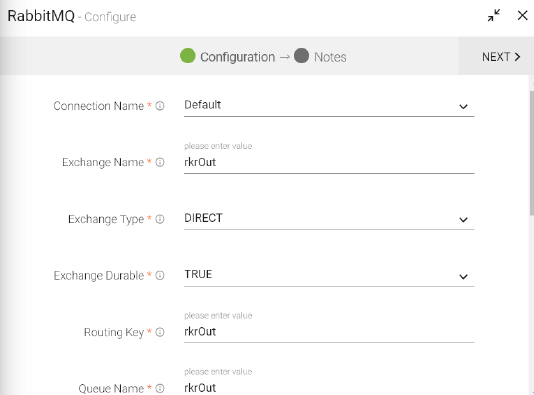
RabbitMQ Data Source reads messages from the RabbitMQ cluster using its exchanges and queues.
Configuring RabbitMQ Data Source
To add a RabbitMQ into your pipeline, drag the Data Source to the canvas and right click on it to configure.
Under the Schema Type tab, select Fetch From Source or Upload Data File.
|
Field |
Description |
|---|---|
|
Connection Name |
Connections are the Service identifiers. Select the connection name from the available list of connections, from where you would like to read the data. |
|
Exchange Name |
RMQ producers can only send messages to an exchange. The exchange pushes messages to queues from where consumers can read the message. |
|
Exchange Type |
Defines the functionality of the exchange i.e., how messages are routed through it. Exchange types: DIRECT, TOPIC and FANOUT. |
|
Exchange Durable |
Durable exchanges remain active when a server restarts. Non-durable exchanges (transient exchanges) are purged when a server restarts. |
|
Exchange Auto Delete |
If you set this to True, the exchange is deleted when all queues finish using it. |
|
Routing Key |
Identifies a key for redirecting messages to a specific topic. |
|
Queue Name |
Name of the queue where data will be published. |
|
Queue Durable |
Durable queues remain active when a server restarts. Non- durable queues (transient queues) are purged if/when a server restarts. |
|
Queue Auto Delete
|
If set, the queue is deleted when all the consumers finish using it. |
|
Add Configuration |
To add additional custom RabbitMQ properties in key-value pair. |
Click on the add notes tab. Enter the notes in the space provided.
Click Done to save the configuration.
RDS emitter allows you to write to RDS DB Engine, which could be through SSl or without ssl. RDS is Relational Database service on Cloud.
RDS Channel can read in Batch from the RDS Databases (Postgresql, MySql, Oracle, Mssql). RDS is Relational Database service on Cloud. The properties of RDS are similar to those of a JDBC Connector with one addition of SSL Security.
SSL Security can be enabled on RDS Databases.
System should be able to connect, read and write from SSL Secured RDS.
If security is enabled, it will be configured in Connection and automatically propagated to channel.
Please note: SSL Support is not available for Oracle.
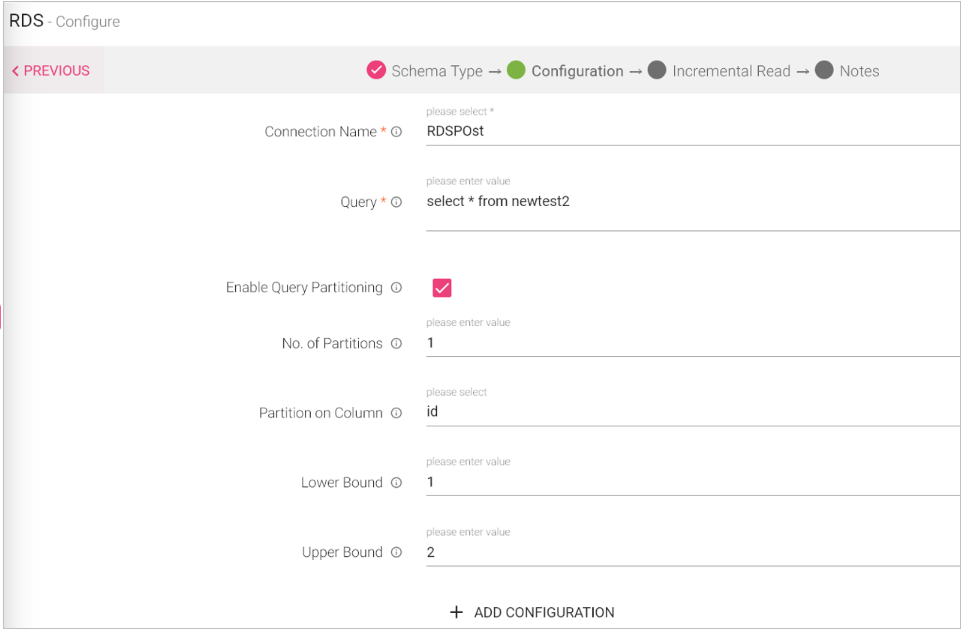
Configuring RDS Data Source.
To add a RDS Data Source into your pipeline, drag the Data Source to the canvas and right click on it to configure.
Under the Schema Type tab, select Fetch From Source or Upload Data File:
|
Field |
Description |
|---|---|
|
Connection Name |
Connections are the Service identifiers. Select the connection name from the available list of connections for data ingestion. |
|
Query |
Hive compatible SQL query to be executed in the component. |
|
Enable Query Partitioning |
Tables will be partitioned and loaded RDDs if this check-box is enabled. This enables parallel reading of data from the table. |
|
Number of Partitions |
Specifies no of parallel threads to be invoked to read from JDBC in spark. |
|
Partition on Column |
Partitioning column can be any column of type Integer, on which spark will perform partitioning to read data in parallel. |
|
Lower Bound/Upper Bound |
Value of the lower bound for partitioning column/Value of the upper bound for partitioning column. |
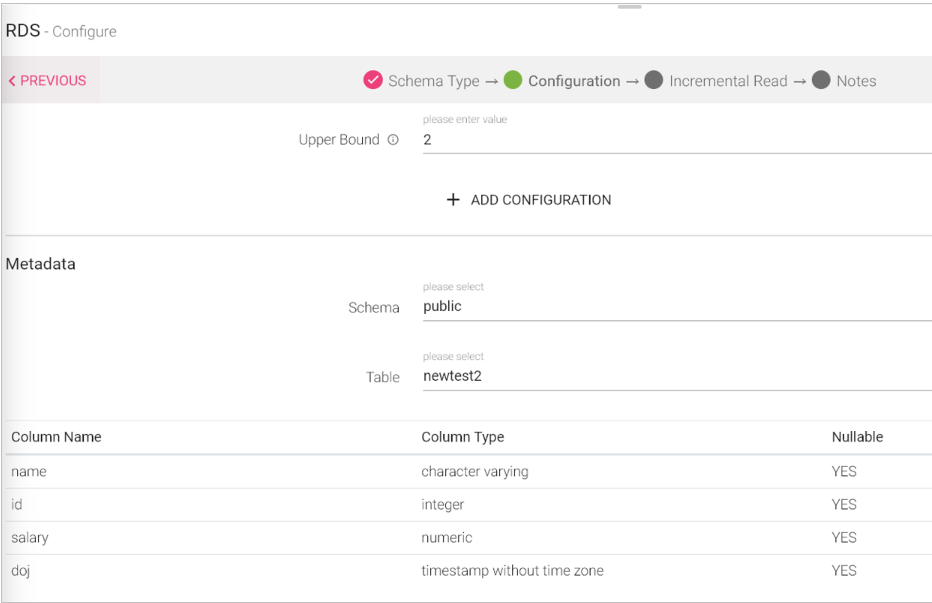
Metadata
Enter the schema and select table. You can view the Metadata of the tables.
|
Field |
Description |
|---|---|
|
Schema |
Schema name for which the list of table will be viewed. |
|
Table |
Select table of which you want to view Metadata. |
Once the Metadata is selected, Click Next and go to the Incremental Read tab.
Incremental Read
Enter the schema and select table. You can view the Metadata of the tables.
|
Field |
Description |
|---|---|
|
Enable Incremental Read |
Check this checkbox to enable incremental read support. |
|
Column to Check |
Select a column on which incremental read will work. Displays the list of columns that has integer, long, date, timestamp, decimal types of values. |
|
Start Value |
Mention a value of the reference column, only the records whose value of the reference column is greater than this value will be read. |
|
Read Control Type |
Provides three options to control data to be fetched -None, Limit By Count, and Maximum Value. None: All the records with value of reference column greater than offset will be read. Limit By Count: Mentioned no. of records will be read with the value of reference column greater than offset will be read. Maximum Value: All the records with value of reference column greater than offset and less than Column Value field will be read. For None and Limit by count it is recommended that table should have data in sequential and sorted (increasing) order. |
Amazon Redshift is a fully managed, petabyte-scale data warehouse service in the cloud.
Note: This is a batch component.
Configuring RedShift Data Source.
To add a Redshift Data Source into your pipeline, drag the Data Source to the canvas and right click on it to configure.
Under the Schema Type tab, select Fetch From Source or Upload Data File.
|
Field |
Description |
|---|---|
|
Message Type |
Single: If only one type of message will arrive on the Data Source. Multi: If more than one type of message will arrive on the Data Source. |
|
Message Name |
Select the message you want to apply configuration on. |
|
Field |
Description |
|---|---|
|
Connection Name |
Connections are the service identifiers. Select the connection name from the available list of connections, from where you would like to read the data. |
|
Query |
Write a valid query for RedShift |
|
Enable Query Partitioning |
Enable Redshift to read parallel data from a running query. |
|
No. of Partitions |
Specifies number of parallel threads to be invoked to read from RedShift in Spark. |
|
Partition on Columns
|
Partitioning column is applied on column of Integer type. Spark performs partitioning to read data in parallel. |
|
Lower Bound |
Value of the lower bound for partitioning column |
|
Upper Bound |
Value of the upper bound for partitioning column |
Click Done to save the configuration.
Configure Pre-Action in Source
S3 Data Source reads objects from Amazon S3 bucket. Amazon S3 stores data as objects within resources called Buckets.
For an S3 Data Source, if data is fetched from the source, and the type of data is CSV, the schema has an added tab, Is Header Included in source.
This is to signify if the data that is fetched from source has a header or not.
If Upload Data File is chosen, then there is an added tab, which is Is Header included in Source. This signifies if the data is uploaded is included in source or not.
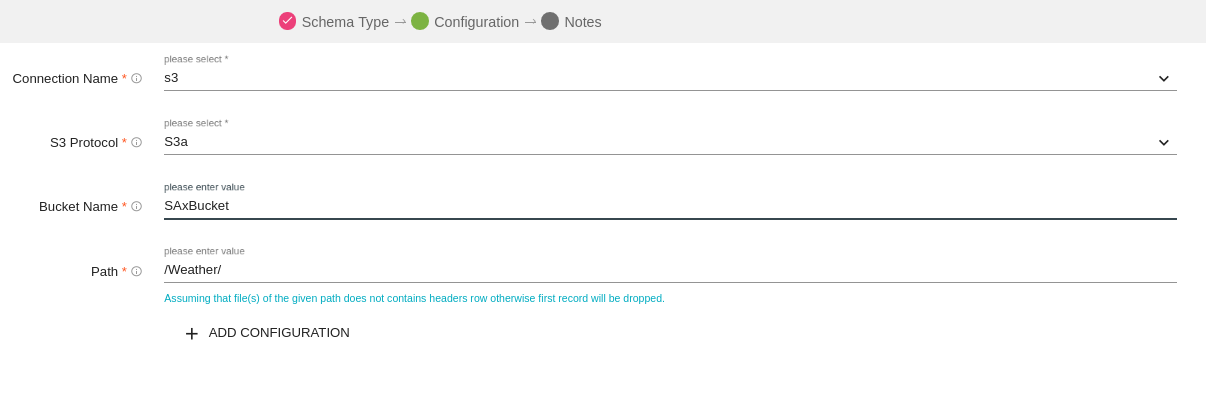
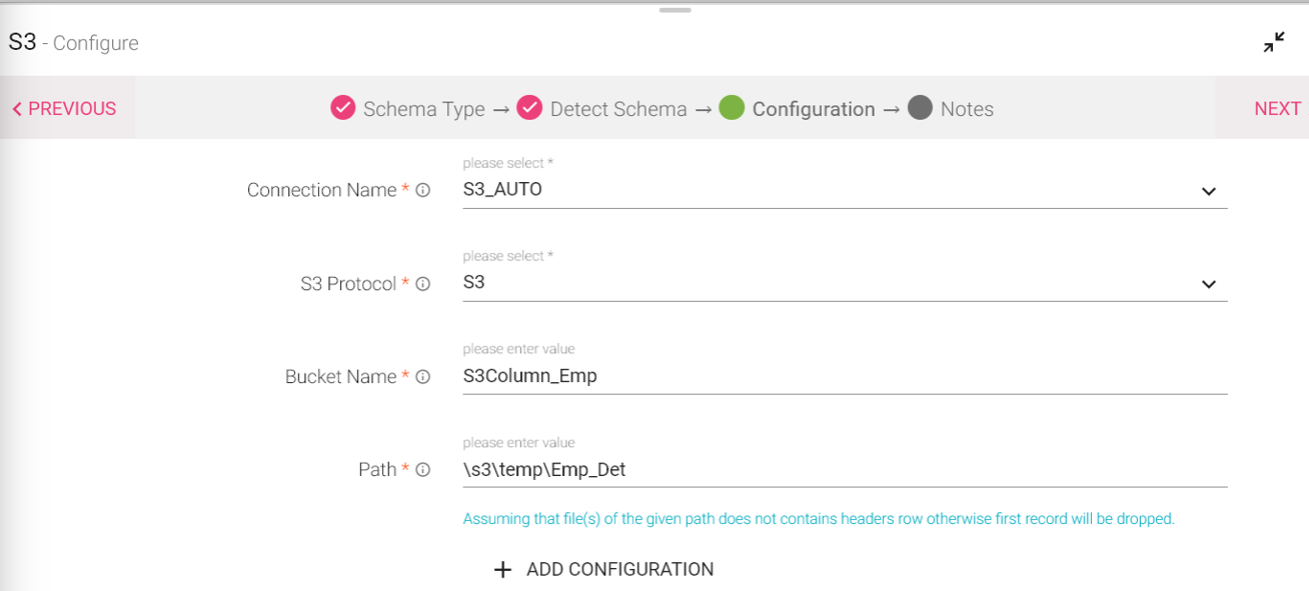
Configuring S3 Data Source
To add a S3 Data Source into your pipeline, drag the Data Source to the canvas and right click on it to configure.
Under the Schema Type tab, select Fetch From Source or Upload Data File.
|
Field |
Description |
|---|---|
|
Connection Name |
Connections are the Service identifiers. Select the connection name from the available list of connections, from where you would like to read the data. |
|
S3 Protocol |
Protocols available are S3, S3n, S3a |
|
Bucket Name |
Buckets are storage units used to store objects, which consists of data and meta-data that describes the data. |
|
Path |
File or directory path from where data is to be read. |
|
Add Configuration |
To add additional custom S3 properties in a key-value pair. |
Click on the add notes tab. Enter the notes in the space provided.
Click Done to save the configuration.
S3 Batch Channel can read data from S3 Buckets in incremental manner. Amazon S3 stores data as objects within resources called Buckets.
On a S3 Batch Channel you will be able to read data from specified S3 Bucket with formats like json, CSV, Text, Parquet, ORC. How it helps is only the files modified after the specified time would be read.
For an S3 Data Source, if data is fetched from the source, and the type of data is CSV, the schema has an added tab, Is Header Included in source.
This is to signify if the data that is fetched from source has a header or not.
If Upload Data File is chosen, then there is an added tab, which is Is Header included in Source. This signifies if the data is uploaded is included in source or not.
Configuring S3 Batch Data Source
To add a S3 Batch Data Source into your pipeline, drag the Data Source to the canvas and right click on it to configure.
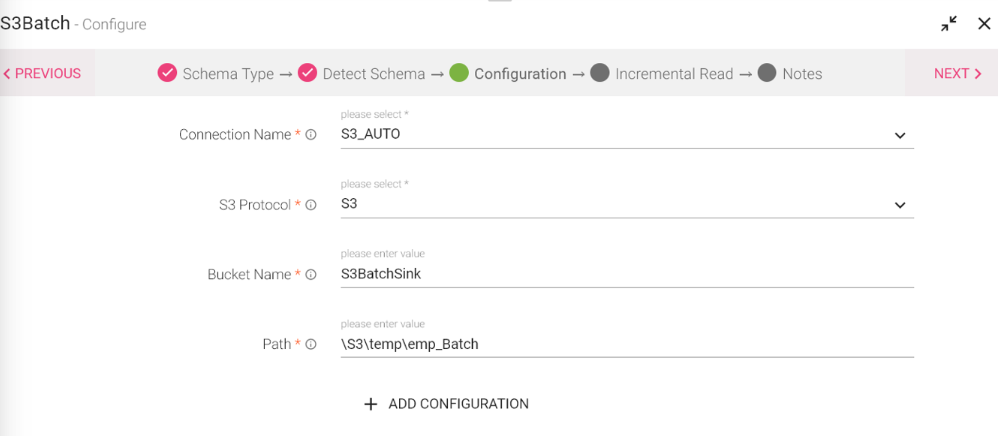
Configuring S3 Data Source
To add a S3 Data Source into your pipeline, drag the Data Source to the canvas and right click on it to configure.
Under the Schema Type tab, select Fetch From Source or Upload Data File.
|
Field |
Description |
|---|---|
|
Connection Name |
Connections are the Service identifiers. Select the connection name from the available list of connections, from where you would like to read the data. |
|
S3 Protocol |
Available protocols of S3 are S3, S3n, S3a. S3a protocol is supported by Databricks. S3 and S3n are supported by EMR. S3a is supported by Hadoop Version 3.x. S3 and S3n protocol is supported by Hadoop Version below 3.x. |
|
Bucket Name |
Buckets are storage units used to store objects, which consists of data and meta-data that describes the data. |
|
Path |
File or directory path from where data is to be read. |
|
Enable Incremental Read |
NOTE: Incremental Read works during Pipeline run. |
|
Offset |
Specifies last modified time of file - all the files whose last modified time is greater that this value will be read. |
|
Add Configuration |
To add additional custom S3 properties in a key-value pair. |
Configuration Tab
Click on the add notes tab. Enter the notes in the space provided.
Click Done to save the configuration.
Configure Pre-Action in Source
Parse Salesforce data from the source itself or import a file in either data type format except Parquet. Salesforce channel allows to read Salesforce data from an Salesforce account. Salesforce is a top-notch CRM application built on the Force.com platform. It can manage all the customer interactions of an organization through different media, like phone calls, site email inquiries, communities, as well as social media. This is done by reading Salesforce object specified by Salesforce Object Query Language.
However there are a few pre-requisites to the same.
First is to create a Salesforce connection and for that you would require the following:
l A valid Salesforce accounts.
l User name of Salesforce account.
l Password of Salesforce account.
l Security token of Salesforce account.
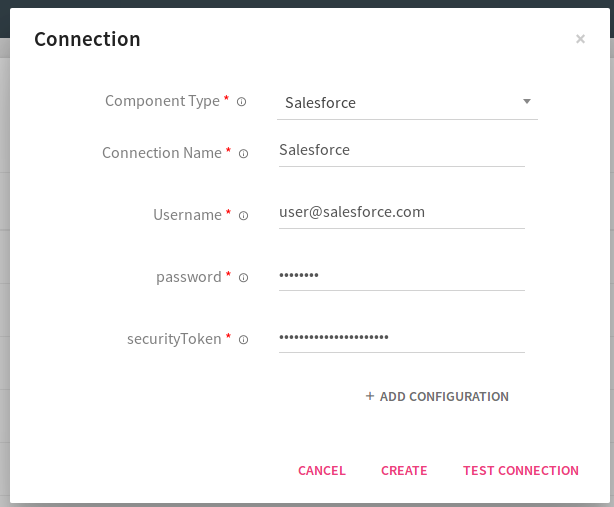
Configuring Salesforce Data Source
To add a Salesforce Data Source into your pipeline, drag the Data Source to the canvas and right click on it to configure.
Under the Schema Type tab, select Fetch from Source or Upload Data File
Now, select a Salesforce connection and write a query to fetch any Salesforce object. Then provide an API version.
|
Field |
Description |
|---|---|
|
Connection Name |
Select the Salesforce connection. |
|
Query |
Use the Salesforce Object Query Language (SOQL) to search your organization’s Salesforce data for specific information. SOQL is similar to the SELECT statement in the widely used Structured Query Language (SQL) but is designed specifically for Salesforce data. |
|
Infer Schema |
(Optional) Inferschema from the query results. This will find the data type of the field specified in SOQL.This will work if number of records are 5 or greater. |
|
Bulk |
(Optional) Flag to enable bulk query. This is the preferred method when loading large sets of data. Bulk API is based on REST principles and is optimized for loading large sets of data. You can use it to query many records asynchronously by submitting batches. Salesforce will process batches in the background. Default value is false. |
|
Salesforce Object |
(Conditional) Salesforce Objects are database tables which permit you to store data specific to organization. This is mandatory parameter when bulk is true and must be same as specified in SOQL. |
|
Pk Chunking |
(Optional) Flag to enable automatic primary key chunking for bulk query job. This splits bulk queries into separate batches that of the size defined by chunkSize option. By default, false and the default chunk size is 100,000. PK Chunking feature can automatically make large queries manageable when using the Bulk API. PK stands for Primary Key — the object’s record ID — which is always indexed. This feature is supported for all custom objects, many standard objects, and their sharing tables. |
|
ChunkSize |
The size of the number of records to include in each batch. Default value is 100,000. This option can only be used when Pk Chunking is true. Maximum size is 250,000. |
|
Salesforce Object |
Salesforce Object to be updated. |
|
Date Format |
A string that indicates the format that follows java.text.SimpleDateFormat, when reading timestamps. This applies to Timestamp Type. By default, it is null which means it tries to parse timestamp by java.sql.Timestamp.valueOf() |
Configure Pre-Action in Source
The snowflake cloud-based data warehouse system can be used as a source/channel in StreamAnalytix for configuring ETL pipelines.
Configure the snowflake source by filling the below mentioned details:
|
Field |
Description |
|---|---|
|
Connection Name |
The user is required to select the Snowflake connection. |
|
Create Warehouse |
The user can create a new warehouse by selecting the check-box. The user will be required to upload the file to detect schema. Note: Upon selecting the create warehouse option, the user is required to mention the warehouse configuration details as shown in the below image. |
|
Warehouse Name |
The user is required to mention the warehouse name. The user can select a warehouse from the existing warehouse list displayed here. |
|
Schema Name |
Snowflake schema list of the database of the selected connection is to be mentioned here. Note: Upon selecting schema, the metadata of the table will be displayed. |
|
Query |
The user is required to write the Snowflake SQL query. |
|
Pre-Action Query |
A semicolon separated list of SQL commands that are executed before reading data. |
|
Post Action Query |
A semicolon separated list of SQL commands that are executed after reading data. |
|
Field |
Description |
|---|---|
|
Warehouse Size |
User will be required to select a warehouse size. |
|
Maximum Cluster Count |
The user will be required to specify the maximum number of clusters for the warehouse. |
|
Scaling Policy |
The user is required to mention the scaling policy. |
|
Auto Suspend |
The user is required to mention the value in seconds. |
|
Auto Resume |
Specifies whether to automatically resume a warehouse when a SQL statement (e.g. query) is submitted to it. |
|
Comments |
If needed, the user can mention specific comments. |

Configure Pre-Action in Source
Socket Data Source allows you to consume data from a TCP data source from a pipeline. Configure Schema type and choose a Socket connection to start streaming data to a pipeline.
Configuring Socket Data Source
To add a Socket Data Source into your pipeline, drag the Data Source to the canvas and right click on it to configure.
Under the Schema Type tab, select Fetch from Source or Upload Data File.
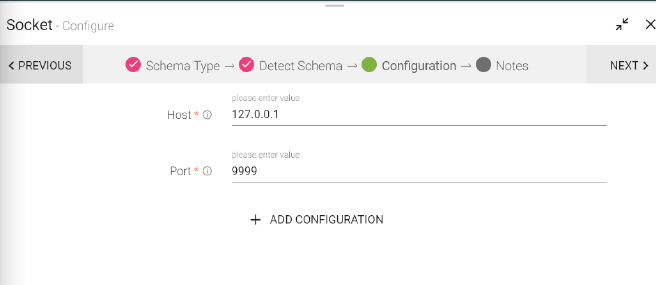
|
Field |
Description |
|---|---|
|
Connection Name |
Connections are the Service identifiers. Select the connection name from the available list of connections, from where you would like to read the data. |
|
Add Configuration |
To add additional custom properties in key-value pairs. |
Click on the add notes tab. Enter the notes in the space provided. Click Done to save the configuration.
VERTICA Channel supports Oracle, Postgres, MYSQL, MSSQL, DB2 connections.
You can configure and connect above mentioned DB-engines with JDBC. It allows you to extract the data from DB2 and other sources into your data pipeline in batches after configuring JDBC channel.
Note: This is a batch component.
Prerequisite: Upload appropriate driver jar as per the RDBMS used in JDBC Data Source. Use the upload jar option.
For using DB2, create a successful DB2 Connection.
Configuring a Vertica Data Source
To add a Vertica Data Source into your pipeline, drag the Data Source to the canvas and right click on it to configure.
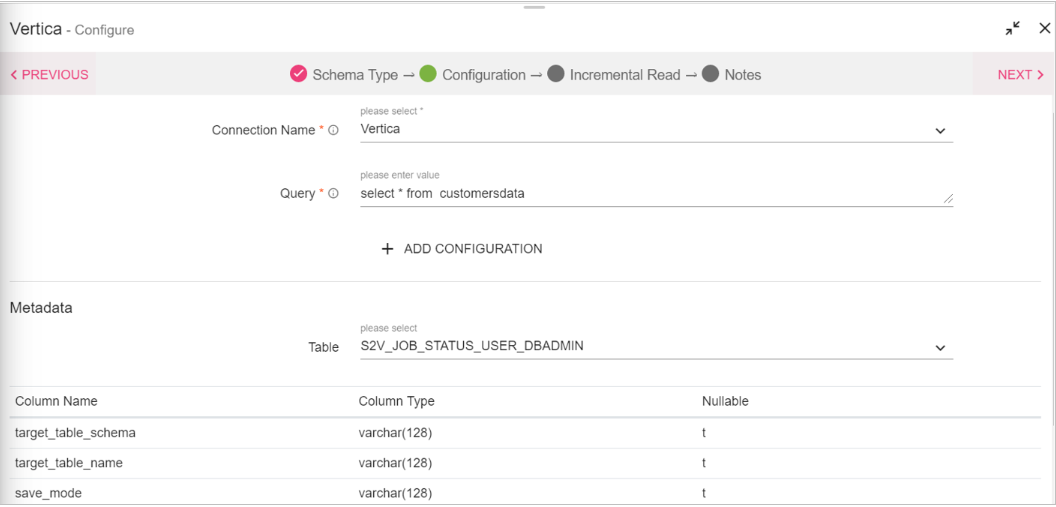
|
Field |
Description |
|---|---|
|
Connection Name |
Connection Name for creating connection. |
|
Query |
Hive compatible SQL query to be executed in the component. |
Metadata
Enter the schema and select table. You can view the Metadata of the tables.
|
Field |
Description |
|---|---|
|
Table |
Select table of which you want to view Metadata. |
|
Column Name |
Name of the column generated from the table. |
|
Column Type |
Type of the column, for example: Text, Int |
|
Nullable |
If the value of the column could be Nullable or not. |
Once the Metadata is selected, Click Next and detect schema to generate the output with Sample Values. The next tab is Incremental Read.
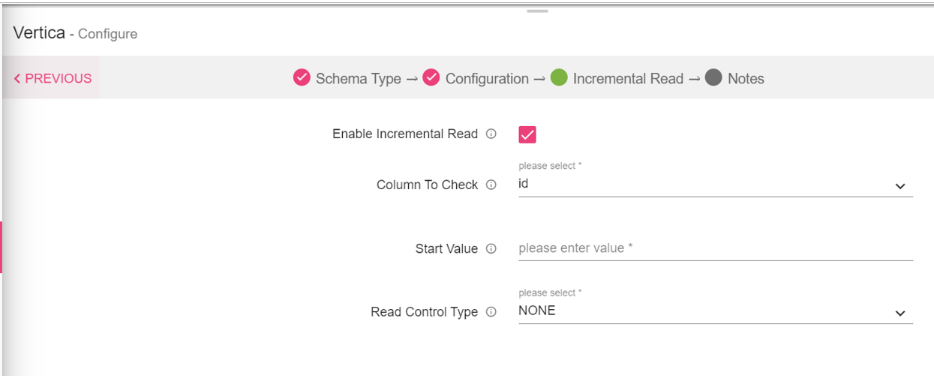
Incremental Read
Enter the schema and select table. You can view the Metadata of the tables.
|
Field |
Description |
|---|---|
|
Enable Incremental Read |
Check this check-box to enable incremental read support. |
|
Column to Check |
Select a column on which incremental read will work. Displays the list of columns that has integer, long, date, timestamp, decimal types of values. |
|
Start Value |
Mention a value of the reference column, only the records whose value of the reference column is greater than this value will be read. |
|
Read Control Type |
Provides three options to control data to be fetched -None, Limit By Count, and Maximum Value. None: All the records with value of reference column greater than offset will be read. Limit By Count: Mentioned no. of records will be read with the value of reference column greater than offset will be read. Maximum Value: All the records with value of reference column greater than offset and less than Column Value field will be read. For None and Limit by count it is recommended that table should have data in sequential and sorted (increasing) order. |
Click Done to save the configuration.
Configure Pre-Action in Source
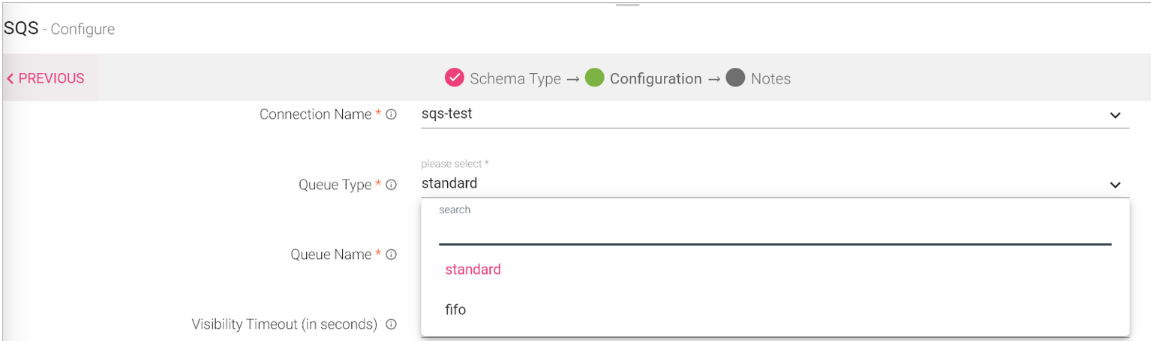
SQS Channel allows you to read data from different SQS queues. The Queue types supported are Standard and FIFO. Along with providing maximum throughput you can achieve scalability using the buffered requests independently.
Configuring a SQS Data Source
To add a SQS Data Source into your pipeline, drag the Data Source to the canvas and right click on it to configure.
Under the Schema tab, you can select the Max No. of Rows and Sampling Method as Top-N or Random Sample.
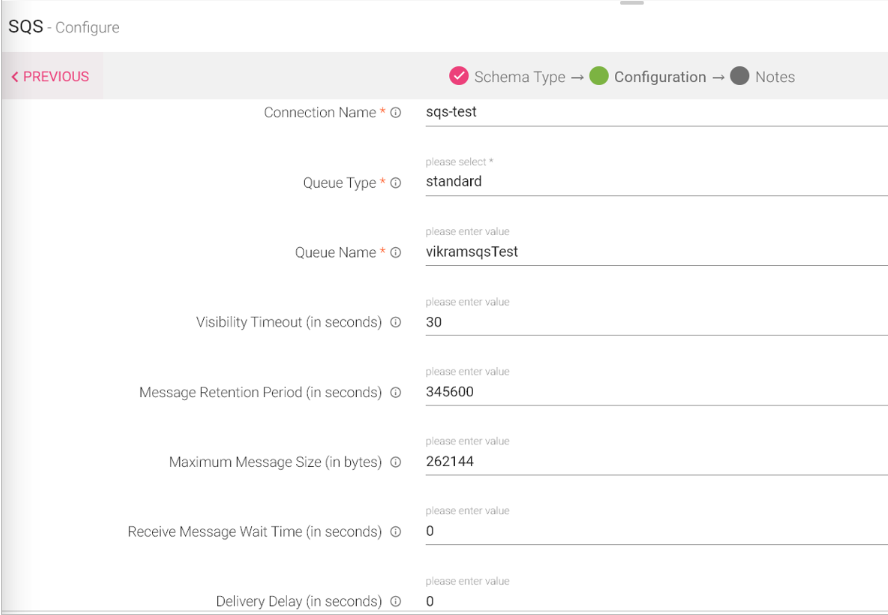
|
Field |
Description |
|---|---|
|
Connection Name |
Connection Name for creating connection. |
|
Queue Type |
Select type of the queue: Standard or FIFO. |
|
Queue Name |
Name of the queue where data will be published. |
|
Visibility Timeout |
The length of the time (in seconds) that a message received from a queue will be invisible to other receiving components. |
|
Message Retention Period (in seconds) |
The amount of time Amazon SQS will retainna message in if it does not get deleted. |
|
Maximum Message Size (in bytes) |
Maximum message size (in bytes) accepted by Amazon SQS. |
|
Receive Message Wait Time (in seconds) |
The maximum amount of time that a long polling receive call will wait for a message to become available before returning an empty house. |
|
Delivery Delay (in seconds) |
The amount of time to delay the first delivery of all messages added to this queue. |
Stream Cosmos Channel can read data in stream manner from CosmosDB (SQL API). It reads updated documents by specifying change-feed directory and using its options.
NOTE: Both BatchCosmos and StreamCosmos works with Local Session and Job Submit mode as Spark-Submit does not work in case of Inspect Session as Livy and job submit mode as Livy. BatchCosmos, without Change-feed will only work with Inspect Session as Livy and Job Submit mode as Livy. Change Feed works during pipeline run.
Configuring a Stream Cosmos Data Source
To add a Stream Cosmos Data Source into your pipeline, drag the Data Source to the canvas and right click on it to configure.
Under the Schema Type tab, you can Upload Data File and Fetch From Source.
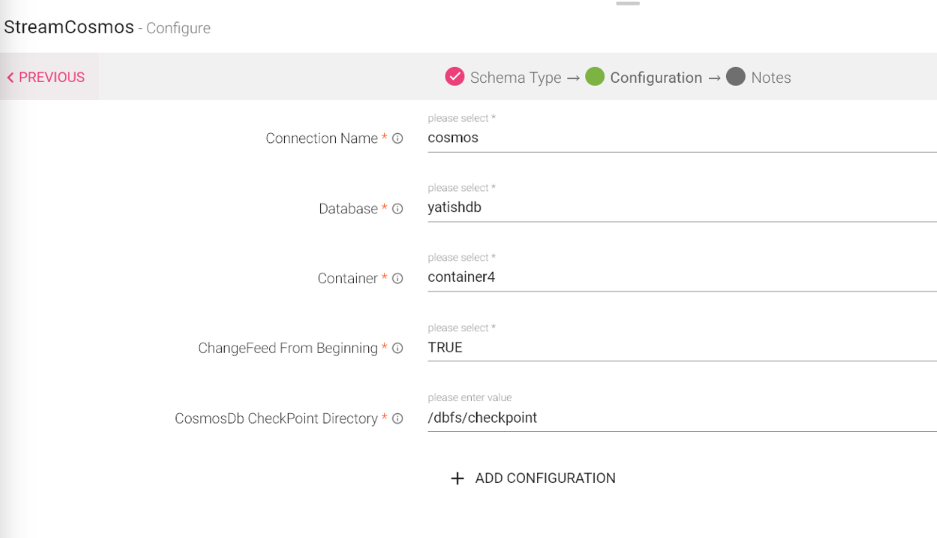
Configuration Tab:
|
Field |
Description |
|---|---|
|
Connection Name |
Select the connection name from the available list of connections, from where you would like to read the data. |
|
Database |
Cosmos Database. |
|
Container |
Container name in Cosmos. |
|
Change Feed from Beginning |
If set to True, data will be read from beginning. |
|
CosmosDB Checkpoint Directory |
It is the file path where Cosmos stores the checkpoint data for Change feed. |
|
Add Configuration |
To add additional custom properties in key-value pairs. |
On Delta Lake Channel, you should be able to read data from delta lake table on S3 , HDFS or DBFS.
Configuring a Streaming Delta Data Source
To add a Streaming Delta Data Source into your pipeline, drag the Data Source to the canvas and right click on it to configure.
Under the Schema Type tab, you can Upload Data File and Fetch From Source.
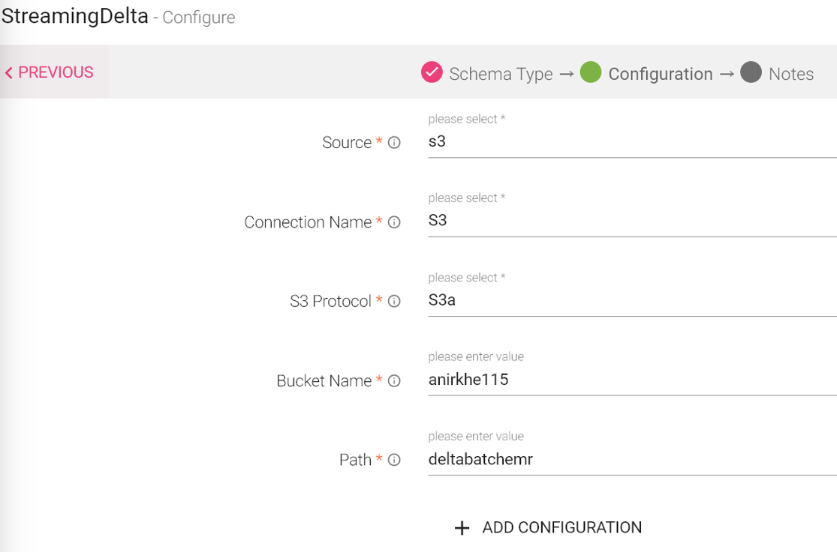
Configuration Tab:
|
Field |
Description |
|---|---|
|
Source |
Mention the source. |
|
Connection Name |
Select the connection name from the available list of connections, from where you would like to read the data. |
|
S3 Protocol |
S3 protocol is to be used. |
|
Bucket Name |
Mention Bucket Name. |
|
Path |
Sub-directories of the bucket name mentioned above to which the data is to be written on. |
|
Add Configuration |
To add additional custom properties in key-value pairs. |
VSAM Channel reads data stored in COBOL EBCDIC and Text Format.
Configuring a COBOL Data Source
To add a VSAM Data Source into your pipeline, drag the Data Source to the canvas and right click on it to configure.
Under the Schema tab, you can select the Max No. of Rows and Sampling Method as Top-N or Random Sample.
|
Field |
Description |
|---|---|
|
HDFS Connection |
Container connection name for creating connection. |
|
Data Type |
Two types of data type are supported: EBDCIC: Extended Binary Coded Decimal Interchange Code, is an 8 bit character encoding used on IBM mainframes and AS/400s. TEXT: Text files are also accepted as data type. |
|
Generate Record ID |
Every generated record will have a primary record id corresponding to every entry. |
|
HDFS Copy Book Path |
CopyBook is Schema file for Cobol. This is where you can use the Scope Variable using @. To know more about the same, read about Scope Variable. |
|
HDFS Data Path |
The file path in HDFS from where the data will be read. |