MLflow Models Listing Page
Manage and explore MLflow models associated with your connections in Gathr on the MLflow listing page.
To access this page, navigate through the Projects (main menu) > Models (sub-menu) > MLflow Tab.
Note: For models to display here, ensure at least one MLflow connection has been created in Gathr.

Upon selecting a connection, MLflow models associated with it will display.
You can organize, monitor, and leverage your MLflow models within Gathr’s intuitive interface.
The actions available on the MLflow Models listing page are explained below:
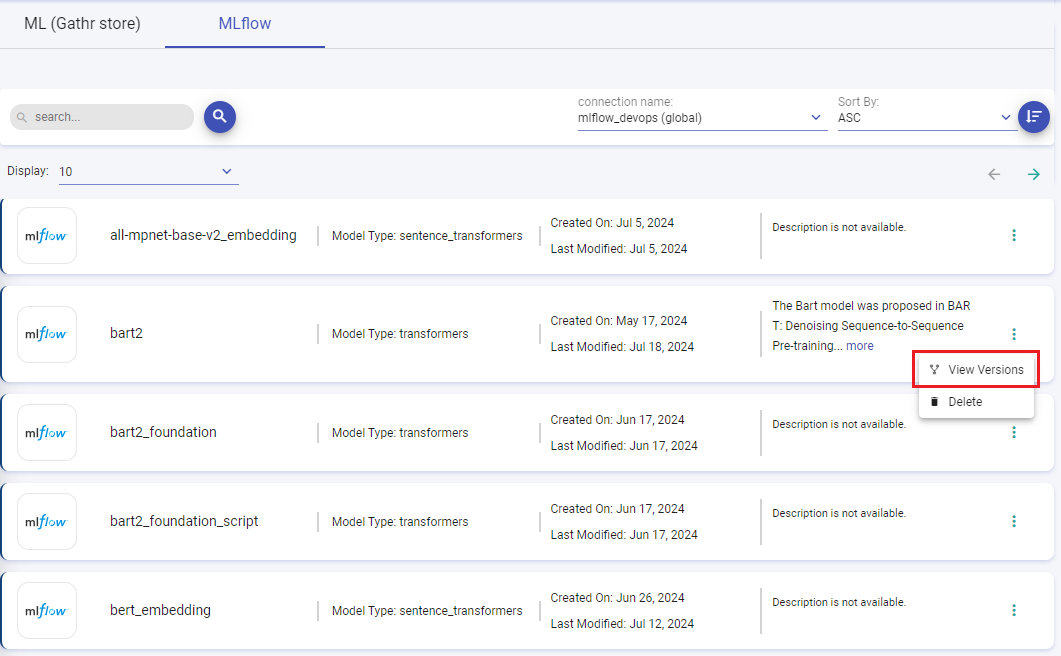
Select a Connection: Choose from your configured connections to view models specific to that connection and manage MLflow models.
Search: Enter the model names (case-sensitive) as keywords to quickly find models based on their names.
Sort Listed Models: Arrange models in ascending or descending order based on Model Names. In the Sort By field, select either ‘ASC’ (ascending) or ‘DEC’ (descending), and then click the ‘Sort’ button to list the models accordingly.
Display Number of Models per Page: Adjust the pagination settings to control how many models are displayed at once.
View Model Versions: Upon selecting a specific MLflow model from the listing, you can access detailed information and actions related to its versions. To know more, see View Model Versions.
Delete Model: Removes an MLflow model from the listing page as well as MLflow tracking server.
The details shown on the MLflow Models listing page are:
Model Name: The unique identifier of the MLflow model.
Model Type: Categorization of the model (Example: sklearn, transformers).
Created On: Timestamp indicating when the model was initially created.
Last Modified On: Timestamp of the most recent modification to the model.
Description: Optional user-provided information offering context or details about the model’s purpose and functionality.
View Model Versions
To explore model versions, click View Versions next to any model to access its detailed version listing page.
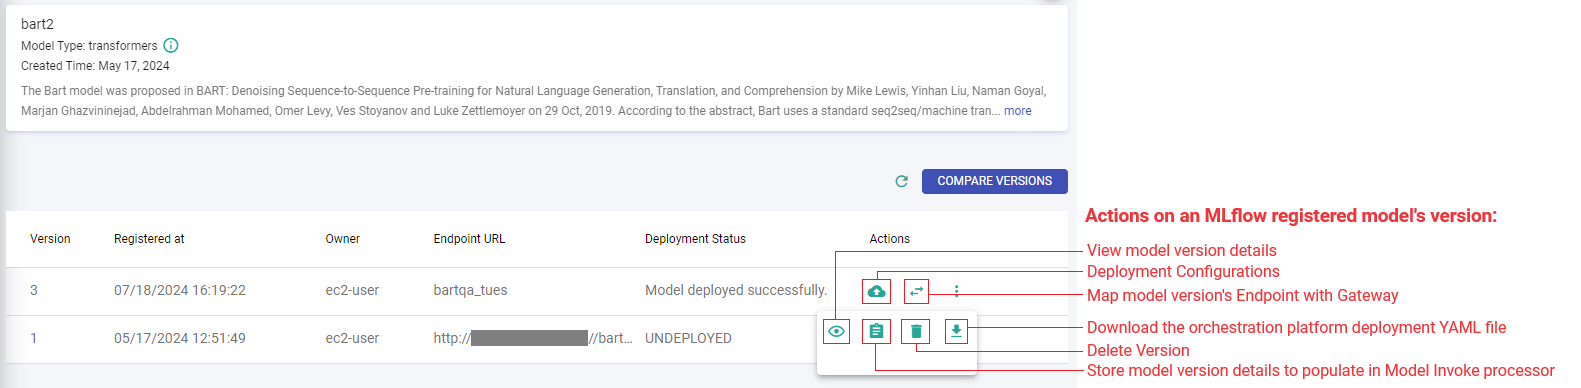
Here, you can view comprehensive information and perform various actions related to each version.
Deployment Configurations
Deploying an MLflow model as an endpoint enables it to process input data and provide predictions via a network interface.
Deploy your MLflow model onto orchestration platforms like Kubernetes directly from Gathr or outside, depending on your preference.
It’s recommended to deploy the models through Gathr as it streamlines the deployment process and subsequent usage in the Model Invoke Processor.
Important: To activate Model Deployment Configurations, ensure that the Allow Model Deployment field is enabled in the MLflow connection settings.
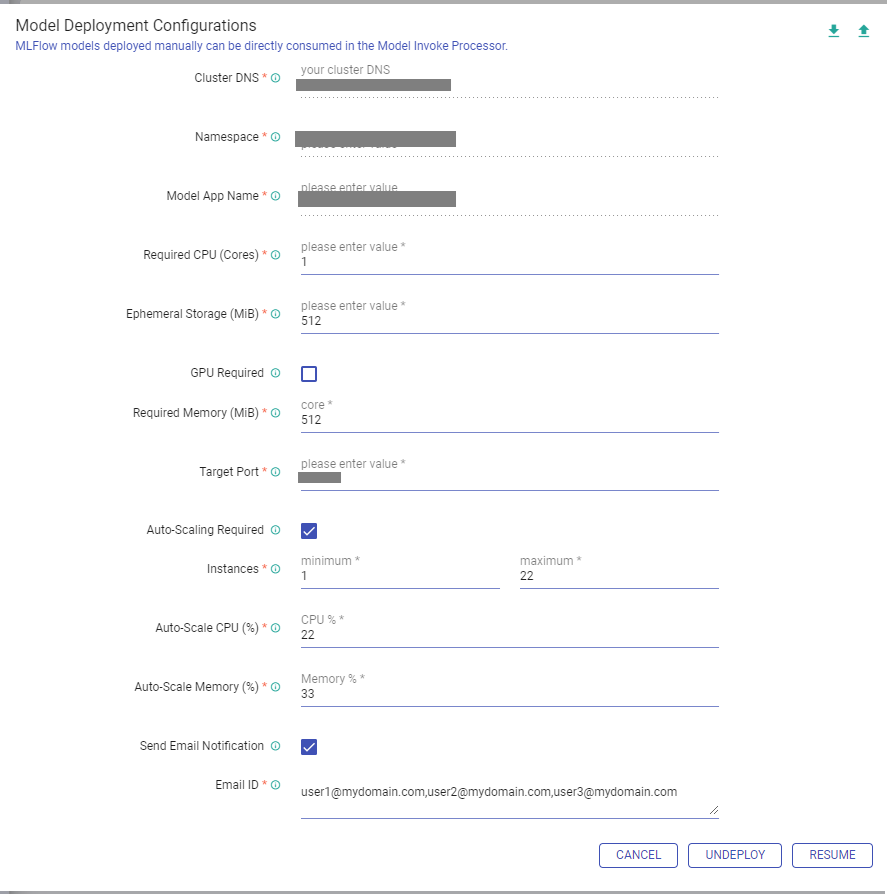
Deployment Configuration Parameters:
Cluster DNS
The cluster DNS endpoint or cluster URL where the MLflow model will be deployed.
For information on obtaining Cluster DNS, expand this section.
The Cluster DNS or cluster URL is typically provided by the administrator of the Kubernetes cluster.
Contact the administrator of the Kubernetes cluster to get the DNS name or URL of the cluster.
If using a managed Kubernetes service (e.g., Google Kubernetes Engine, Amazon EKS, Azure Kubernetes Service), you can usually find the cluster endpoint in the cloud provider’s console under the Kubernetes cluster details.
If you have access to the cluster’s
kubeconfigfile, it will contain the cluster’s API server endpoint. This can be found under theclusterssection in the file.
Format of Cluster DNS:
Fully Qualified Domain Name (FQDN):
Example:
https://kubernetes.example.comorhttps://api.cluster-name.k8s.localIP Address:
Sometimes, it might be an IP address if DNS is not set up, such as
https://192.168.1.100:6443.Cloud-specific URLs:
For managed Kubernetes services, the URL might look like
https://<cluster-name>.<region>.eks.amazonaws.comfor AWS EKS orhttps://<cluster-name>.<region>.azmk8s.iofor Azure AKS.
Always ensure you have the correct endpoint and that it is accessible from Gathr.
Namespace
Provide a cluster namespace where MLflow model will be deployed to organize and manage resources.
The namespace should already be there in the Kubernates cluster.
The Gathr user should have View/Read/Create access for model Deployment, Services, ConfigMap, HPA, and for the namespace.
For steps to Create a Namespace, expand this section.
Namespace in Kubernetes can be created by a user with administrative privileges or by someone who manages the Kubernetes cluster. It involves using the kubectl command-line tool to execute commands.
Create a Namespace to isolate resources using below command:
kubectl create namespace <namespace-name>Create a Role with the required permissions in the specified namespace.
Create a YAML file with below configurations:
apiVersion: rbac.authorization.k8s.io/v1
kind: Role
metadata:
  namespace: <namespace-name>
  name: <role-name>
rules:
- apiGroups: [""]
  resources: ["pods", "services", "configmaps", "secrets"]
  verbs: ["get", "list", "watch", "create", "update", "delete"]
- apiGroups: ["apps"]
  resources: ["deployments"]
  verbs: ["get", "list", "watch", "create", "update", "delete"]
- apiGroups: ["autoscaling"]
  resources: ["horizontalpodautoscalers"]
  verbs: ["get", "list", "watch", "create", "update", "delete"]
#- apiGroups: ["*"]
#  resources: ["*"]
#  verbs: ["*"]
Once created, apply the YAML file to the cluster using below command:
kubectl apply -f <filename>.yamlCreate a Service Account in the specified namespace using below command:
kubectl create serviceaccount <role-name>-sa --namespace <namespace-name>Bind the Role to the Service Account using a RoleBinding.
Create a YAML file with below configurations:
apiVersion: rbac.authorization.k8s.io/v1
kind: RoleBinding
metadata:
  name: <role-name>-rolebinding
  namespace: <namespace-name>
subjects:
- kind: ServiceAccount
  name: <role-name>-sa
  namespace: <namespace-name>
roleRef:
  kind: Role
  name: <role-name>
  apiGroup: rbac.authorization.k8s.io
Once created, apply the YAML file to the cluster using below command:
kubectl apply -f <filename>.yamlCreate the Service Account Token for specified duration using below command:
kubectl create token <role-name>-sa -n <namespace-name> --duration=8760hCreate the Kubernetes Config File.
Use the following template to create a custom Kubernetes Config file for restricted authorization:
apiVersion: v1
kind: Config
clusters:
- cluster:
    certificate-authority-data: <certificate-authority-data>
    server: https://kuberneteshost:port
  name: <k8s-cluster-name>
contexts:
- context:
    cluster: <k8s-cluster-name>
    user: <service-account-username>
  name: <service-account-username>@<k8s-cluster-name>
current-context: <service-account-username>@<k8s-cluster-name>
preferences: {}
users:
- name: <service-account-username>
  user:
    token: <service-account-token>
Once created, apply the YAML file to the cluster using below command:
kubectl apply -f <filename>.yaml
Variables to Replace:
<namespace-name>: Namespace name to be created.
<role-name>: Role name to be created.
<certificate-authority-data>: Base64 encoded certificate authority data of k8s.
<k8s-cluster-name>: Name of your Kubernetes cluster.
<kuberneteshost>:<port>: The URL and port of your Kubernetes API server.
<service-account-username>: The name of the Service Account.
<service-account-token>: The token generated for the Service Account.
Model App Name
Provide a name for the MLflow model to uniquely identify it within the cluster.
Required CPU (Cores)
Specify the CPU cores required for running the model image. For example, if you specify 2 cores, the model image will be allocated 2 CPU cores for execution.
Ephemeral Storage (MiB)
Allocate a temporary storage space for the model image during execution. This parameter specifies the ephemeral storage (in Mebibytes, or MiB) required for MLflow model images.
GPU Required
Select if the model requires GPU during execution.
GPU Type & Core
Please choose from NVIDIA or AMD GPUs depending on your cluster configuration and provide the required cores.
If you are using a GPU, make sure that it is already enabled on the Kubernetes cluster.
Verify GPU Plugin: (At Kubernetes Cluster Level)
Use below command on the Kubernetes node to check for the device plugin pod.
kubectl get pods -n kube-system | grep nvidia-device-plugin
Expected output:
nvidia-device-plugin-daemonset-fn2qc 1/1 Running 78 (3h7m ago) 97d
If you don’t get this output, you may need to install or configure the appropriate device plugin for your GPU type.
Verify GPU Plugin: (At Kubernetes Node Level)
Use below command on the Kubernetes node to list the nodes and check for GPU resources.
kubectl describe node <node-name> | grep -i gpu
Expected output:
nvidia.com/gpu: 1
If you don’t get this output, you may need to install or configure the appropriate device plugin for your GPU type.
Note: If the GPU has only one core and it is fully utilized by one model, then autoscaling or running multiple models simultaneously on the same GPU may not be feasible. The single core can only handle one task at a time efficiently.
For steps to Install and Configure NVIDIA GPU Driver, expand this section.
Steps for NVIDIA GPU Driver Installation and Configuration: In Docker and Kubernetes.
Enable GPU Support in Kubernetes
Once you have configured NVIDIA GPU Driver on all the GPU nodes in your cluster, you can enable GPU support by deploying the following Daemonset:
kubectl create -f https://raw.githubusercontent.com/NVIDIA/k8s-device-plugin/v0.15.0/deployments/static/nvidia-device-plugin.ymlNote: This is a simple static daemonset meant to demonstrate the basic features of the nvidia-device-plugin.
Run Sample GPU Jobs
With the daemonset deployed, NVIDIA GPUs can now be requested by a container using the nvidia.com/gpu resource type:
Below is example of sample vector add Pod that uses GPU.
$ cat <<EOF | kubectl apply -f -
apiVersion: v1
kind: Pod
metadata:
  name: gpu-pod
spec:
  restartPolicy: Never
  containers:
    - name: cuda-container
      image: nvcr.io/nvidia/k8s/cuda-sample:vectoradd-cuda10.2
      resources:
        limits:
          nvidia.com/gpu: 1 # requesting 1 GPU
  tolerations:
  - key: nvidia.com/gpu
    operator: Exists
    effect: NoSchedule
EOF


$ kubectl logs gpu-pod
[Vector addition of 50000 elements]
Copy input data from the host memory to the CUDA device
CUDA kernel launch with 196 blocks of 256 threads
Copy output data from the CUDA device to the host memory
Test PASSED
Done
WARNING: If you don’t request GPUs when using the device plugin with NVIDIA images all the GPUs on the machine will be exposed inside your container.
Troubleshooting
You may get below errors while setting up.
- NVIDIA Device Plugin DaemonSet is showing running 1/1 but not starting properly, its pod logs are below:
I0507 16:48:49.066195       1 main.go:279] Retrieving plugins.
W0507 16:48:49.066224       1 factory.go:31] No valid resources detected, creating a null CDI handler
I0507 16:48:49.066259       1 factory.go:104] Detected non-NVML platform: could not load NVML library: libnvidia-ml.so.1: cannot open shared object file: No such file or directory
I0507 16:48:49.066288       1 factory.go:104] Detected non-Tegra platform: /sys/devices/soc0/family file not found
E0507 16:48:49.066306       1 factory.go:112] Incompatible platform detected
E0507 16:48:49.066311       1 factory.go:113] If this is a GPU node, did you configure the NVIDIA Container Toolkit?
E0507 16:48:49.066315       1 factory.go:114] You can check the prerequisites at:
https://github.com/NVIDIA/k8s-device-plugin#prerequisites
E0507 16:48:49.066319       1 factory.go:115] You can learn how to set the runtime at:
https://github.com/NVIDIA/k8s-device-plugin#quick-start
E0507 16:48:49.066323       1 factory.go:116] If this is not a GPU node, you should set up a toleration or nodeSelector to only deploy this plugin on GPU nodes
I0507 16:48:49.066327       1 main.go:308] No devices found. Waiting indefinitely.
Solution:
- It comes when you forget to update default container runtime property to nvidia in /etc/containerd/config.toml file, please cross check the below property.
default_runtime_name = “nvidia”
Once done, please restart containerd process.
Required Memory (MiB)
Specify the memory required for running model image, measured in Mebibytes (MiB). For example, if you specify 4096 MiB, the model image will be allocated 4 GB of memory.
Target Port
Model is getting deployed on to cluster on this port.
For ML Models: The model will be deployed on the specified port on the Kubernetes cluster. This port will be directly accessible for consuming the model.
For LLM Models: Instead of being accessed directly, the port should be mapped to the AI Gateway. The AI Gateway acts as an intermediary, managing requests and routing them to the appropriate service or model.
The same port serves different purposes based on the type of model.
The port can range between 30000 - 32000.
Make sure the specified port is available.
Auto-Scaling Required
Select if auto-scaling is required. It allows automatic scale-in/scale-out of PODs within the Kubernetes cluster based on resource utilization.
To understand the Prerequisites for Kubernetes AutoScaling, expand this section.
To enable autoscaling in Kubernetes, it’s essential to have the Metrics Server installed, as it provides the necessary data on CPU and RAM usage for scaling decisions.
Steps to ensure you’re set up for auto-scaling:
Verify the Metrics Server is active by running the command:
kubectl get pod -n kube-system | grep metricsThe expected output should confirm the Metrics Server is running, similar to:
metrics-server-<unique-identifier> 1/1 Running 52 (4h7m ago) 64dIf the Metrics Server is not installed, you’ll need to set it up. Start by creating a file named
metricserver.yamlwith below configuration details. (Or, click here to download the YAML file.)apiVersion: v1 kind: ServiceAccount metadata: labels: k8s-app: metrics-server name: metrics-server namespace: kube-system --- apiVersion: rbac.authorization.k8s.io/v1 kind: ClusterRole metadata: labels: k8s-app: metrics-server rbac.authorization.k8s.io/aggregate-to-admin: "true" rbac.authorization.k8s.io/aggregate-to-edit: "true" rbac.authorization.k8s.io/aggregate-to-view: "true" name: system:aggregated-metrics-reader rules: - apiGroups: - metrics.k8s.io resources: - pods - nodes verbs: - get - list - watch --- apiVersion: rbac.authorization.k8s.io/v1 kind: ClusterRole metadata: labels: k8s-app: metrics-server name: system:metrics-server rules: - apiGroups: - "" resources: - nodes/metrics verbs: - get - apiGroups: - "" resources: - pods - nodes verbs: - get - list - watch --- apiVersion: rbac.authorization.k8s.io/v1 kind: RoleBinding metadata: labels: k8s-app: metrics-server name: metrics-server-auth-reader namespace: kube-system roleRef: apiGroup: rbac.authorization.k8s.io kind: Role name: extension-apiserver-authentication-reader subjects: - kind: ServiceAccount name: metrics-server namespace: kube-system --- apiVersion: rbac.authorization.k8s.io/v1 kind: ClusterRoleBinding metadata: labels: k8s-app: metrics-server name: metrics-server:system:auth-delegator roleRef: apiGroup: rbac.authorization.k8s.io kind: ClusterRole name: system:auth-delegator subjects: - kind: ServiceAccount name: metrics-server namespace: kube-system --- apiVersion: rbac.authorization.k8s.io/v1 kind: ClusterRoleBinding metadata: labels: k8s-app: metrics-server name: system:metrics-server roleRef: apiGroup: rbac.authorization.k8s.io kind: ClusterRole name: system:metrics-server subjects: - kind: ServiceAccount name: metrics-server namespace: kube-system --- apiVersion: v1 kind: Service metadata: labels: k8s-app: metrics-server name: metrics-server namespace: kube-system spec: ports: - name: https port: 443 protocol: TCP targetPort: https selector: k8s-app: metrics-server --- apiVersion: apps/v1 kind: Deployment metadata: labels: k8s-app: metrics-server name: metrics-server namespace: kube-system spec: selector: matchLabels: k8s-app: metrics-server strategy: rollingUpdate: maxUnavailable: 0 template: metadata: labels: k8s-app: metrics-server spec: containers: - args: - --cert-dir=/tmp - --secure-port=10250 - --kubelet-insecure-tls - --kubelet-preferred-address-types=InternalIP,ExternalIP,Hostname - --kubelet-use-node-status-port - --metric-resolution=15s image: registry.k8s.io/metrics-server/metrics-server:v0.7.0 imagePullPolicy: IfNotPresent livenessProbe: failureThreshold: 3 httpGet: path: /livez port: https scheme: HTTPS periodSeconds: 10 name: metrics-server ports: - containerPort: 10250 name: https protocol: TCP readinessProbe: failureThreshold: 3 httpGet: path: /readyz port: https scheme: HTTPS initialDelaySeconds: 20 periodSeconds: 10 resources: requests: cpu: 100m memory: 200Mi securityContext: allowPrivilegeEscalation: false capabilities: drop: - ALL readOnlyRootFilesystem: true runAsNonRoot: true runAsUser: 1000 seccompProfile: type: RuntimeDefault volumeMounts: - mountPath: /tmp name: tmp-dir nodeSelector: kubernetes.io/os: linux priorityClassName: system-cluster-critical serviceAccountName: metrics-server volumes: - emptyDir: {} name: tmp-dir --- apiVersion: apiregistration.k8s.io/v1 kind: APIService metadata: labels: k8s-app: metrics-server name: v1beta1.metrics.k8s.io spec: group: metrics.k8s.io groupPriorityMinimum: 100 insecureSkipTLSVerify: true service: name: metrics-server namespace: kube-system version: v1beta1 versionPriority: 100Once you have your YAML file ready, apply it using the command:
kubectl apply -f metricserver.yaml
For the latest version of the Metrics Server, you can refer to the official Kubernetes SIGs repository.
By following these steps, you’ll have the Metrics Server up and running, ready to support the autoscaling of your Kubernetes workloads based on their resource consumption.
Instances (POD Replicas)
Provide minimum and maximum POD replicas to scale-in/scale-out.
Auto-Scale CPU (%)
Please provide CPU percentage threshold for auto-scaling.
Auto-Scale Memory (%)
Please provide memory percentage threshold for auto-scaling.
Send Email Notification
Enable this field to share email notifications to the specified email addresses about model deployment status updates.
Email ID
Provide comma-separated email IDs to which the model deployment status updates should be shared.
Deploy Model
Deploy the MLflow model onto the orchestration platform by updating all necessary configuration fields. This action initiates the model’s deployment process.
A successful model deployment usually consists of these states:
The process of deploying a model begins with the submission of a deployment request, followed by the commencement of Docker image creation. This is the first step in a six-stage sequence.
Once the Docker image is successfully created, the system proceeds to generate the necessary Docker secrets. With the secrets in place, the Docker image can then be deployed.
The subsequent step involves setting up the model service, which is essential for the model’s operation.
Finally, the creation of the Model Horizontal Pod Autoscaler (HPA) is initiated, leading up to successful deployment of the model.
Un-Deploy
To remove the model from the orchestration platform, select this option. It ensures the complete termination of the deployment process.
Resume Deployment
Should the model deployment process encounter a failure, this option allows you to resume deployment from the precise point of interruption on the orchestration platform.
Map Model Version Endpoint with Gateway
After deployment, map the model endpoint with AI Gateway for easy accessibility and integration.
Steps to map a model version endpoint with AI gateway:
Click on Map Model Version’s Endpoint with Gateway to open the mapping screen.
Follow step-by-step instructions to complete mapping.
Step 1: Copy the model service endpoint URL.
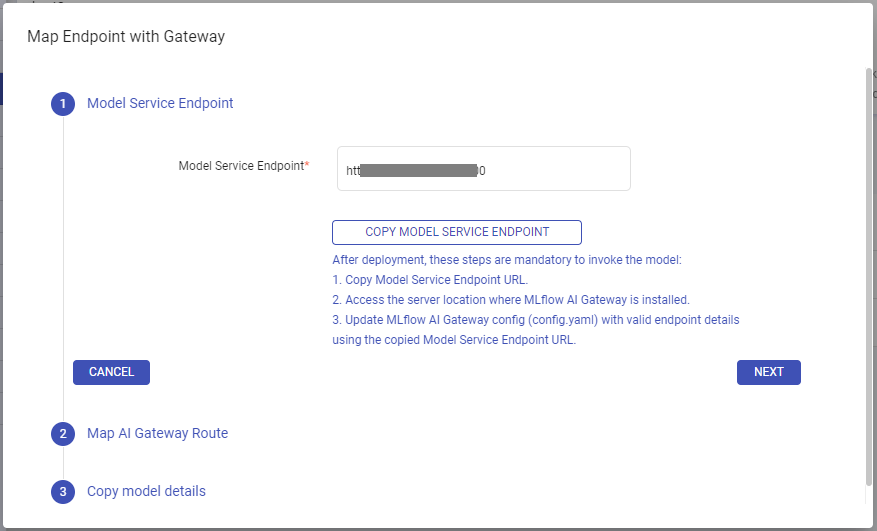
The next operation is done outside Gathr:
Access the server location where MLflow AI Gateway is installed and update the
config.yamlof AI Gateway with the appropriate endpoint details based on the model type.Example of Completion Model:
- name: bart
    endpoint_type: llm/v1/completions
    model:
      provider: mlflow-model-serving
      name: finetuned-bart
      config:
        model_server_url: http://10.80.72.197:30987
Example of Embedding Model:
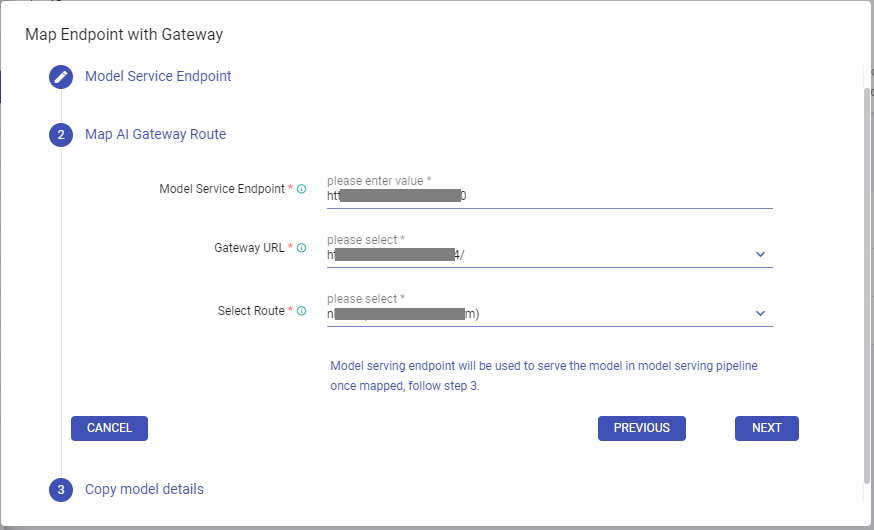
  - name: embedding_all_mpnet_base_v2
    endpoint_type: llm/v1/embeddings
    model:
      provider: mlflow-model-serving
      name: all_mpnet_base_v2_embedding
      config:
        model_server_url: http://10.80.72.197:30675
Step 2: Proceed to map the AI Gateway Route within Gathr.
The Model Service Endpoint will be pre-filled.
Enter or select the Gateway URL associated with the endpoint updated in Step 1.
The Select Route dropdown will populate based on the Gateway URL. Choose the appropriate route.
Click on Map & Next to save the Gateway URL and selected route combination for the model version.
Step 3: Click Store Model Version Details to store mapping details. The latest saved details can be populated later in the Model Invoke processor.
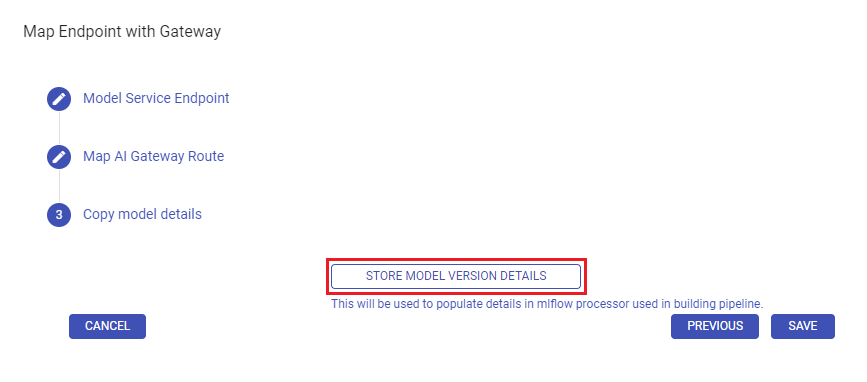
Store Model Version Details to Populate in Model Invoke Processor
Store model details from the MLflow model versions listing page.
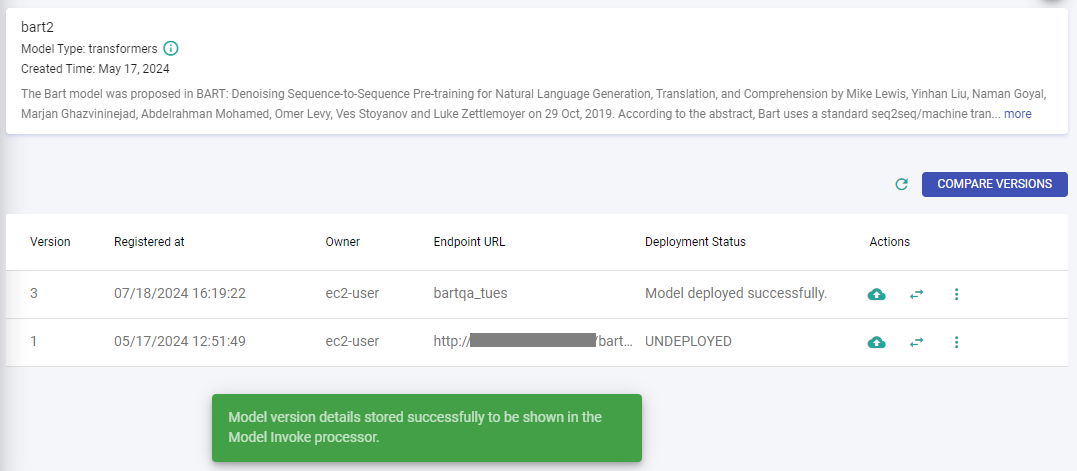
Auto-populate Model Invoke Processor’s configuration values for Model Selection tab with this feature.
Download the Orchestration Platform Deployment YAML File
Obtain deployment configurations in YAML format to refer the deployment details.
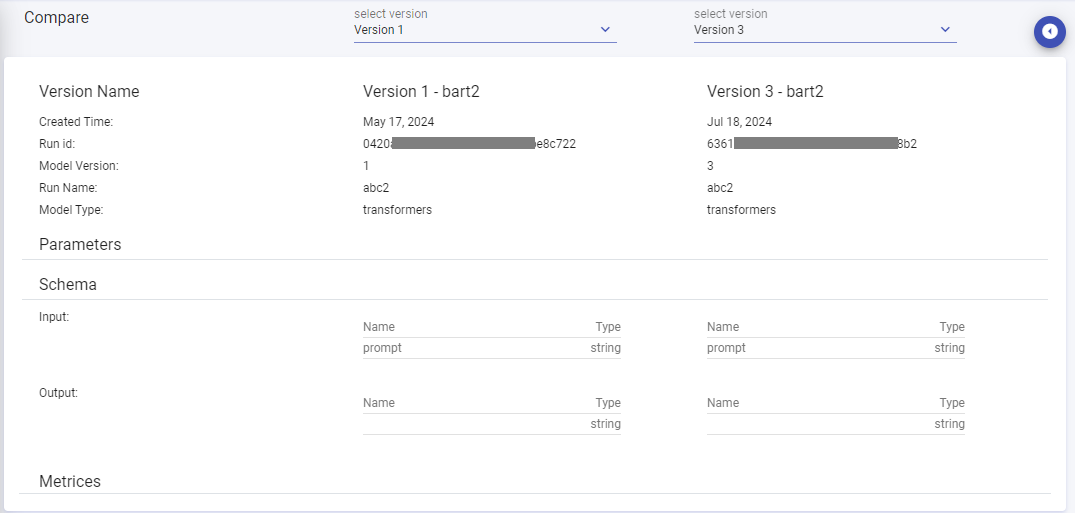
Compare Model Versions
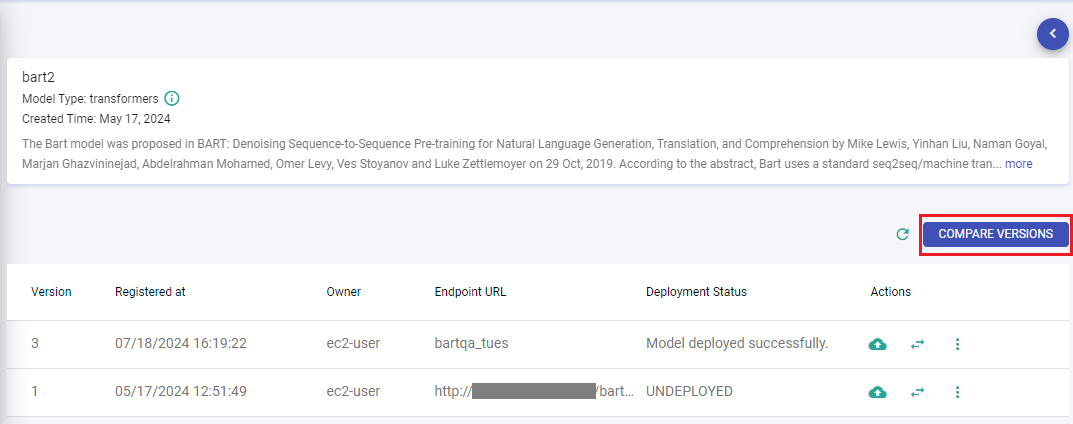
Compare different versions of the selected MLflow model to assess parameters, metrices, and changes over time.
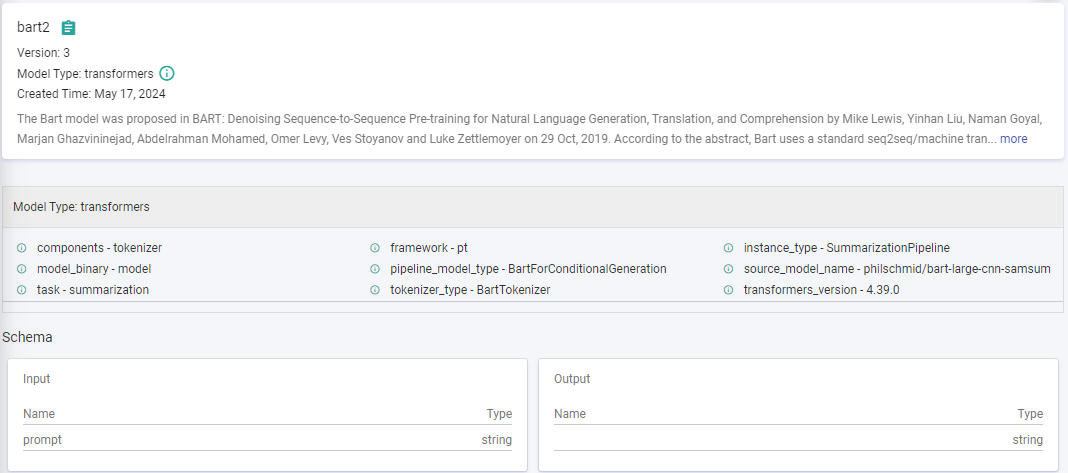
View Model Version Details
Dive deeper into the specifics of each version, including metadata, metrices, and various other details.
Delete Version
Delete specific versions of the MLflow model that are no longer needed or have been superseded.
This action deletes the model version from Gathr as well as MLflow tracking server.
If you have any feedback on Gathr documentation, please email us!