MLflow Connection
To access the Connections page, simply navigate through the Workspace > Connections (main-menu) > Create Connection.
To set up a connection with MLflow tracking server from Gathr, you need to configure these fields.
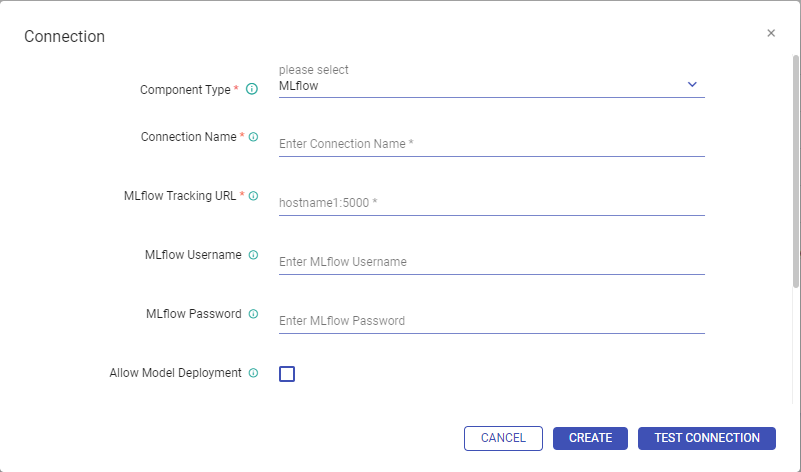
Component Type
Select MLflow as the ‘Component Type’ to create the connection for MLflow.
Connection Name
Provide a unique name for your MLflow connection. The saved connection can be identified in Gathr with the name you provide.
MLflow Tracking URL
URL where the MLflow Tracking server is hosted.
If your MLflow server is hosted locally, the URL might look like http://localhost:5000. If it’s hosted on a server accessible over the internet, it could look something like http://mlflow.example.com.
Example: http://mlflow-server:5000
In this example:
httpindicates the protocol.mlflow-serveris the hostname or IP address where your MLflow Tracking server is hosted.5000is the port number where the MLflow Tracking server is listening.
Replace mlflow-server and 5000 with the actual hostname or IP address and port number of your MLflow Tracking server.
MLflow Username
Username of MLflow to create connection.
Provide a username/password combination that grants access. Check with your MLflow server administrator for the authentication method in place and obtain the necessary credentials.
MLflow Password
Password of MLflow to create connection.
Provide a username/password combination that grants access. Check with your MLflow server administrator for the authentication method in place and obtain the necessary credentials.
Allow Model Deployment
Enabling model deployment from Gathr streamlines the process of using MLflow models in the Model Invoke processor for performing inferences.
To enable model deployment from Gathr, you need to configure these fields.
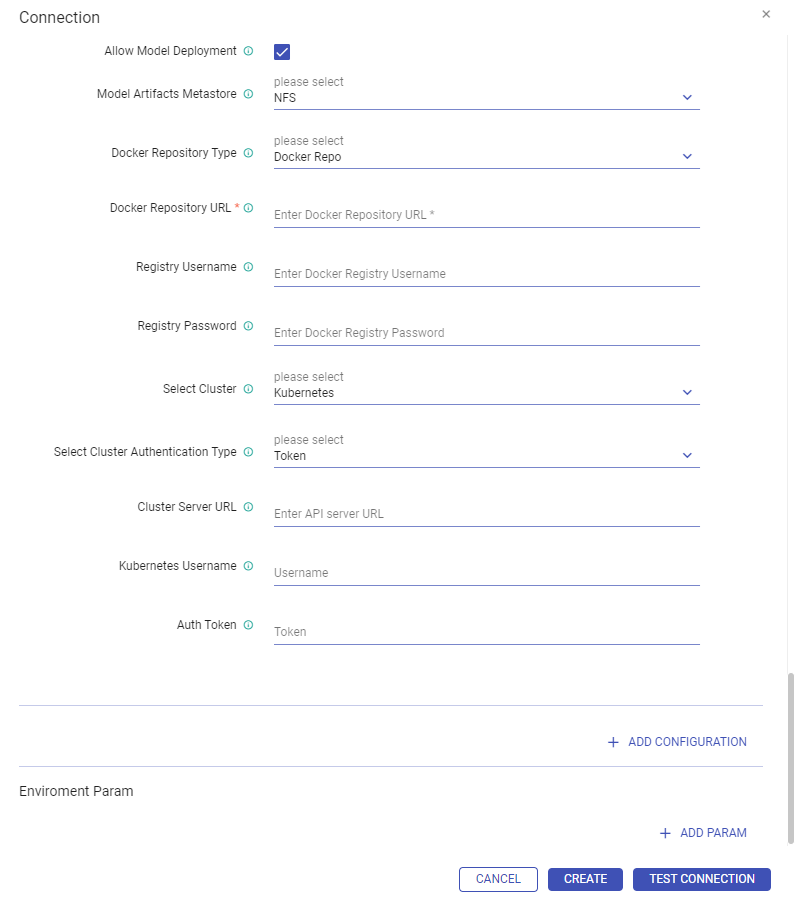
If enabled, MLflow models can be deployed directly on an orchestration platform (like Kubernetes) from the Gathr application. This can be done from the Models listing page after creating the MLflow connection.
If you choose not to deploy a model from Gathr:
Deployment Requirement: Manually deploy the MLflow registered model on your orchestration platform.
Configuration in Gathr: After deployment, obtain the following details and provide in the Model Invoke processor:
For LLM Models: AI Gateway URL & Model Route Name.
For ML Models: Model Serving URL.
Ensure the model services are up and running before using them for inferences within Gathr.
Software & Versions Supported for Model Deployment
| Software | Version |
|---|---|
| MLflow Tracking | 2.9.2 |
| Kubernetes | 1.25.16 |
| Docker | 24.0.7 |
Model Deployment Prerequisites
If you choose to deploy an MLflow model via Gathr, follow these prerequisites:
Ensure Docker and Docker Compose are installed and running on the machine where Gathr is running.
Verify Docker version using below command:
docker --versionVerify Docker Compose version using below command:
docker compose versionIf Docker is not installed, expand this section to see the steps.
Online Installation Steps:
To install Docker on RHEL/CentOS, execute the following commands:
sudo yum install yum-utils
sudo yum-config-manager --add-repo https://download.docker.com/linux/centos/docker-ce.repo
sudo yum install docker-ce-24.0.7 docker-ce-cli-24.0.7 containerd.io docker-buildx-plugin docker-compose-plugin-2.21.0
sudo systemctl start docker
sudo systemctl enable docker
Offline Installation Steps:
Obtain the Docker RPM packages from Gathr’s support team and place them on your source machine. Then, install Docker on RHEL/CentOS with these commands:
cd <Docker RPMs directory>
sudo yum localinstall docker-ce-24.0.7 docker-ce-cli-24.0.7 containerd.io docker-buildx-plugin docker-compose-plugin-2.21.0
sudo systemctl start docker
sudo systemctl enable docker
Ensure Docker commands are executed by the application user (who should be part of the docker group).
To add a user to the docker group, use the following command:
sudo usermod -aG docker <user>Replace
<user>with your application username.
If the Docker Registry is secured (SSL enabled) using self-signed certificates, you must add the registry to the “insecure-registries” field inside the Docker configuration file (
/etc/docker/daemon.json).To do this, open the daemon.json file in a text editor and add the following property under the root object:
Example:
{
  "insecure-registries" : ["<registry-host>:<registry-port>"]
}
Replace
<registry-host>and<registry-port>with your Docker Registry’s hostname and port.After editing, restart Docker using the following command to apply the changes:
sudo systemctl restart docker
Model Artifacts Metastore
Specify where MLflow model artifacts are stored:
- Supported Options: NFS, S3.
Metastore Details
NFS: Choose NFS and proceed with configuration.
- Ensure that the NFS path (where MLflow Server artifacts are stored) is mounted on the Gathr machine, and the Gathr application user has appropriate read permissions for the mounted path.
- If you are deploying the Gathr application in a Kubernetes cluster, ensure that the NFS path is also mounted in the Kubernetes cluster. Failing to mount the NFS path in the Kubernetes environment may result in the application failing to fetch the required artifacts.S3: If using S3, additionally provide the following details:
Connect Using: AWS Keys or Role ARN.
Role ARN: The Role ARN used for S3 authentication.
AWS Key ID: AWS Access Key ID for authentication.
Secret Access Key: AWS Secret Access Key for authentication.
Ensure that the AWS credentials provided have read/write permissions to access the S3 bucket where MLflow artifacts are stored.
Docker Repository Type
Select the type of Docker registry to use for storing images.
Docker Repository URL
Enter the URL of the Docker repository.
Registry Username
Enter the username for the Docker registry.
Registry Password
Enter the password for the Docker registry.
Select Cluster
Choose the cluster for deploying your MLflow models.
Select Authentication Type
Choose the authentication method for accessing the cluster:
- Supported Options: Token, File Upload.
Token Authentication
Cluster Server URL: API server URL of the cluster.
Kubernetes Username: Username for cluster authentication.
Auth Token: Enter the authentication token for the cluster.
For steps to generate an Authentication Token, expand this section.
To generate an authentication token for a Kubernetes cluster, you can run these kubectl commands from your terminal window:
Create a Service Account: First, create a service account in the namespace where you want to generate the token.
bash
kubectl create serviceaccount test -n default
This command creates a new service account named
testin thedefaultnamespace. Service accounts are used by applications running in Kubernetes to interact with the Kubernetes API.Bind the Service Account to a Role: Next, bind the service account to a cluster role that grants the necessary permissions.
Example of binding to a cluster role:
bash
kubectl create clusterrolebinding test-binding --clusterrole=cluster-admin --serviceaccount=default:test
This command creates a ClusterRoleBinding named
test-bindingthat binds thecluster-adminClusterRole to thetestservice account in thedefaultnamespace. This grants thetestservice account cluster-admin privileges, meaning it has full access to all resources in the cluster.Generate the Token: Now, you can generate the token using the below command:
bash
kubectl -n default create token test --duration=8760h
This command creates a new token for the
testservice account in thedefaultnamespace with a specified duration of 8760 hours (1 year).
Use this token for authentication when interacting with the Kubernetes API.
File Upload Authentication
Cluster Config Key File: Upload the configuration file used for cluster authentication.
To know more about Cluster Config Key File, expand this section.
A Kubeconfig file is a YAML file that contains all the necessary details for connecting to a Kubernetes cluster, including certificates and secret tokens for authentication. This file can typically be obtained directly from the cluster administrator or from a cloud platform if you are using a managed Kubernetes cluster.
The default location of the kubeconfig file is
$HOME/.kube/config.Example Kubeconfig File:
apiVersion: v1
clusters:
- cluster:
    certificate-authority-data: <ca-data-here>
    server: https://your-k8s-cluster.com
  name: <cluster-name>
contexts:
- context:
    cluster:  <cluster-name>
    user:  <cluster-name-user>
  name:  <cluster-name>
current-context:  <cluster-name>
kind: Config
preferences: {}
users:
- name:  <cluster-name-user>
  user:
    token: <secret-token-here>
In this example:
certificate-authority-dataspecifies the cluster’s CA certificate.serveris the endpoint (IP/DNS) of the Kubernetes master node.namerepresents the cluster’s name.userindicates the user or service account name.tokenis the secret token associated with the user or service account.
Steps to Obtain the Cluster Config Key File:
The configuration file used to access Kubernetes clusters is typically located in the
$HOME/.kubedirectory of your Kubernetes node.Download or copy this
kubeconfigfile.Upload the file in Gathr’s MLflow connection configuration to authenticate the Kubernetes cluster using File Upload Authentication.
Test Connection
After entering all the necessary details, it’s important to verify that the connection to the specified resources is correctly configured.
Click on the Test Connection button.
If the provided details are correct and all required services are operational, you will receive a confirmation message indicating that the connection to the specified resources is successfully established.
If any of the provided credentials are incorrect, or if any required services are not running or accessible, you will receive an appropriate message indicating an issue with the connection setup. You will need to review and correct the configuration details accordingly.
If you have any feedback on Gathr documentation, please email us!