MLFlow Server Deployment on Docker
Please follow these steps to deploy MLflow Server using Docker Compose.
Prerequisites
Docker and docker compose service should be installed and running.
To verify docker version, run this commands:
docker --version
To verify docker compose version, run this command:
docker compose version
Steps for docker installation.
ONLINE STEPS: To install docker on RHEL/Centos, run the below commands:
$ sudo yum install yum-utils
$ sudo yum-config-manager --add-repo https://download.docker.com/linux/centos/docker-ce.repo
$ sudo yum install docker-ce-24.0.7 docker-ce-cli-24.0.7 containerd.io docker-buildx-plugin docker-compose-plugin-2.21.0
$ sudo systemctl start docker
$ sudo systemctl enable docker
OFFLINE STEPS: To install docker on RHEL/Centos, run the below commands:
Copy docker RPMs on the source machine.
$ cd <Docker RPMs directory>
$ sudo yum localinstall docker-ce-24.0.7 docker-ce-cli-24.0.7 containerd.io docker-buildx-plugin docker-compose-plugin-2.21.0
$ sudo systemctl start docker
$ sudo systemctl enable docker
Application user should be part of docker group.
Docker commands should be run by application user.To add user in docker group, run below command:
sudo usermod -aG docker <user>Replace <user> with your application username
Database for backend store should be pre-created.
Example: For Postgres, run the below commands to create database.
psql -h <hostname> -U <username> -p <port>
psql# CREATE DATABASE <dbname>
If docker registry is SSL enabled, then add the registry in docker insecure registry.
Steps to add the registry in docker insecure registry.
SSH to Gathr machine.
Edit docker config file:
sudo vi /etc/docker/daemon.jsonAdd below content:
{
"insecure-registries" : [ "<DockerRegistryHost>:<Port>" ]
}
Restart docker service using below command:
sudo systemctl restart docker
Steps for MLFlow Server Deployment
1. Extract the Setup Bundle
Extract the mlflow_setup_docker.tar.gz file, provided by Gathr team.
It includes the following folders:
mlflow_aigateway
bart-model-registrar
mpnet-model-registrar
generic-model-registrar
2. Load Docker Image
Go to the directory mlflow_aigateway/deploymentpackage/. You will see three files:

Load the Docker image from the mlflow_aigateway.tar file that is extracted by the setup bundle.
docker load -i mlflow_aigateway.tar
After the docker loads successfully, image should be visible in “docker images” command output.

3. Edit .env File
Open the .env file using a text editor.
Modify the variables in the .env file according to your preferences.
These variables may include configurations such as user, ports, database connections, or any other settings required for your environment.
Below is the content of .env file for your reference:
# User and Group Configuration
MLFLOW_SERVICE_USER=ec2-user
MLFLOW_SERVICE_UID=1000
MLFLOW_SERVICE_GROUP=ec2-user
MLFLOW_SERVICE_GID=1000

# Port Configuration (It should be opened - allowed from firewall)
MLFLOW_SERVER_PORT=5222
AIGATEWAY_PORT=5005

# Backend Store Configuration
BACKEND_STORE_TYPE=db  # Supported options are nfs, db
# Uncomment and set the URI for the desired database
# PostgreSQL
BACKEND_STORE_URI=postgresql://<username>:${DB_PASSWORD}@<hostname>:<port>/<db-name>
# MySQL
#BACKEND_STORE_URI=mysql+pymysql://<username>:${DB_PASSWORD}@<hostname>:<port>/<dbname>
# Microsoft SQL Server
#BACKEND_STORE_URI=mssql+pyodbc://<username>:${DB_PASSWORD}@<hostname>/<dbname>?driver=ODBC+Driver+17+for+SQL+Server

BACKEND_STORE_PATH=  # Ignore if BACKEND_STORE_TYPE is db

# Artifact Storage Configuration
ARTIFACT_STORAGE_TYPE=nfs  # Supported options are nfs, s3
DEFAULT_ARTIFACT_ROOT=  # Path should be pre created # (eg /mnt/mlflow incase of nfs OR s3://bucket/mlflow incase of s3)

# AWS Credentials (Required if using S3 for artifact storage)
AWS_ACCESS_KEY_ID=
AWS_SECRET_ACCESS_KEY=

# Volume Mount Configuration
VOLUME_MOUNT=  # Should match DEFAULT_ARTIFACT_ROOT if using nfs
AIGATEWAYCONFIGPATH=/mnt/mlflow/aigateway  # You will see config.yaml of AIGateway at this path and can edit from here
Save the changes made to the .env file.
4. Start MLflow Tracking Server Container
Run the command given below to start the MLflow tracking server container in detached mode:
docker compose up -d
Output of the above command will be as follows:
![]()
5. Check Container Logs
After starting the MLflow tracking server container, you can check its logs to ensure that it started successfully and diagnose for any issues.
docker logs <container_id>
Replace <container_id> with the ID of the MLflow tracking server container obtained from the command docker ps.
This command will display the logs generated by the MLflow tracking server container.
![]()
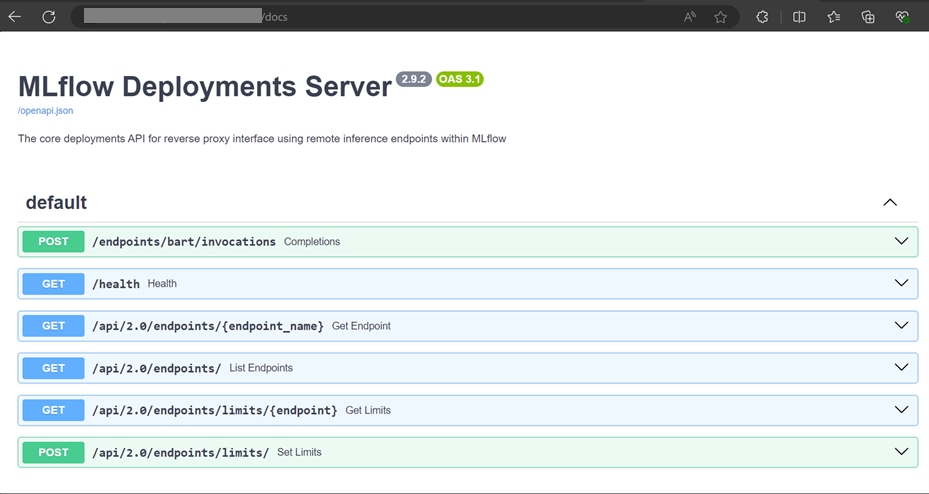
6. Access MLflow Tracking Server and AI Gateway Server
Once the MLflow tracking server container is running, you can access it using a web browser.
In a web browser, and open the below URL:
http://<hostname>:<port>
Replace <hostname> with the hostname or IP address of the machine where the MLflow tracking server container is running, and <port> with the port number specified in the .env file.
![]()
The MLFlow server is now up and running; you can use the URL for registering models.
Similarly access the AI Gateway:
Register Foundation Bart Model Using Docker Image
Steps to register foundation Bart Model using Docker Image:
Extract the Setup Bundle
Extract the setup bundle (example:
mlflow_setup_docker.tar.gz) provided by the Gathr team which includes the following folder after extracting:bart-model-registrar
Load Docker Image
Load the docker image from the aigateway.tar file, extracted from the setup bundle.
docker load -i bart-model-registrar.tarConfigure
.envFileGathr team will need the MLFlow tracking server URL for this.
# User and Group Configuration
MLFLOW_SERVICE_USER=gathr
MLFLOW_SERVICE_UID=1012
MLFLOW_SERVICE_GROUP=gathr
MLFLOW_SERVICE_GID=1064

# Model Configuration
MLFLOW_TRACKING_URI=http://10.80.72.197:5222

# Artifact Storage Configuration
# CASE 1 - If using S3 as ARTIFACT STORE
AWS_ACCESS_KEY_ID=
AWS_SECRET_ACCESS_KEY=

# CASE 2 - If using NFS as ARTIFACT STORE
VOLUME_MOUNT=/mnt/mlflow/artifacts  # Should match DEFAULT_ARTIFACT_ROOT of MLFlow server
Run Docker Compose
Run the below command to start the Docker Compose setup:
docker compose upYou will get output of this process in a few minutes. The container should exit with the status code as ‘0’.
Verify Model is registered in MLFlow Tracking Server
In a web browser, open the MLFlow tracking server URL specified in your
.envfile.Go to the Models section in the MLFlow UI.
Verify that your foundation model named ‘bart’ is successfully registered and listed.
Register Generic Model
Steps to register Generic Model:
Here, you need to provide some variables in .env file.
Extract the Setup Bundle
Extract the setup bundle (example:
mlflow_setup_docker.tar.gz) provided by the Gathr team which includes the following folder after extracting:generic-model-registrar
Configure
.envFileHere, you need to provide three paths:
PYTHON_SCRIPT_PATH: Path to a .py file of model that you want to register.
Example: /mnt/efs/mlflowsetups/mlflowdocker/generic-model-registrar/externaldata/bartmodel.py
MODEL_WEIGHT_PATH: Path to model weight directory of the model that you want to register.
Example: /mnt/efs/mlflowsetups/mlflowdocker/generic-model-registrar/externaldata/bart2
REQ_TXT_PATH: Path of ‘requirements.txt’ file of model that contains necessary dependencies.
Example: /mnt/efs/mlflowsetups/mlflowdocker/generic-model-registrar/externaldata/requirements.txt
cd <setup-dir>/generic-model-registrar
vi .env
# User and Group Configuration MLFLOW_SERVICE_USER=ec2-user MLFLOW_SERVICE_UID=1000 MLFLOW_SERVICE_GROUP=ec2-user MLFLOW_SERVICE_GID=1000 PYTHON_SCRIPT_PATH=/mnt/efs/mlflowsetups/mlflowdocker/generic-model-registrar/externaldata/bartmodel.py MODEL_WEIGHT_PATH=/mnt/efs/mlflowsetups/mlflowdocker/generic-model-registrar/externaldata/bart2 REQ_TXT_PATH=/mnt/efs/mlflowsetups/mlflowdocker/generic-model-registrar/externaldata/requirements.txt MLFLOW_TRACKING_URL=http://1.1.1.1 5333 PYTHON_ENV_IMAGE_NAME=bartmodelregistar # Artifact Storage Configuration # CASE 1 - If using S3 as ARTIFACT STORE AWS_ACCESS_KEY_ID= AWS_SECRET_ACCESS_KEY= # CASE 2 - If using NFS as ARTIFACT STORE VOLUME_MOUNT=/home/ec2-user/mlflowdocker/tempvolume/artifacts # Should match DEFAULT_ARTIFACT_ROOT of MLFlow serverRun the script
buildModelAndRegister.shRun the below command to execute script that will build docker image and then register model.
cd <setup-dir>/generic-model-registrar
./buildModelAndRegister.sh
Script content for reference:
#!/bin/bash
set -e
#set -x

SCRIPT_DIR="$(cd "$(dirname "${BASH_SOURCE[0]}")" && pwd)"

source "$SCRIPT_DIR/.env"

echo $PYTHON_SCRIPT_PATH
echo $MODEL_WEIGHT_PATH
echo $REQ_TXT_PATH
echo $MLFLOW_TRACKING_URL
echo $PYTHON_ENV_IMAGE_NAME

docker load -i pythonbaseimage.tar

cp $PYTHON_SCRIPT_PATH ./models/mlflowmodel/modelscript.py

cp -r $MODEL_WEIGHT_PATH/* ./models/mlflowmodel/modelweight

cp $REQ_TXT_PATH ./requirements.txt

docker build --build-arg MLFLOW_TRACKING_URL="$MLFLOW_TRACKING_URL" -t $PYTHON_ENV_IMAGE_NAME .

docker images | grep $PYTHON_ENV_IMAGE_NAME


docker-compose up
If you have any feedback on Gathr documentation, please email us!