Gathr Prerequisites
💡 Before beginning with the installation, see Component Versions Supported →
Hardware and Software Configurations
Machine Type: 8 VCPUs, 32 GiB memory
Disk Space: 100 GB (Min)
Operating System
Linux: RHEL9/OEL9
sudo Access: Required during installation.
Internet Access: Optional (preferred during the installation)
Prerequisites
The prerequisites are listed below, and explained further in the sub-topics must be deployed before proceeding further:
Note: - For RHEL9 use yum package manager and for OEL9 use dnf package manager to install/update/remove packages.
💡 The component versions that are mentioned for each prerequisite are for representational purpose. For the Gathr supported component version details, see Component Versions Supported →
Java
Zookeeper
PostgreSQL
Elasticsearch
RabbitMQ
Python
Anaconda
Docker
Kubernetes
Tesseract Installation for Text Parsing
Java 8
Java is a basic prerequisite and it is required for Gathr installation.
Update Existing Packages on Machine
Install the latest updates on your machine using the below command:
sudo yum update
Java Installation Command
To install Java 8 on your machine, follow the below steps:
# sudo yum install java-1.8.0-openjdk
# sudo yum install java-1.8.0-openjdk-devel
For Multiple Java on System
If the machine has multiple JDK installed, you can use the alternatives command to set the default java.
# sudo alternatives --config java
A list of all installed Java versions will be printed on the screen. Enter the number of the version you want to use as the default and press Enter.
Set Java Home in User bashrc
Edit the bashrc using below command to set the Java home.
vi ~/.bashrcOnce the .bashrc file opens, append this Java home at the end:
export JAVA_HOME=/usr/lib/jvm/java-1.8.0-openjdk-1.8.0.412.b08-1.el7_9.x86_64
export PATH=$JAVA_HOME/bin:$PATH
Test Java home to check if it is set correctly using below command:
# source ~/.bashrc

# echo $JAVA_HOME

# echo $PATH
Type
jpsto check the status of running Java processes.
Zookeeper 3.9.1
Zookeeper is a basic prerequisite and it is required for Gathr installation.
Install Zookeeper
Steps to Install Zookeeper:
Download the
apache-zookeeper-3.9.1-bin.tar.gzpackage.You can download the package from: https://archive.apache.org/dist/zookeeper
Copy it in
<installation_dir>(e.g: /opt/gathr/services/).Untar the bundle using below command:
tar -xvzf apache-zookeeper-3.9.1-bin.tar.gzRun the below commands as a root or sudo user to provide permissions to the respective service ID.
chown -R serviceId:serviceId apache-zookeeper-3.9.1-binIn zookeeper folder, create a folder with the name
datadir.mkdir -p apache-zookeeper-3.9.1-bin/datadirCreate a copy of
<installation_dir>/apache-zookeeper-3.9.1-bin/conf/zoo_sample.cfgand rename it tozoo.cfgusing below command:cp apache-zookeeper-3.9.1-bin/conf/zoo_sample.cfg apache-zookeeper-3.9.1-bin/conf/zoo.cfgOpen the
zoo.cfgfile using below command:vi apache-zookeeper-3.9.1-bin/conf/zoo.cfgNext, update the below details in the
zoo.cfgfile:Update the IP address in
zoo.cfgfile and add below property:server.1=<ip of machine where zk is being installed>:2888:3888Update
dataDirpath inzoo.cfg:dataDir=<installation_dir>/apache-zookeeper-3.9.1-bin/datadir
Execute the below command to start Zookeeper.
<installation_dir>/apache-zookeeper-3.9.1-bin/bin/zkServer.sh startTo check the zookeeper status, run the below command:
<installation_dir>/apache-zookeeper-3.9.1-bin/bin/zkServer.sh statusRun
jpscommand to see if the QuorumPeerMain process is running.
PostgreSQL 14
PostgreSQL is the recommended database for various storage operations in Gathr.
Install PostgreSQL using the below steps:
Download the Postgres RPM using below command:
sudo yum install https://download.postgresql.org/pub/repos/yum/reporpms/EL-$(rpm -E %{rhel})-x86_64/pgdg-redhat-repo-latest.noarch.rpmInstall Postgresql 14:
sudo yum install postgresql14 postgresql14-serverInitialize the Database:
sudo /usr/pgsql-14/bin/postgresql-14-setup initdbYou will get a confirmation stating - ‘Initializing database … OK’.
Start the PostgreSQL Service:
sudo systemctl start postgresql-14Enable the PostgreSQL Service:
sudo systemctl enable postgresql-14Check the status of the PostgreSQL Service:
sudo systemctl status postgresql-14Configure PostgreSQL
Login into Postgres console using below command:
sudo -u postgres psqlReset the Admin database password:
psql -c "ALTER USER postgres WITH PASSWORD 'your-password';"Identify the PostgreSQL primary configuration file using below command:
sudo -u postgres psql -c 'SHOW config_file;'Create a backup of the Postgres primary configuration file:
sudo cp /var/lib/pgsql/14/data/postgresql.conf /var/lib/pgsql/14/data/postgresql.conf.bakOpen and configure the PostgreSQL configuration file to allow remote access:
sudo vi /var/lib/pgsql/14/data/postgresql.confAllow remote access:
listen_addresses = 'localhost'Change the listen address from localhost to all as follows:
listen_addresses = '*'Now, edit the PostgreSQL access policy configuration file:
sudo vi /var/lib/pgsql/14/data/pg_hba.conf
Update the PostgreSQL access policy configuration file as shown in the below example:
 ```
 # TYPE  DATABASE        USER            ADDRESS                 METHOD

 # "local" is for Unix domain socket connections only
 local   all             all                                     peer
 # IPv4 local connections:
 host    all         all         0.0.0.0/0          md5
 # IPv6 local connections:
 host    all             all             ::1/128                 md5
 # Allow replication connections from localhost, by a user with the
 # replication privilege.
 local   replication     all                                     peer
 host    replication     all             127.0.0.1/32            md5
 host    replication     all             ::1/128                 md5
 ```
Restart Postgresql service using below command:
sudo systemctl restart postgresql-14
RabbitMQ 3.11.16 (Optional)
This is an optional component; However, it is important as we are using this for pipeline error handling in Gathr.
Download below files from Rabbit MQ.
rabbitmq-server-generic-unix-3.11.16.tar.xz
esl-erlang_25.0.3-1~centos~7_amd64.rpm
Install erlang package
yum localinstall esl-erlang_25.0.3-1~centos~7_amd64.rpm -y
Then extract RabbitMQ tar:
tar -xf rabbitmq-server-generic-unix-3.11.16.tar.xz
Export PATH:
export PATH=$PWD/rabbitmq_server-3.11.16/sbin:$PATH
Starting the Server
To start the server, run the
sbin/rabbitmq-server
This displays a short banner message, concluding with the message “completed with [n] plugins.”, indicating that the RabbitMQ broker has been started successfully. To start the server in “detached” mode, use.
rabbitmq-server -detached
This will run the node process in the background.
Stopping the Server
To stop a running node, use the below command:
sbin/rabbitmqctl shutdown.
The command will wait for the node process to stop. If the target node is not running, it will exit with an error.
The node can be instructed to use more conventional system directories for configuration, node data directory, log files, plugins and so on.
In order to make the node use operating system defaults, locate the following line:
PREFIX=${RABBITMQ_HOME}
In the sbin/rabbitmq-defaults script, change this line to:
SYS_PREFIX=
Do not modify any other line in this script.
To create test user use the below command:
sudo rabbitmqctl add_user test test ; sudo rabbitmqctl set_user_tags test administrator; sudo rabbitmqctl set_permissions -p / test ".*" ".*" ".*"
rabbitmq-plugins enable rabbitmq_management
Systemd unit file:
Replace $DATA_PATH with actual Path. Create a file:
/tmp/rabbitmq-server.service
[Unit]
Description=RabbitMQ broker
After=syslog.target network.target

[Service]
Type=notify
User=rabbitmq
Group=rabbitmq
UMask=0027
NotifyAccess=all
TimeoutStartSec=600
LimitNOFILE=32768

Restart=on-failure
RestartSec=10
#WorkingDirectory=/var/lib/rabbitmq
ExecStart=$DATA_PATH/rabbitmq_server-3.11.16/sbin/rabbitmq-server
ExecStop=$DATA_PATH/rabbitmq_server-3.11.16/sbin/rabbitmqctl shutdown
# See rabbitmq/rabbitmq-server-release#51
SuccessExitStatus=69

[Install]
WantedBy=multi-user.target
Start/Stop/enable/Status commands for RabbitMQ:
Status- sudo systemctl status rabbitmq-server.service Start- sudo systemctl start rabbitmq-server.service Enable- sudo systemctl enable rabbitmq-server.service Stop-sudo systemctl stop rabbitmq-server.service
Elasticsearch 6.8.22
Elasticsearch is required to run features like Audit Trail, Error Search, Monitoring Graphs, and various search operations in Gathr.
To install Elasticsearch, open an SSH terminal and follow these steps:
Download Elasticsearch binary
(.tar.gz)(version 6.8.22) using below command:wget https://artifacts.elastic.co/downloads/elasticsearch/elasticsearch-6.8.22.tar.gzExtract the
tar.gzusing below command:$ tar -xvf elasticsearch-6.8.22.tar.gz -C <<installationDir>> $ cd <<installationDir>>/<<extractedDir>>Open
config/elasticsearch.ymlusing below command:vi config/elasticsearch.ymlOnce elasticsearch.yml file opens, update below configurations:
Parameter Value cluster.name: ES6822 node.name: < IP of the machine > path.data: /< installation-directory >/elasticsearch-6.8.22/data path.logs: /< installation-directory >/elasticsearch-6.8.22/logs network.host: < IP of the machine > http.port: 9200 discovery.zen.ping.unicast.hosts: ["< IP of the machine >"] Place this at the end of the file:
action.auto_create_index: .security*,.monitoring*,.watches,.triggered_watches,.watcher-history*,.ml*,sax-meter*,sax_audit_*,*-sax-model-index,true,sax_error_*,ns*,gathr_*,*_accumulator_*,query_monitoring_*Run the below command to set vm.max_map_count:
sudo sysctl -w vm.max_map_count=262144Run below command to start Elasticsearch in background:
nohup ./bin/elasticsearch &Check if the Elasticsearch process is running correctly by following any of these steps:
Run
jpscommand, it will show Elasticsearch process in output:OR
Hit the below URL on a Web browser to check if Elasticsearch service is running.
http://<IP of the machine>:9200/
Python 3.8.8
Gathr requires Python for features like Workflows, Scikit-Based Models Registration, Python Processor, Scikit Processor, OpenAI Embeddings Generator Processor, Pinecone Vector Emitter, Pinecone Vector Lookup, Binary To Text Parser, and so on.
Python 3.8.8 should be installed on all the nodes of the cluster that are hosting any services required to run Gathr, like, HDFS, Spark, Yarn, Airflow, Gathr Webstudio, and so on.
Python 3.8.8 Installation
To install Python 3.8.8, open an SSH terminal and follow these steps:
Required Packages for Installation:
Use the following command to install prerequisites for Python 3.8.8.
sudo yum install zlib-devel bzip2-devel openssl-devel ncurses-devel sqlite-devel readline-devel tk-devel gdbm-devel db4-devel libpcap-devel xz-devel gcc openssl-devel bzip2-devel libffi-devel zlib-devel

sudo yum groupinstall "Development Tools"
If the command
sudo yum groupinstall "Development Tools"fails to download development tools, then run the below command:sudo yum install @developmentOnce the prerequisites for installing Python 3.8.8 are met, proceed to the next step.
Download Python 3.8.8 tar bundle
Download Python tar bundle using the below command:
cd /opt

wget https://www.python.org/ftp/python/3.8.8/Python-3.8.8.tgz
Now, extract the downloaded package.
cd /opt

tar xzf Python-3.8.8.tgz
Compile Python Source
Use the below set of commands to compile python source code on your system.
cd Python-3.8.8

sudo ./configure --enable-optimizations

sudo make altinstall
Now, remove the downloaded source archive file from your system.
sudo rm Python-3.8.8.tgzCheck Python 3.8 Version
Check the Python 3.8 version using the below command:
python3.8 -VCreate a softlink
Run the below command to create a softlink so that default “python3” points to “python3.8”
ln -sf /usr/local/bin/python3.8 /usr/bin/python3

ln -sf /usr/local/bin/pip3.8 /usr/bin/pip3
Check Python 3 Version
Check Python 3 version using the below command:
python3 -VInstall Python Packages
Install below required Python packages with Python 3.8:
pip3 install urllib3==1.26.15(optional)

pip3 install h2o==3.28.1.3

pip3 install scikit-learn==0.24.1

pip3 install numpy==1.19.2

pip3 install pandas==1.2.4

pip3 install matplotlib==3.4.2

pip3 install mlflow==1.0.0

pip3 install hdfs==2.5.8

pip3 install scipy==1.6.2
Anaconda Installation
Below are the steps to install Anaconda
To use GUI (Graphical User Interface) packages with Linux, install the following extended dependencies for Qt:
yum install libXcomposite libXcursor libXi libXtst libXrandr alsa-lib mesa-libEGL libXdamage mesa-libGL libXScrnSaverTo download the installer, open a terminal and use the following command:
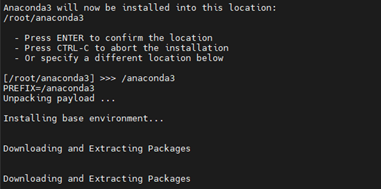
curl -O https://repo.anaconda.com/archive/Anaconda3-2023.09-0-Linux-x86_64.shTo install, run the following command as mentioned below:
bash Anaconda3-2023.09-0-Linux-x86_64.shEnter to review the license agreement.
Then press and hold Enter to scroll.
Enter yes to agree to the license agreement.

- Use Enter key to accept the default install location, use CTRL+C to cancel the installation, or enter another file path to specify an alternate installation directory. Eg:- /anaconda3 in below case:
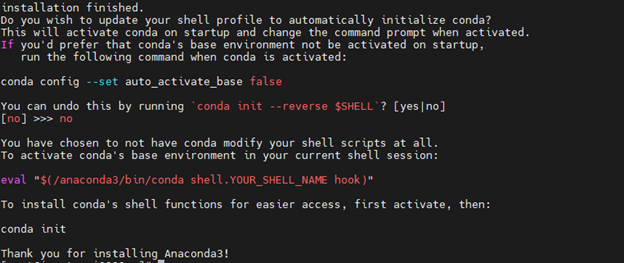
- Enter “no”, conda will not modify your shell scripts at all to initialize Anaconda Distribution.
Change permission of /anaconda3 folder by using the below command:
```
sudo chmod 777 /anaconda3

```
Once installation is done, go to the below folder
```
<anaconda installed folder>/bin

```
Run the below command:
```
conda init

```
It will make entries in .bashrc.
Repeat this step for users to initialize conda.
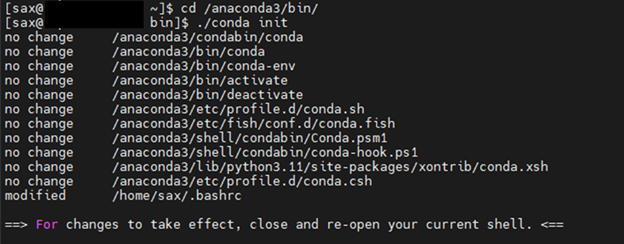
Switch to sax user.
```
cd /anaconda3/bin
./conda init
```
Even if conda activate base environment after login, run the below command
```
conda config --set auto_activate_base false

```
Open new terminal with sax user.

Repeat step 8 and 9 for root user.


Installation is done, now check conda version.

To know more about anaconda refer to the click here.
Tesseract Installation for Text Parsing
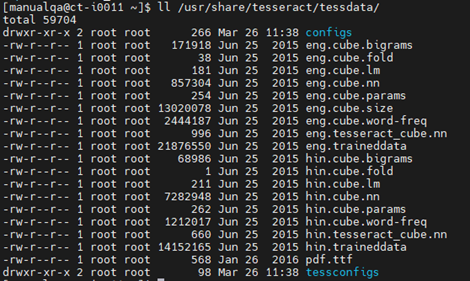
Install the below packages:
- sudo yum install epel-release
- sudo yum install tesseract-langpack-eng
- sudo yum install tesseract-langpack-hin
echo 'export TESSDATA_PREFIX=/usr/share/tesseract/tessdata/' >> ~/.bashrc
source ~/.bashrc
Make sure tessract path “export TESSDATA_PREFIX=/usr/share/tesseract/tessdata/” is correct.
Generic JDBC Elasticsearch Connector
Steps to follow for the Generic JDBC Elasticsearch component first time deployment.
Create folder /genericjdbc/ inside sax installation directory i.e $SAX_HOME/lib/genericjdbc/
Copy the Generic JDBC Elasticsearch connector jars to the given location $SAX_HOME/lib/genericjdbc/ from $SAX_HOME/conf/thirdpartylib/genericjdbc-elasticsearch-1.0.1.jar
Update “sax.local.inspect.classpath”:"$SAX_HOME/lib/genericjdbc/*.jar” property in common.yaml file.
Add the connector jar to the “$SAX_HOME/server/tomcat/lib/ " folder from $SAX_HOME/lib/genericjdbc/
Read-only user for Postgres database required for Data asset AI support
Below are the steps to Create readonly user in SQL Server:
Login with SQL admin user
CREATE LOGIN readonly WITH PASSWORD = ‘ReadOnly@123’;
USE gathr_database;
CREATE USER readonly FOR LOGIN readonly;
GRANT SELECT TO readonly;
Below are the steps to create readonly user in Postgres Server:
Login with postgres admin user
CREATE ROLE readonly WITH LOGIN PASSWORD ‘readonly’;
GRANT CONNECT ON DATABASE gathr_database TO readonly;
GRANT USAGE ON SCHEMA public TO readonly;
\c <db_name>
GRANT SELECT ON ALL TABLES IN SCHEMA public to readonly;
Kubernetes
💡 The component versions that are mentioned in this sub-topic are for representational purpose only. For the Gathr supported component version details, see Component Versions Supported →
Kubernetes is required to register container images in Gathr application and connect integrated development environments such as, Jupyter Lab or Visual Studio Code on the sandbox.
Below are the setup details for Kubernetes cluster:
Requirements
A Kubernetes cluster with access to the kube-apiserver endpoint.
https://kube-apiserver:kube-apiserver_port_number)
Default API port is 443
Connectivity between the access node and the API server endpoint URL.
To check accessibility, run the following command on the access node:
curl https://kube-apiserver:kube-apiserver\_port\_number/version --insecure
- A Kubernetes service account, an account to access Kubernetes, or a kubeconfig file that is created by using the service account and a token.
Kubernetes cluster should be available, which typically comprises of master node and multiple worker nodes.
The cluster and its nodes are managed from the master node using ‘kubeadm’ and ‘kubectl’ command.
To install and deploy Kubernetes, it is recommend to have Kubeadm (Multi Node Cluster).
On the Master Node following components will be installed:
API Server
Scheduler
Controller Manager
etcd
Kubectl utility
On the Worker Nodes following components will be installed:
Kubelet
Kube-Proxy
Pod
For the detailed setup information about setting up Kubernetes cluster, please refer:
or:
Verify Kubernetes Installation:
On Kubernetes master and worker nodes, check Start/Stop/Restart services:
systemctl status kubelet
systemctl status docker
systemctl status nfs-server
Run below commands on Kubernetes master to get status of cluster and pods:
kubectl get nodes
kubectl get pods --all-namespaces
Debugging Kubernetes Pods:
Run below commands on Kubernetes master:
Try to get pod info and verify the events, volume mounts, environment variables, endpoints etc.
kubectl describe pod <pod-name>You can also watch logs of pod using:
kubectl logs -f <pod-name>|Try entering bash/sh terminal of the pod and look at the configurations, volume map etc.
kubectl exec -it <pod-name> bashIf a pod is evicted, try to look at nodes, CPU/Memory/Disk pressure. Describe a node:
kubectl describe node <node-name>If disk pressure is True, which evicts the pod, also see the events listed at bottom while you describe node. You can also watch logs of kube-scheduler for more details.
Troubleshooting Cluster
Run below commands on Kubernetes master:
Listing cluster:
kubectl get nodes
To get detailed information about the overall health of the cluster:
kubectl cluster-info dump
To check logs on Master Node:
- API Server, responsible for serving the API
/var/log/kube-apiserver.log
- Scheduler, responsible for making scheduling decisions:
/var/log/kube-scheduler.log
- Controller that manages replication controllers:
/var/log/kube-controller-manager.log
To check logs on Worker Nodes:
- Kubelet, responsible for running containers on the node:
/var/log/kubelet.log
- Kube Proxy, responsible for service load balancing:
/var/log/kube-proxy.log
Firewall Settings
Check whether firewall is stopped:
firewall-cmd --state
systemctl status firewalld
If you have any feedback on Gathr documentation, please email us!