Processors
Processors are built-in operators for processing the data by performing various transformations and analytical operations. Each processor is responsible for performing a specific action. You can drag and drop multiple processors and stitch them together to implement the business logic in a pipeline.
Alert processor notifies users about occurrence of a specific event during pipeline execution as configured by the user.
Configuring Alert processor for Spark pipelines
To add an Alert processor into your pipeline, drag the processor to the canvas and right click on it to configure.D
|
Field |
Description |
|---|---|
|
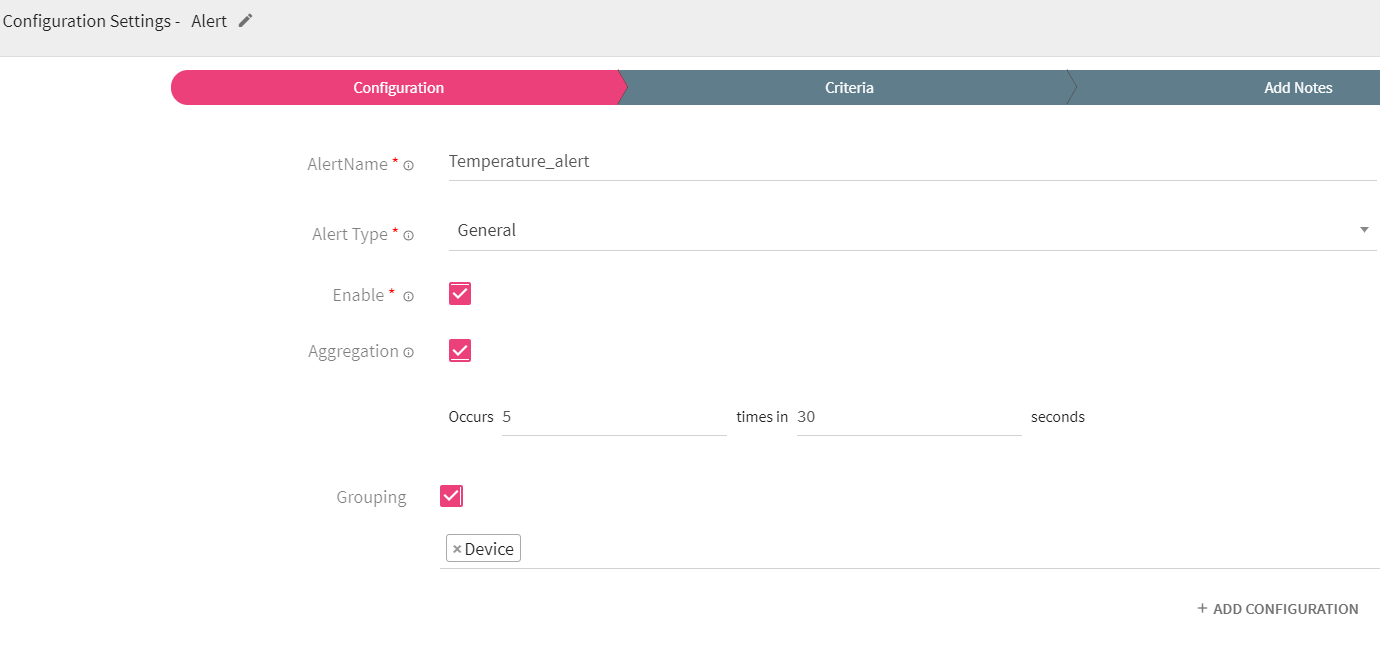
Alert Name |
Specify a name for the alert. The alert is triggered with this name when the criteria is met. |
|
Alert Type |
Depending upon the severity of the alert, you can provide an Alert Type. • General: low severity • Critical: high severity |
|
Enable |
To enable or disable the alert. If enabled, alerts are generated based on the criteria specified. If disabled, no alerts are generated. |
|
Aggregation |
It accumulates incoming records for a specific window interval. You can enable or disable the Aggregation property. • Enabled: When Aggregation is selected, a single alert is generated for a specific time window and frequency when it matches the alert criteria. • Disabled: When Aggregation is deselected , alert is generated every time whenever it matches the alert criteria. |
|
Occurs/frequency |
Number of occurrences of a repeating event. |
|
times in |
Window duration of the event. |
|
Grouping |
Grouping field appears only if Aggregation checkbox is selected.
Suppose you want to generate an alert for a device when its temperature goes above 1000 F, for 5 times in the last 30 seconds.
You start by specifying the Alert criteria as: temperature > 1000 F
Then select the Aggregation checkbox and specify values as occurs “5” times in “30”seconds.
The system will check for the specified criteria and verify the devices one by one.
You are receiving temperatures for device MAC001, and if it registers more than 1000 F for 5 times in 30 seconds, the system will generate the alert once.
If both Aggregation and Grouping fields are not selected, and criteria specified is: “temperature > 1000 F”. Alert will be generated every time whenever condition is met. |
|
ADD CONFIGURATION |
Enables to configure additional properties. |
Click on the NEXT button. Specify the Alert criteria here.
 .
.
|
Field |
Description |
|---|---|
|
Criteria |
Criteria provides the condition for the Alert to be generated. Multiple condition on same or different fields can be configured and operations (AND & OR) can be applied to them as well. Supported conditions for creating an expression are as follows (applicable as per data type – Text/Number/Decimal): If you select text field, following function will appear • contains • does not contain • starts with • does not start with • ends with • does not end with • equals • not equal to • less than |
|
Add Group/ Add Rule |
Multiple rules and groups can be configured on same or different message fields. |
|
Send Alerts |
Specify email address to which notifications should be sent when an alert is generated. You can send mail to multiple recipients with CC and BCC fields. |
|
Frequency |
Occurrence of filter condition when specified rule criteria is met. |
Click on the NEXT button. Enter the notes in the space provided. Click Save for saving the configuration details.
How to View Generated Alerts
To view generated Alerts, go to your Workspace > Alerts > Information.

The bell icon on top right of the page shows notification of alerts generated. For example, if you see 1 next to bell icon, it indicates 1 alert is generated.
If you click on the bell icon, you can view the alerts generated. The system will display last twenty alerts at a time.
Refresh Interval: The time interval after which you want to refresh or reload the page. For example, if refresh interval is 5 minutes, page will be refreshed after 5 minutes.
Actions:
The following two types of actions can be performed on the Alerts.
1. View Description: The Alert description which you entered at the time of creation of Alert can be viewed by clicking on the eye  icon.
icon.
2. View Message Source: The source record for which alert is generated can be viewed by clicking on the View Message Source ![]() icon.
icon.
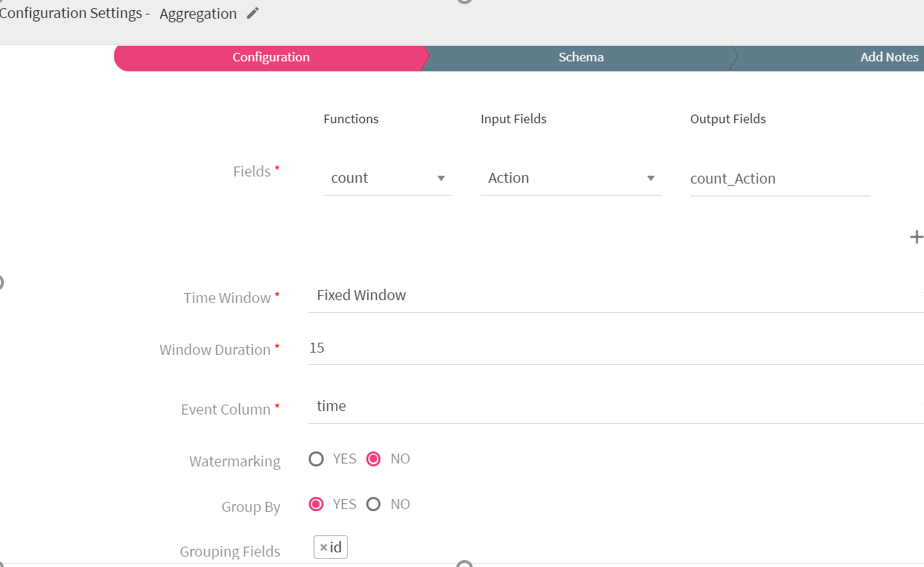
The aggregation processor is used for performing the operations like min, max, average, sum and count over the streaming data.
For example, you have an IOT device, which generates an event comprising of three fields: id, time and action.
You wish to calculate how many actions of each type happened in a window of 15 seconds duration. You can make use of Aggregation (COUNT) operation for calculating the number of actions of each type from total events received in a window of 15 seconds duration.
The following table lists the functions supported by Aggregation processor.
|
Average |
Calculates average of selected fields and also assigns it to provided output field. |
|
Sum |
Sum function totals all the selected fields and also assigns it to provided output field. |
|
Count |
Count values of selected input fields and also assigns it to provided output field. |
|
Minimum |
Calculates the minimum value of selected fields and also assigns it to provided output field. |
|
Maximum |
Calculates the maximum value of selected fields and also assigns it to provided output field. |
Configuring an Aggregation processor for Spark pipelines:
To add an Aggregation processor into your pipeline, drag the processor to the canvas and right click on it to configure.
|
Field |
Description |
|---|---|
|
Functions |
All Aggregation functions are listed here. Select the function from the list which is to be applied over Input fields. |
|
Input Fields |
Select the fields from the list on which Aggregation has to be applied. |
|
Output Field |
Outcome of the Aggregation function is stored in this field. |
|
Time Window |
Type of time window that you want to apply. Time window options: • Fixed Length: When selected, configured aggregation functions get applied over a fixed window duration. • Sliding Window: When selected, configured aggregation functions get applied over the moving window. |
|
Window Duration |
Time window duration in seconds. |
|
Slide Duration |
Window slide duration in seconds. |
|
Event Column |
Time stamp column of incoming records. |
|
Watermarking |
Watermark handles the data which arrives late. The data is considered to be late when it arrives to the system after the end of the window. The water mark mechanism keeps the window open for specified watermark duration in addition to initial defined window duration.
• Yes: Enables watermarking. • No: Disables watermarking. |
|
Watermark duration |
It keeps the window open for the specified watermark duration in addition to initial defined window duration. • Yes: when selected Yes, watermarking will be applied. • No: When selected No, watermarking will not be applied. |
|
Group By |
Applies grouping based on the selected fields. • Yes: Enables selection of grouping fields. • No: Disables selection of grouping fields. This is the default option. |
|
Grouping Fields |
Select fields on which grouping is to be applied. |
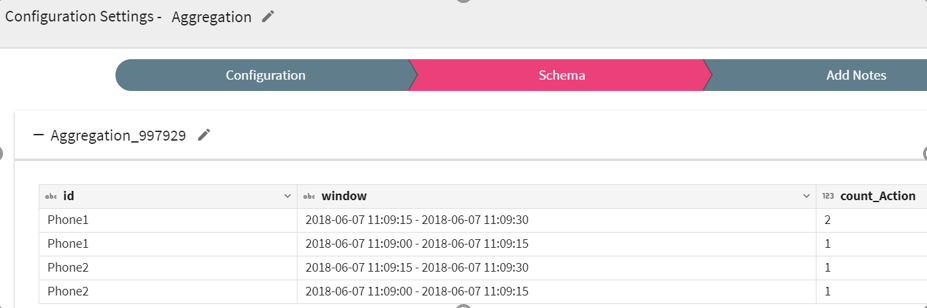
Click on the Next button.You will view new schema based on your aggregation operation applied.
Click on the NEXT button. Enter the notes in the space provided.
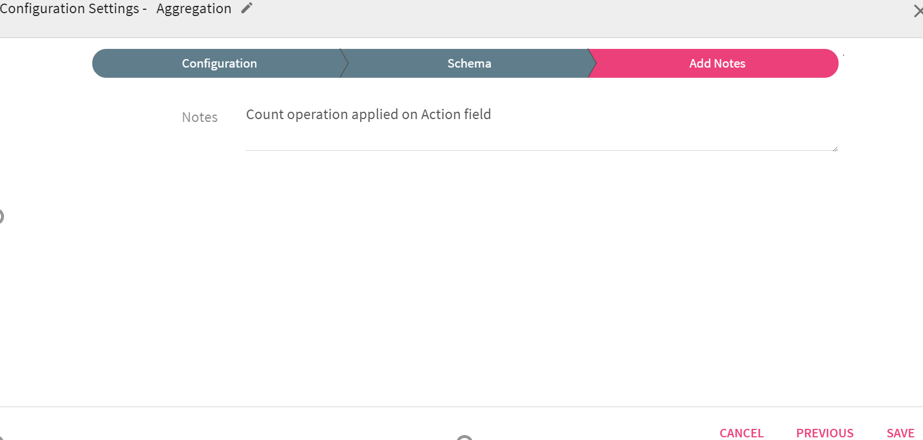
Click SAVE for saving the configuration details.

It is a processor which enables you to create a custom business logic. It is used for components which are not inbuilt within StreamAnalytix.
Implements the ‘com.streamanalytix.framework.api.processor.JSONProcessor ‘interface and provides custom business logic in implemented methods.
You are able to perform operations on datasets which are not supported by other processors.
Pre-requisites
To use a custom processor, you need to create a jar file containing your custom code. Then upload the jar file in a pipeline or as a registered component.
To write a custom logic for your custom channel, download the sample project.
Import the downloaded sample project as a maven project in Eclipse. Ensure that Apache Maven is installed on your machine and that the PATH for the same is set.
Implement your custom code. Build the project to create a jar file containing your code, using the following command:
mvn clean install –DskipTests.

If the maven build is successful, you need to upload the jar on the pipeline canvas as shown below.
Custom processor for Spark
Custom processor for Spark supports writing code in Java programming language.
While using Custom processor in pipeline, you need to create a class which implements com.streamanalytix.framework.api.spark.processor.CustomProcessor interface. Add unimplemented methods in this class to write your own business logic in it.
Shown below is a sample class structure:
There are three methods to implement.
1. Init: Enables to enter any initialization calls.
2. Process: Contains actual business logic.This method is called for each and every tuple.
3. Cleanup: All resource cleanup occurs in this method.
Configuring Custom processor for Spark pipelines
To add a Custom processor into your Spark pipeline, drag the Custom processor on the canvas. Right click on it to configure as explained below.
|
Field |
Description |
|---|---|
|
Implementation Class |
Fully qualified name of the class which implements custom processor and has custom logic.
The control will be passed to this class in order to process incoming dataset. |
|
ADD CONFIGURATION |
Additional properties can be added using ADD CONFIGURATION link. |
Click on the NEXT button. Enter the notes in the space provided.
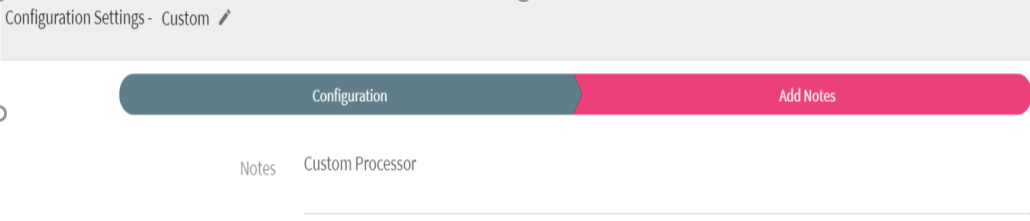
Click SAVE for saving the configuration details.
The container processor loads data to Couchbase server and reads data from it.
This processor is used as a caching container which reads both the aggregated data and raw data from the bucket.
Configuring Container processor for Spark pipelines
To add a Container processor into your pipeline, drag the processor to the canvas and right click on it to configure.

|
Field |
Description |
|---|---|
|
Bucket Name |
Couchbase bucket name. Select the couchbase bucket that gets generated with Couchbase connection .
You can also create a new bucket by specifying the bucket name. you also need to specify bucket password. |
|
Bucket Password |
Specify Bucket password in case new bucket is created. |
|
Memory Quota |
Memory Quota in megabytes per Couchbase server node. Memory Quota cannot be less than 100 MB. |
|
Replicate View Indexes |
By checking the Replicate view indexes checkbox, you ensure that view indexes, as well as data are replicated |
|
Flush |
When flushed, all items in the bucket are removed as soon as possible. |
|
Document Id |
Unique identifier for newly created documents of Couchbase. |
|
Retention Enable |
When selected, each newly created item lives for the number of seconds specified by retention policy. After the expiration time is reached item will be deleted by Couchbase server. |
|
Record Limit |
Limit to fetch the records from Couchbase. When selected Yes, specify number of records to be fetched from the Couchbase server. When selected No, all records will be fetched from the server. |
|
Max No of Records |
Number of records to be pulled from the server. |
|
Overflow Condition |
Fetch the records based on order for the selected column. (Fetch minimum records for ascending order and fetch maximum records for descending order) Note: With aggregation, select the grouping field in the Overflow condition. |
|
Fetch Data |
Raw Data: Fetch the raw data from the Couchbase bucket. Aggregated Data: Fetch the aggregated data from the Couchbase. A new field is populated, where you can group the fields from the schema. |
|
Grouping Fields |
Field of selected message on which group by is applied. |
|
Fields |
Select the fields on which function is to be applied. |
Click on the NEXT button. Enter the notes in the space provided.
Click SAVE for saving the configuration details.
Distinct is a core operation of Apache Spark over streaming data. The Distinct processor is used for eliminating duplicate records of any dataset.
Configuring Distinct processor for Spark pipelines
To add a Distinct processor into your pipeline, drag the processor on to the canvas and right click on it to configure.
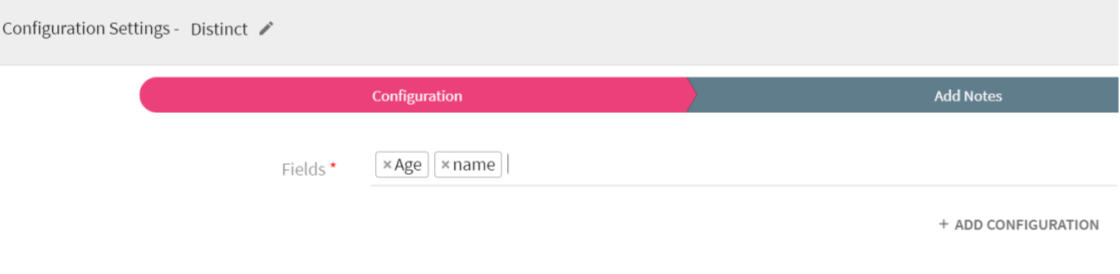
Enter the fields on which distinct operation is to be performed.
Click on the NEXT button. Enter the notes in the space provided.
Click SAVE for saving the configuration details.
Note: Distinct can't be used right after Aggregation and Pivot processor.
Example to demonstrate how distinct works.
If you apply Distinct on any two fields: Name and Age, then the output for the given fields will be as shown below: I
|
Input Set {Name:Mike,Age:7} {Name:Rosy,Age:9} {Name:Jack,Age:5}
{Name:Mike,Age:6} {Name:Rosy,Age:9} {Name:Jack,Age:5} |
Output Set {Name:Mike,Age:7} {Name:Mike,Age:6} {Name:Rosy,Age:9} {Name:Jack,Age:5} |
In applications, you are often encountered with large datasets where duplicate records are available. To make the data consistent and accurate, you need to get rid of duplicate records keeping only one of them in the records.
Dedup processor returns a new dataset after removing all duplicate records.
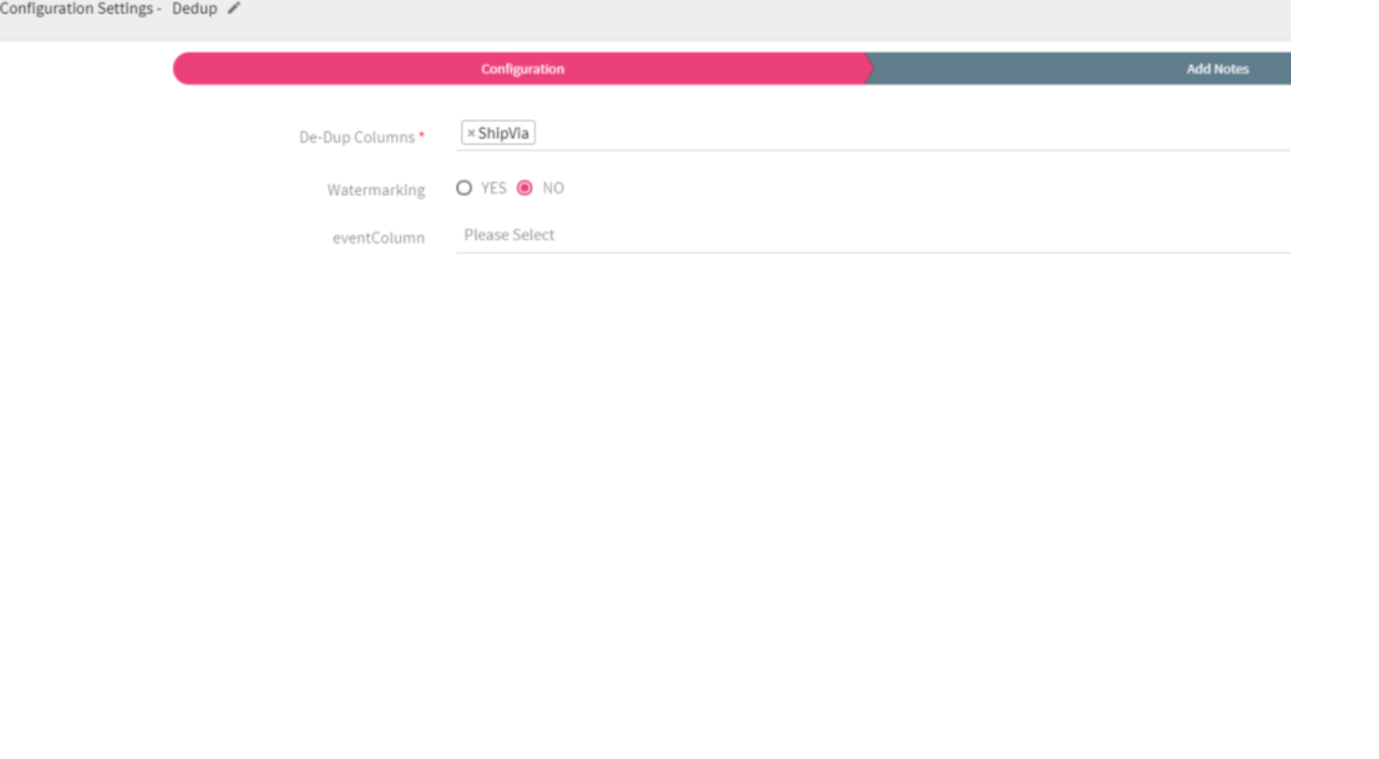
Configuring Dedup processor for Spark pipelines
To add Dedup processor into your pipeline, drag the processor to the canvas and right click on it to configure.
|
Field |
Description |
|---|---|
|
De-Dup Columns |
Columns used for determining the duplicate values. |
|
Watermarking |
Yes: When selected Yes, watermarking will be applied. No: When selected No, watermarking will not be applied. |
|
Watermark Duration |
Specify the watermark duration. |
|
eventColumn |
Message field of type timestamp. |
|
ADD CONFIGURATION |
Additional properties can be added using ADD CONFIGURATION link. |
Click on the NEXT button. Enter the notes in the space provided.
Click Save for saving the configuration details.
Example to demonstrate how Dedup works:
You have a dataset with following rows:
[Row(name='Alice', age=5, height=80),
Row(name='Alice', age=5, height=80),
Row(name='Alice', age=10, height=80)]
Now if Dedup columns are [age, height], then Dedup processor would return below dataset:
[Row(name='Alice', age=5, height=80),
Row(name='Alice', age=10, height=80)]
and if Dedup columns are [name, height], then Dedup processor would return below dataset:
[Row(name='Alice', age=5, height=80)]
DQM stands for Data Quality Management. DQM processor defines the quality rules for data and performs necessary action on the faulty data.
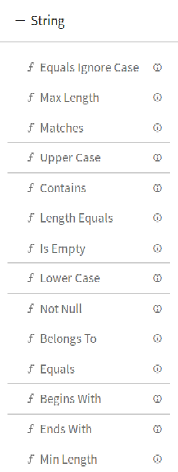
It performs series of validation on individual data field along with actions on functions, in case if applied validation fails. Varieties of validations are available for each Data Type such as Not Null, Contains, and Starts With and Ends With.
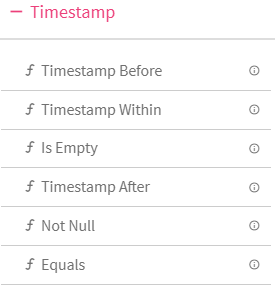
DQM processor has six categories of Validation functions, one for each Data Type.
Data Type
1.String
2.Number
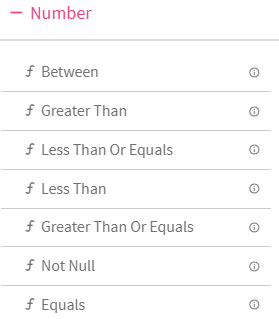
3.Decimal
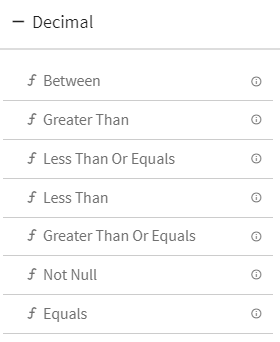
4.Date
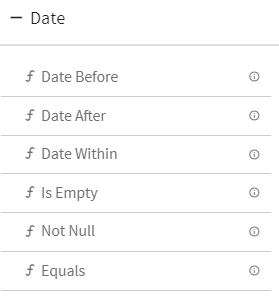
5.Boolean
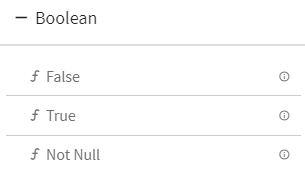
6.Timestamp
DQM processor has three Action functions that are triggered when Validation fails:
1.Send To Error –It persists the invalid record in configured error handler target and discards the record for further processing in pipeline. Error handler becomes mandatory once you select “Send To Error” action. The key “errorMessage” in the error handler target contains the expressions due to which validation failed.
2.Assign Value –It gives option to assign static or dynamic values to any message field.
a.Static Values:
Select any message field and apply validation on it. If the validation criteria is not met , assign static values to that field.
Example :
Let us apply validation on field “id” (id equals to 10).
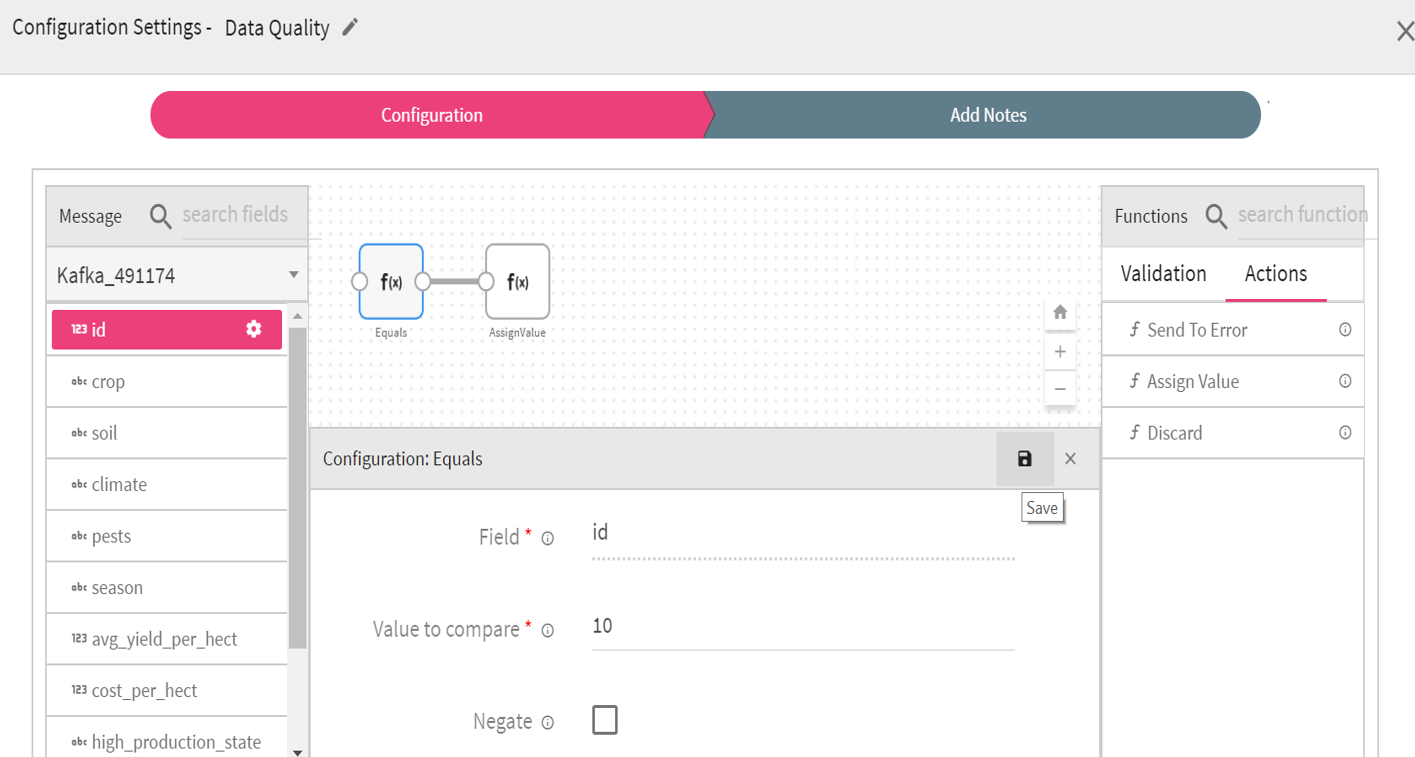
Click on the Save button for saving the validation criteria.
Whenever the value of the field “id” is equal to “10”, the record will be processed as it is .
If the value of the field “id” is not equal to “10” , static value 100 will be assigned to that id .
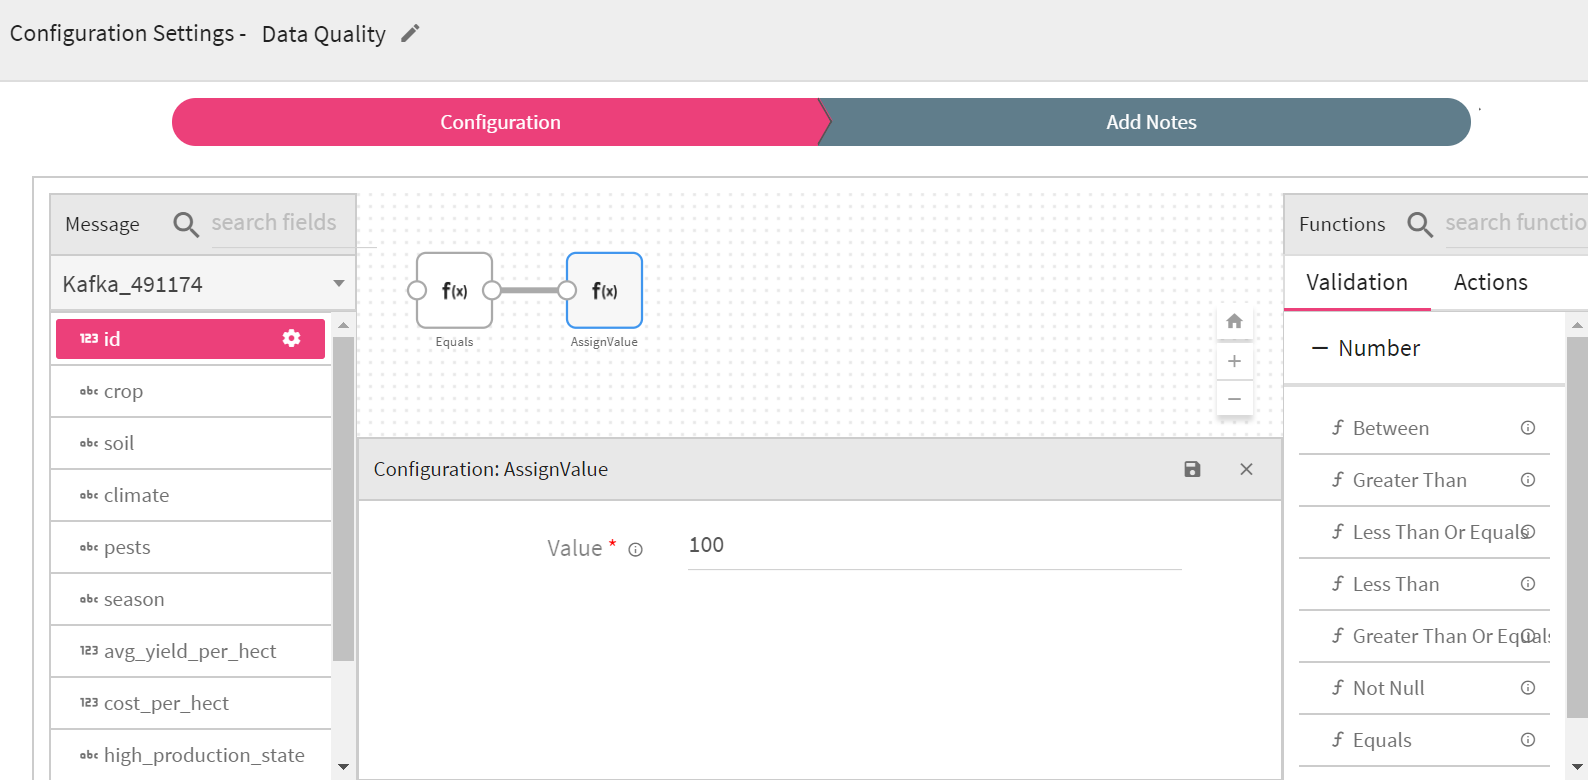
Click on the Save button for saving the configuration settings.
Click Next and write the notes. The changes will be reflected in Auto Inspect window
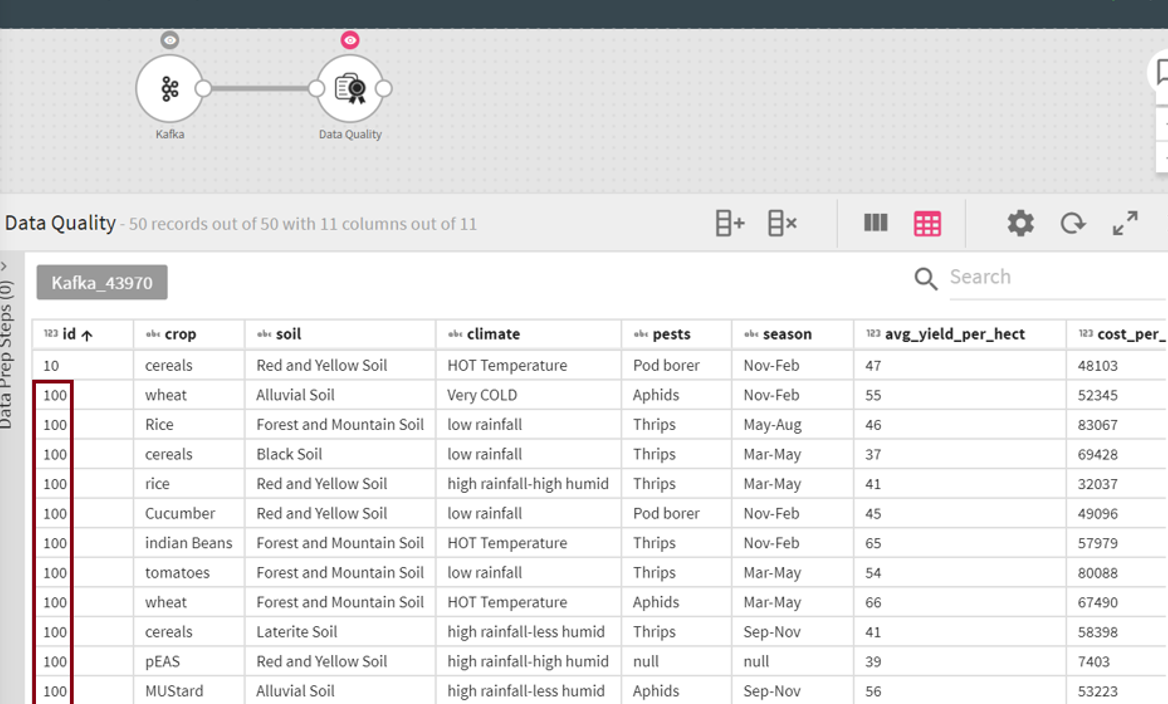
We can see in the above screen wherever id value was not 10, the value got replaced with the static value 100.
b.Dynamic values :
• Dynamic String Values:
• Dynamic Numeric values
Dynamic String Values
Dynamic values can be assigned using @ (the rate operator).
Select any message field and apply validation on it. If the validation criteria is not met, assign dynamic values to that field.
Example:
Let us apply validation on field “id” (id equals to 10).
Wherever the value of the field id is equal to 10, the record will be processed as it is . If this validation criteria is not met , dynamic value should be assigned to that id .
You can dynamically assign the values of any other field like crop, soil, climate, pest, cost_per_hectare (message fields) to the field id wherever validation criteria is not met.
Write @ (the rate operator) in the values text box of Configuration Settings-Assign Value .
All the message fields will be displayed in the drop down list. Select the field whose value is to be dynamically assigned to field id .
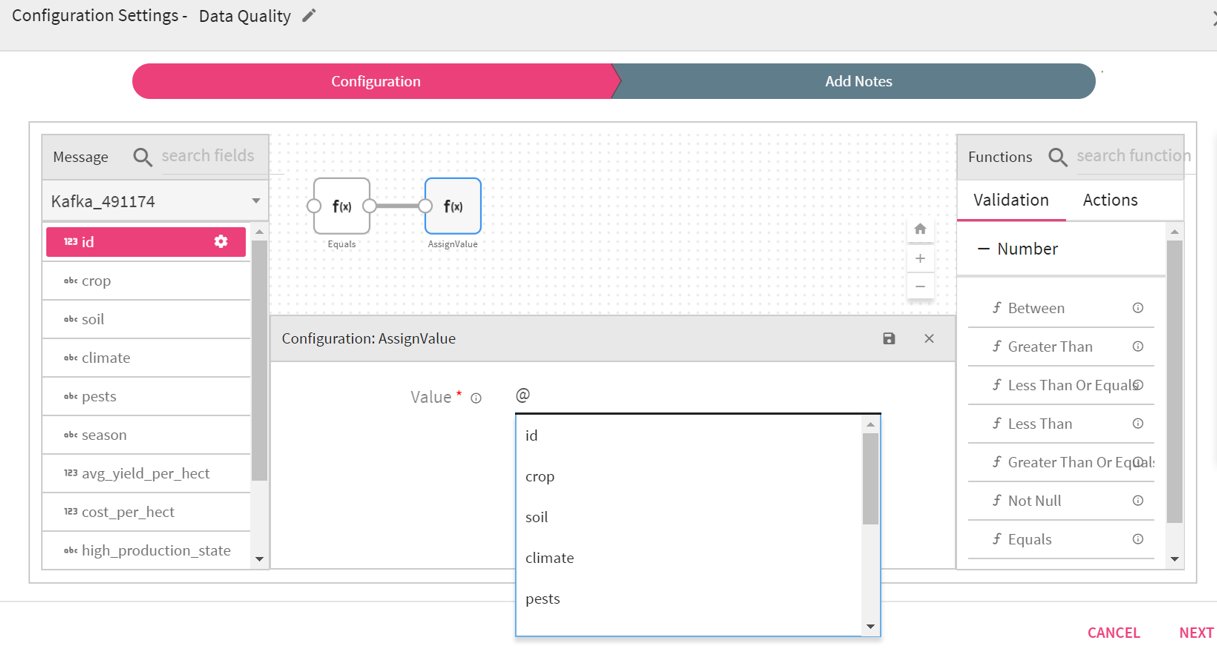
For example, let us select field “soil” from the drop down list.
Write the expression as : @{soil}
The selected field value has to be enclosed within the curly braces.
After writing the expression, click on the Save button.

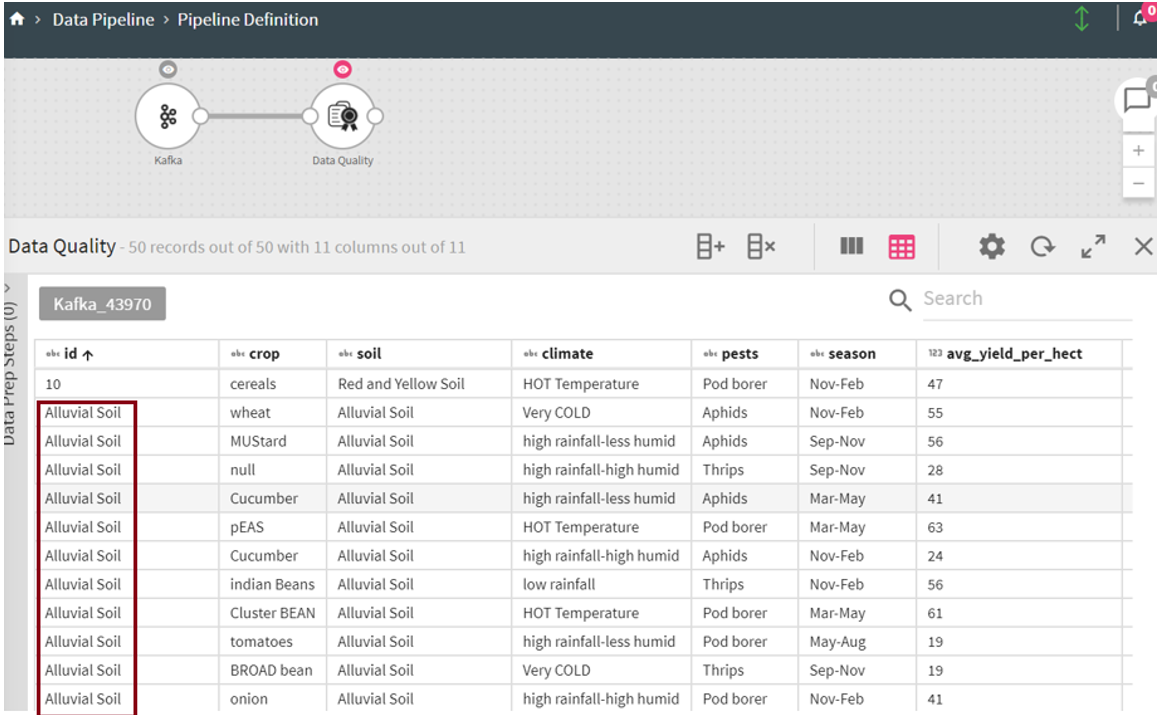
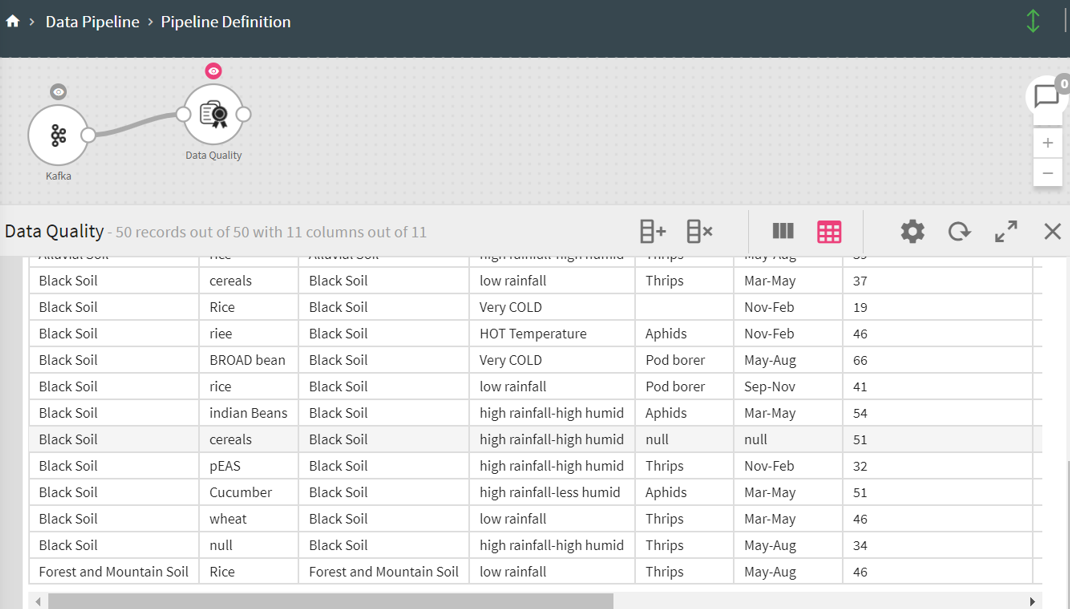
Wherever the value of the field id is 10, the record will be processed as it is.
Otherwise , the value of the field soil will be assigned to the id value in that column.
Click on the Save button for saving the configuration settings.
Click Next and write the notes. The changes will be reflected in Auto Inspect window
We can see in the below screen, wherever field id value was not 10, field soil got assigned to the id value.
Note: It is important to keep data type into consideration while assigning the dynamic values. The data type of two columns should be same for assigning the values except the String datatype.
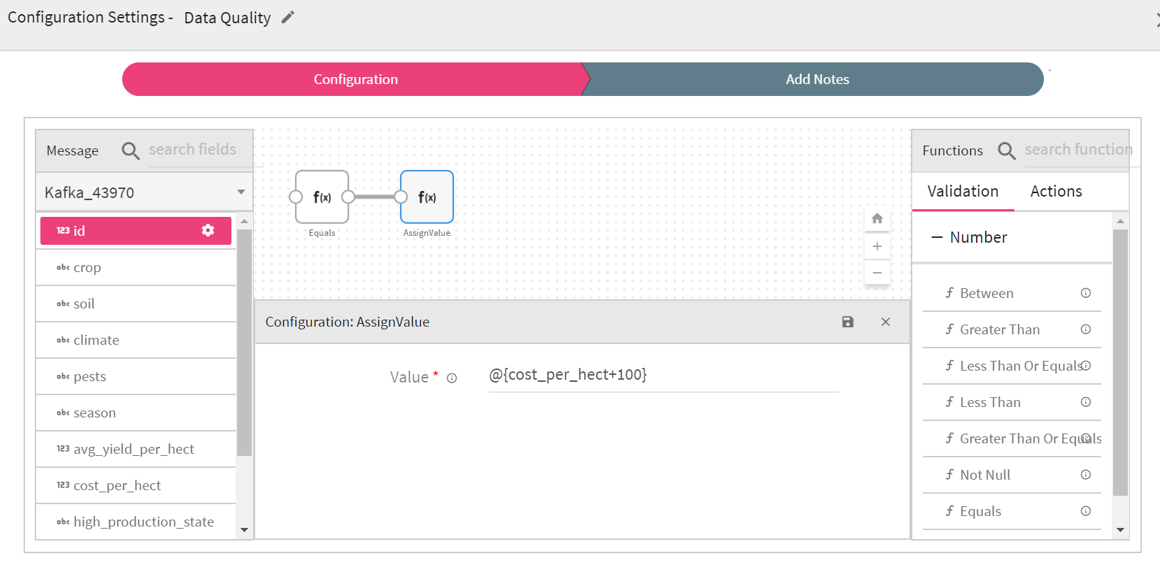
Dynamic Numeric value: For numeric fields, mathematical operations can be used for assigning the values.
Example :
Let us apply validation on field “id” (id equals to 10).
Wherever the value of the field id is equal to 10, the record will be processed as it is . If this validation criteria is not met, assign dynamic value to the field id using arithmetic operators.
Let us apply simple mathematical operation on the field “cost_per_hect”.
Write the expression as @{cost_per_hect+100}
The expression will be evaluated as cost per hectare value will be added to 100. The output will be assigned to the field id wherever its value is not 10.
Click on the Save button for saving the configuration settings.
Click Next and write the notes. The changes will be reflected in Auto Inspect window.
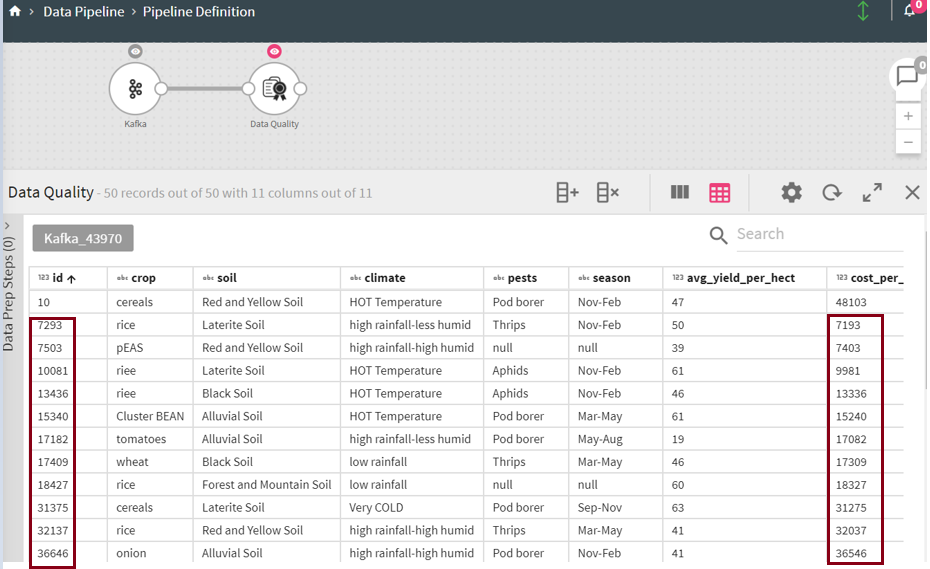
Let us evaluate the columns “ id and cost_per_hect”.
The value of the f cost_per_hect in the second row is 7193 , if 100 is added to it , the output is 7293 and this value gets assigned to the field id .
The value of the f cost_per_hect in the third row is 7403, if 100 is added to it,the output is 7503, this value gets assigned to the field id .
Accordingly, all id values get updated except where the id is 10.
3.Discard –It discards the record for further processing in pipeline.

If a record is eligible for more than one action then Actions will be executed as per below order:
1.Send To Error (Highest priority)
2.Discard (Lowest priority)
Configuring DQM Processor:
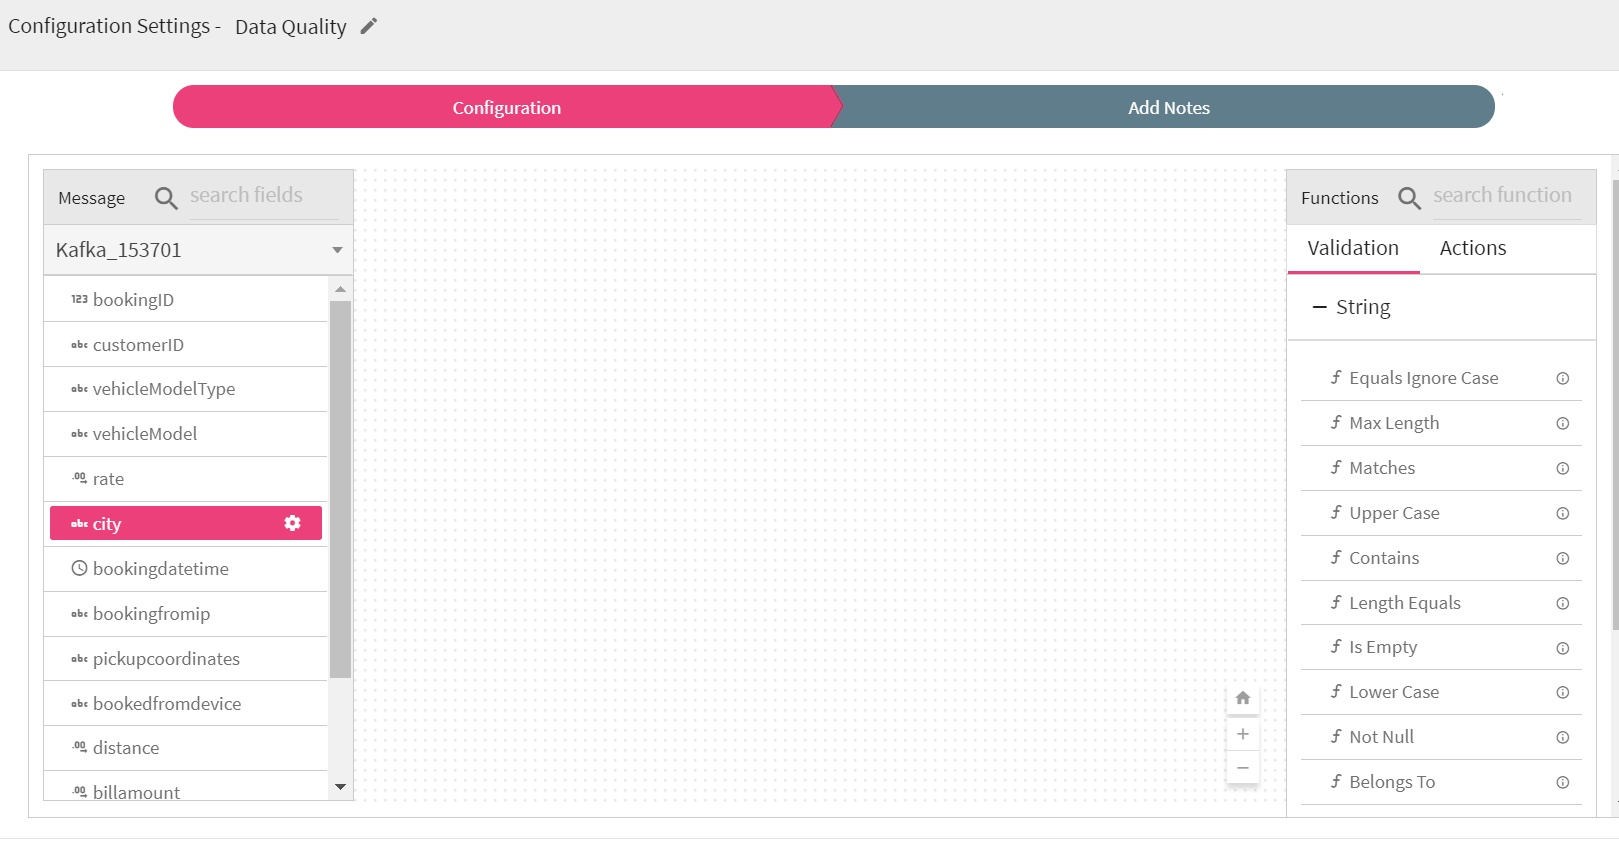
To add a DQM processor into your pipeline, drag the DQM processor to the canvas and connect it to a channel or processor. Right click on it to configure.
On the configuration canvas of Data Quality processor, select fields, then drag and drop the Validation and Action functions.
Choose a field in message panel from Configuration, respective data type validations will be expanded in function panel as shown in below screenshot.
After selecting the message, drag and drop the validation functions and connect them.
Connecting lines show the Logical operator, AND/OR over it.
By default, the AND operator is selected, but it can be toggled to OR operator via right click on it as shown below:
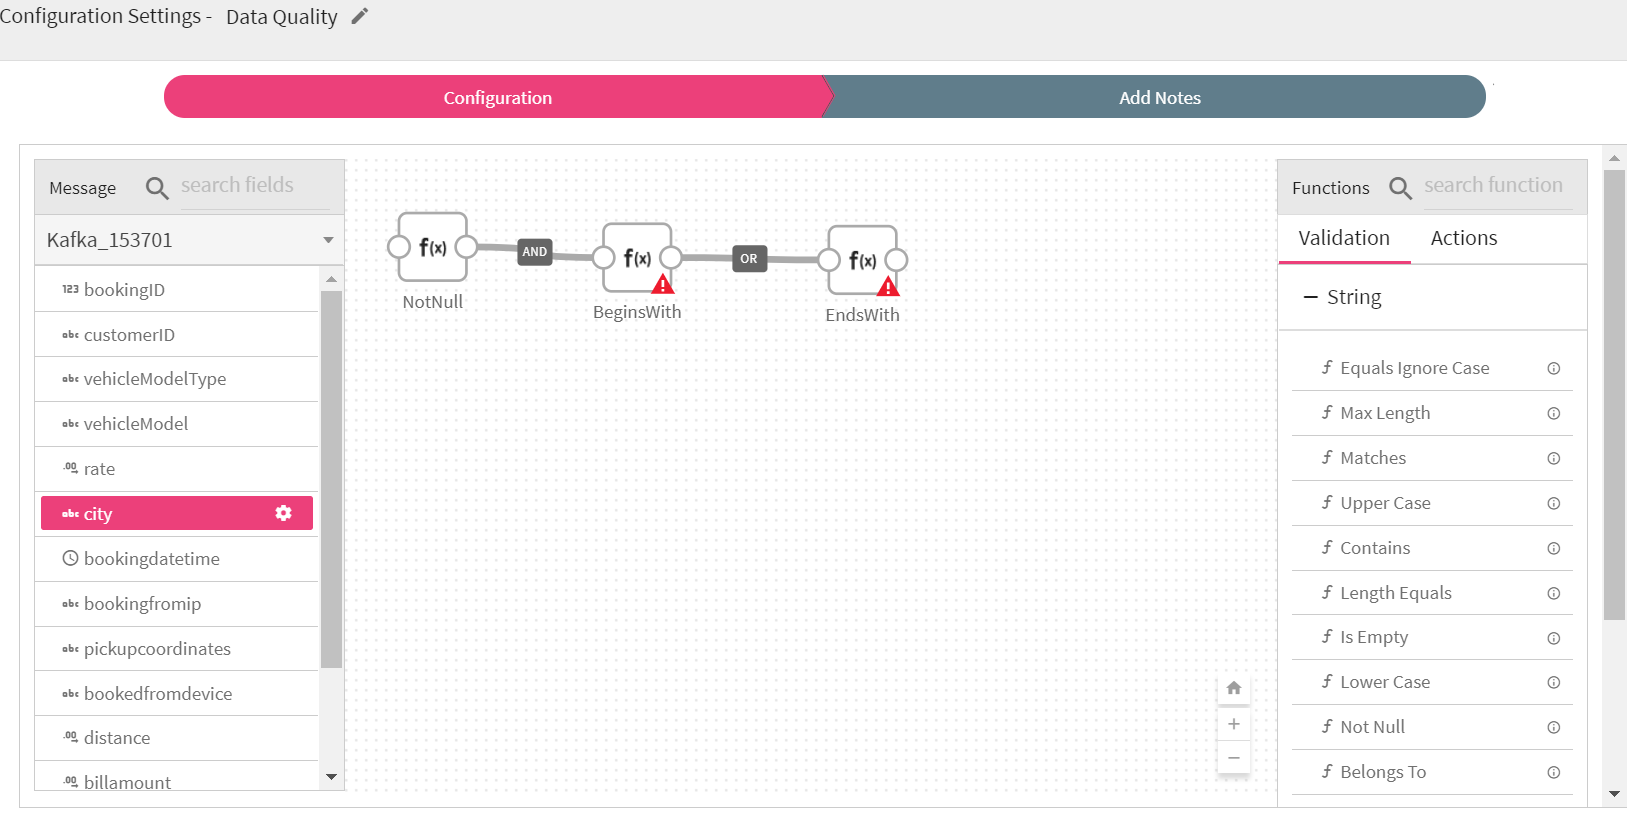
Most validation functions in Data Quality processor does not require user input such as Not Null, Is Empty, Upper Case etc, hence no error icon gets visible on top of them. There are some validation functions which requires user input and shows the error (red) icon for configuration.
Right click on the field (message) to configure the required input for validation function.
Configuration panel also shows the Negate option so that same validation function can be utilized with reverse condition as shown below in the screenshot.
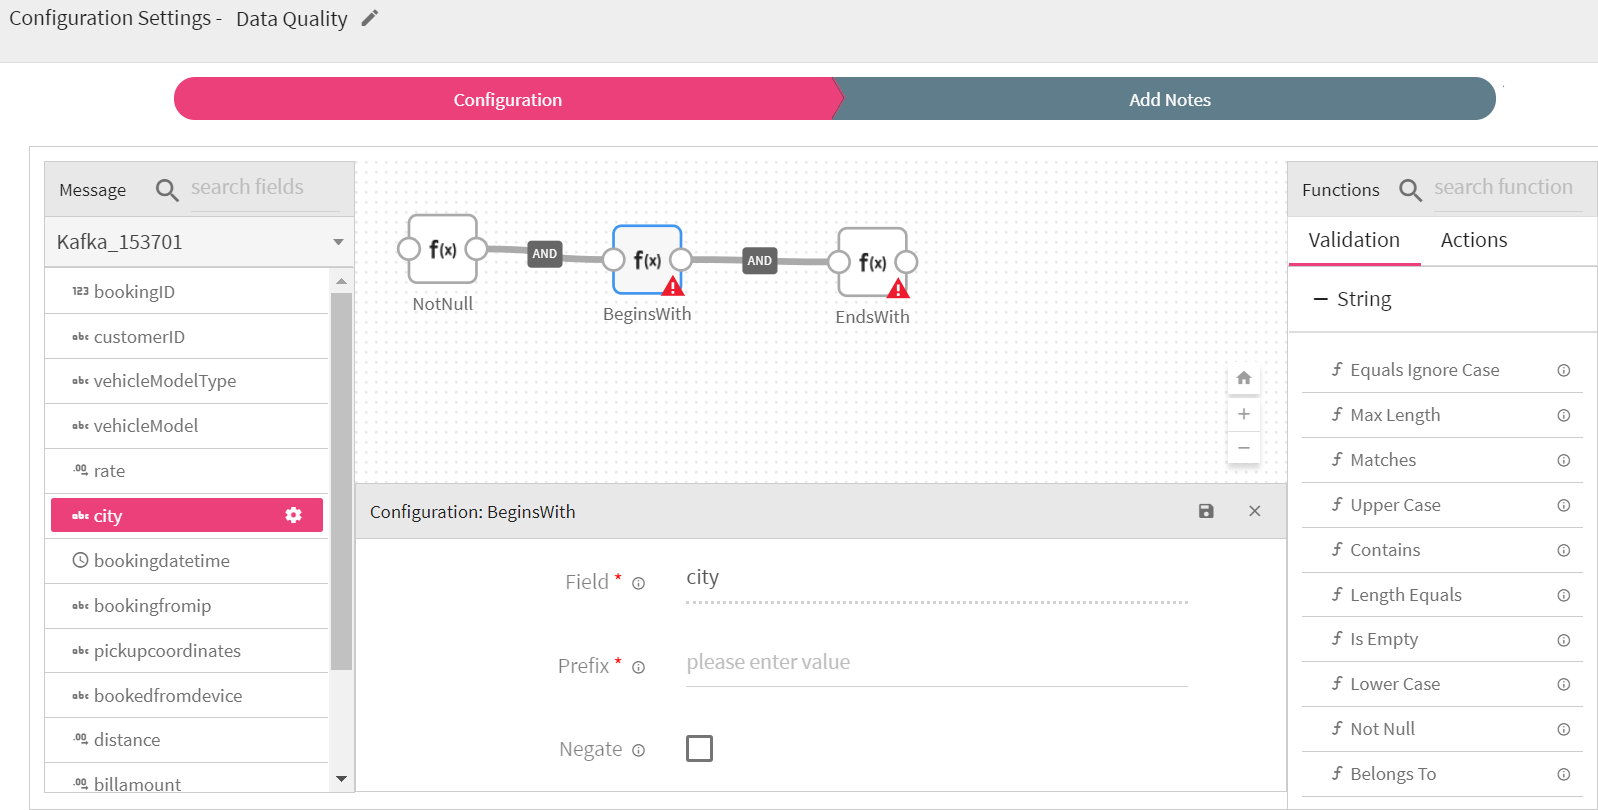
Once all of the validations are configured, you can add an Action function at the end. This action function gets triggered if validation fails as shown below:
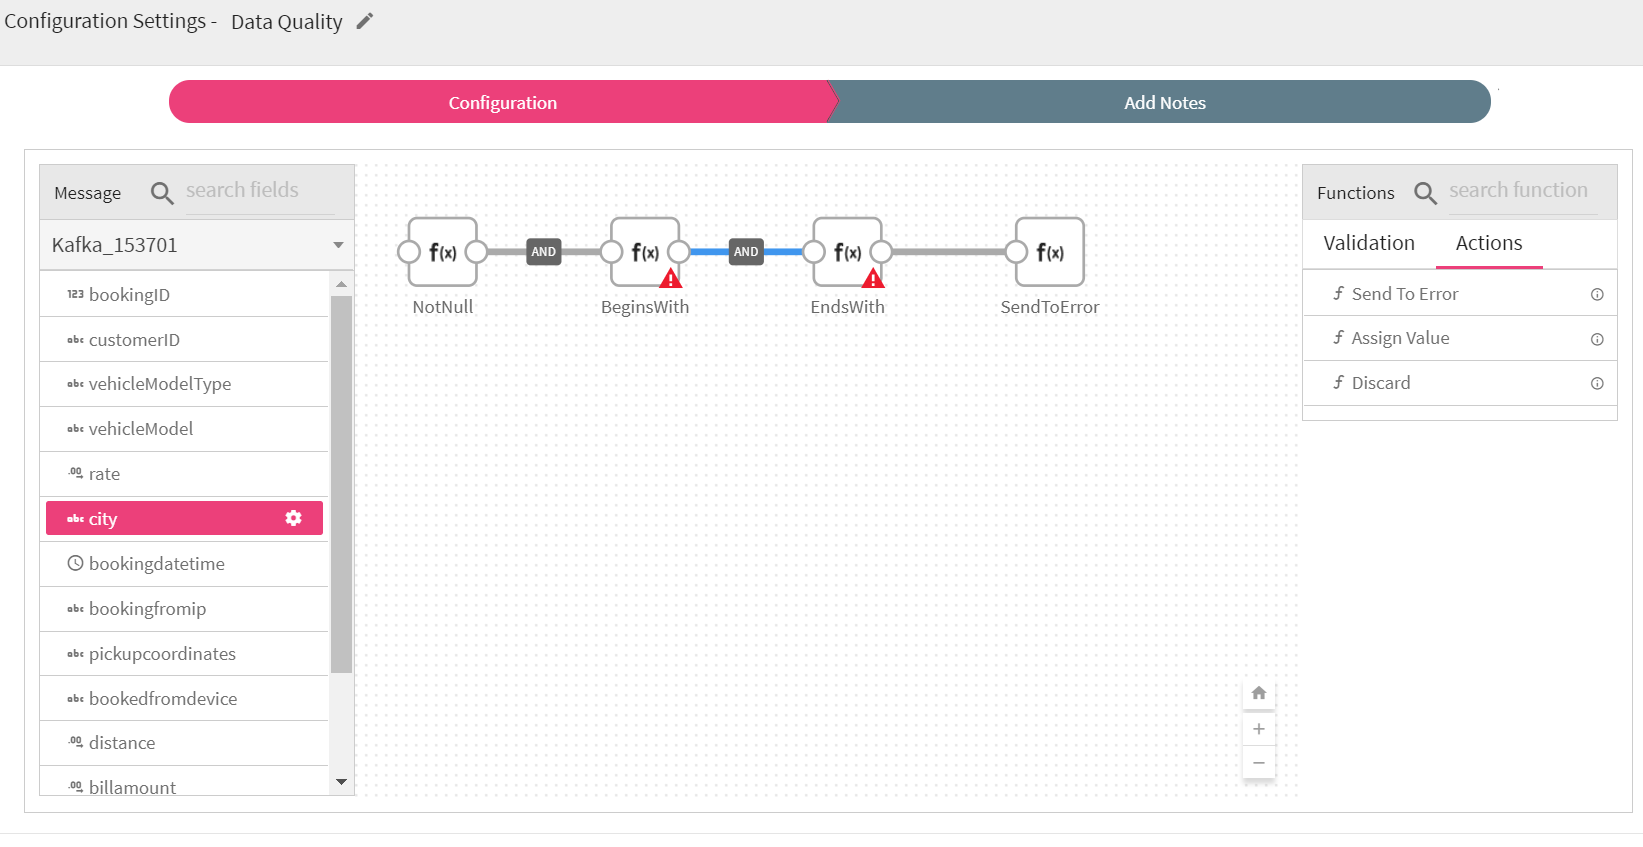
You can select multiple fields and define the validations as defined for city field in above screenshot.
Note: If you are using any Timestamp field for configuration, specify the value in following format:
“yyyy-MM-dd HH:mm:ss”
For Date field, use below format:
“yyyy-MM-dd ”
Drop Processor removes the selected fields from the Data Sets, which means it will not be reflected in the Schema.
Configuring Drop processor for Spark pipelines
To add a Drop processor into your pipeline, drag the processor to the canvas and right click on it to configure.

|
Field |
Description |
|---|---|
|
Fields |
Message Fields which needs to filtered in output records. |
Click NEXT and Edit Schema if required.
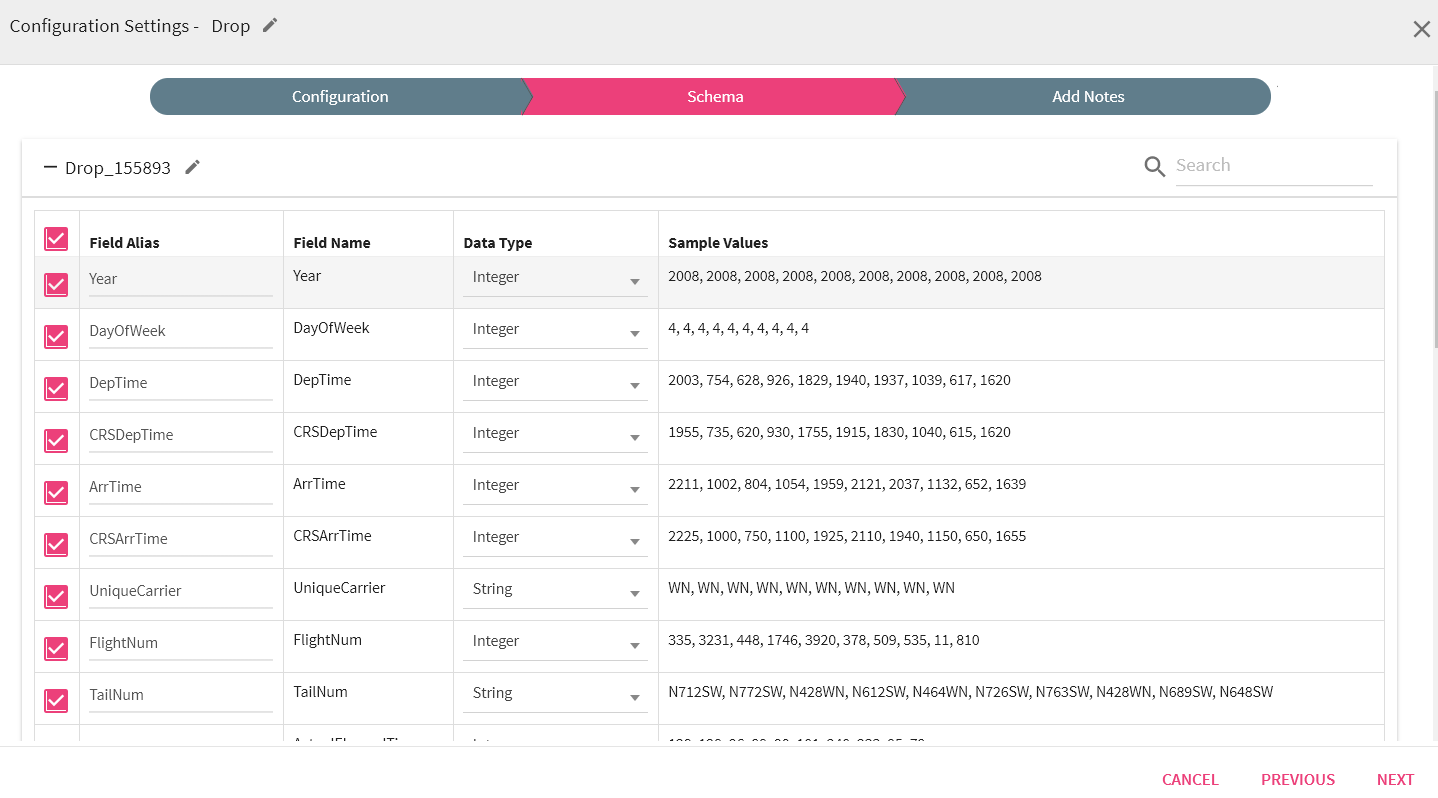
Click NEXT and add notes if required.
Click SAVE for saving the configuration details.
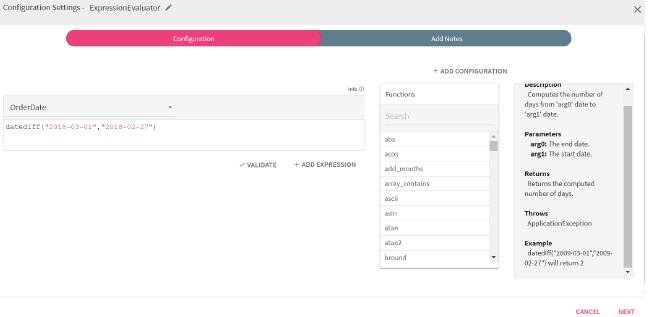
This processor is responsible for performing transformation operations on incoming dataset, e.g., replace, format, trim, uppercase, lowercase, etc. It uses spark expression language for preparing transformation query.
Configuring Expression Evaluator for Spark pipelines
To add an Expression Evaluator processor into your pipeline, drag the processor to the canvas and right click on it to configure.
|
Field |
Description |
|---|---|
|
Expression |
Provide SQL expression using SparkSQL functions, that evaluates to a column. Evaluated value can be updated to an existing column or can be assigned to a new column. Note: Enclose string literal/constant values inside single quotes e.g. ‘John’, ‘Suite 130 Los Gatos, CA 95032, US’. |
|
Validate |
Validate the expressions applied on the column. |
All the columns of the schema are populated and you can apply any transformation on it. The functions that can be applied are all listed in the right table, as shown in the figure.
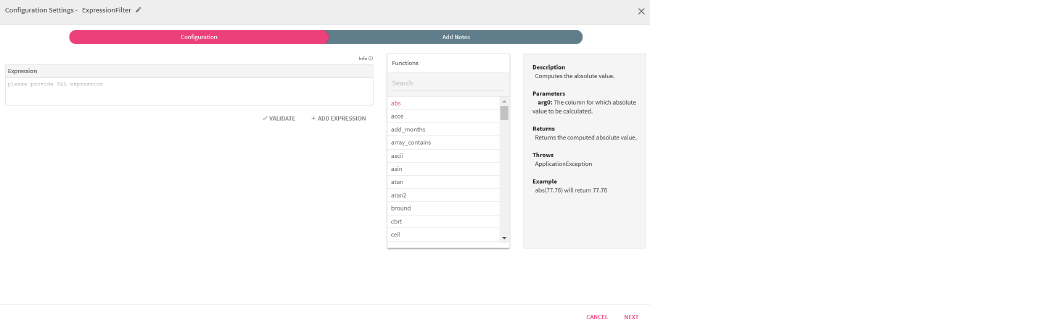
This processor is responsible for performing filtering operations on incoming dataset, e.g., equals, contains, not-null, ranges, matches, starts-with, ends-with, etc. It uses spark expression language for constructing filter criteria.
Configuring Expression Filter for Spark pipelines
To add an Expression Filter processor into your pipeline, drag the processor to the canvas and right click on it to configure
.
|
Field |
Description |
|---|---|
|
Expression |
Provide SQL expression using SparkSQL functions, that evaluates to true/false, e.g., sqrt(ceil(TXN_ID))>2.0 will return either true or false. Rows which satisfy the criteria, e.g. return true, will remain in stream and rest will be filtered out. Note: Enclose string literal/constant values inside single quotes e.g. ‘John’, ‘Suite 130 Los Gatos, CA 95032, US’. |
|
Validate |
Validate the expressions applied on the column. |
You can apply any transformation and the list of functions that can be applied are all listed in the right table, as shown in the figure.
Data filtering is required to refine the datasets so that you simply get what you need excluding other data that can be repetitive, irrelevant or sensitive. Different type of filters can be used to query results or other kind of information.
The Filter processor is used to display specific records by using filter criterion. For example, you can define the Filter rule: grade contains “software” and name contains “Mike”. The system will fetch all the records which meet this criteria.
Configuring Filter processor for Spark pipelines
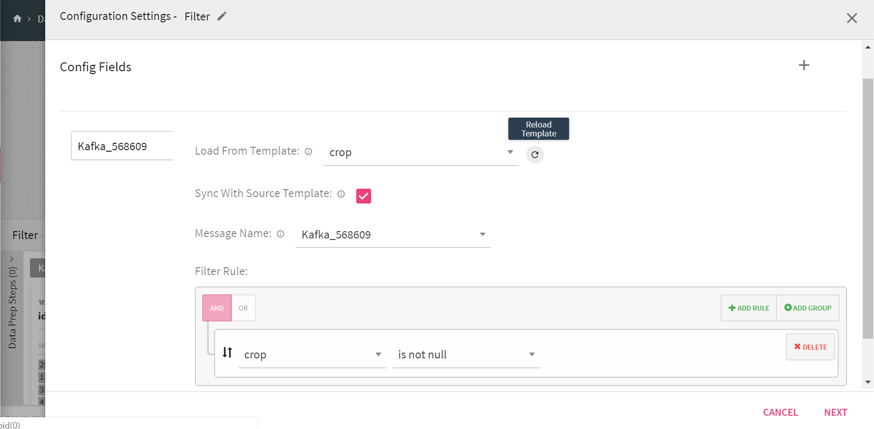
To add a Filter processor into your pipeline, drag the processor to the canvas and right click on it to configure.
|
Field |
Description |
|---|---|
|
Config Fields |
Enables to create local variables |
|
Load From Template |
Select the template from the list.
Only those templates will be visible in the drop down list that are created globally or within that workspace. |
|
Reload Template |
Enables to load the latest template configuration. |
|
Sync with Source Template |
If selected, changes done in source template will be reflected in Filter component configuration.
Else changes done in source template will not be reflected in Filter component configuration. |
|
Message Name |
Message on which filter rule is to be applied. |
|
Filter Rule |
Enables to create a filter rule. The rule applies filter on the data based on the criteria provided. For example, OrderMethodType is not null, Year less than 2050 and OrderMethodType matches Fax. |
|
Add Rule |
Enables to configure additional rules. |
|
Add group |
Additional groups can be added using Add group link. Rule(s) clubbed with either AND or OR operator comes under a group i.e. (Rule1 AND/OR Rule2)
For example, (grade contains software) AND (name contains Mike)
You need multiple groups for adding multiple operators. |
|
Delete |
Enables to delete added group or rule. |
|
Negate |
If Negate is true, the filter criteria is evaluated as NOT of the given criteria.
If Negate is false, then the filter criteria is evaluated as it is. By default it is set to false. |
|
Add New Criteria |
Enables to configure additional criteria. |
|
Up and Down arrows |
Enables to move the groups and rules up and down. |

Click on the NEXT button.
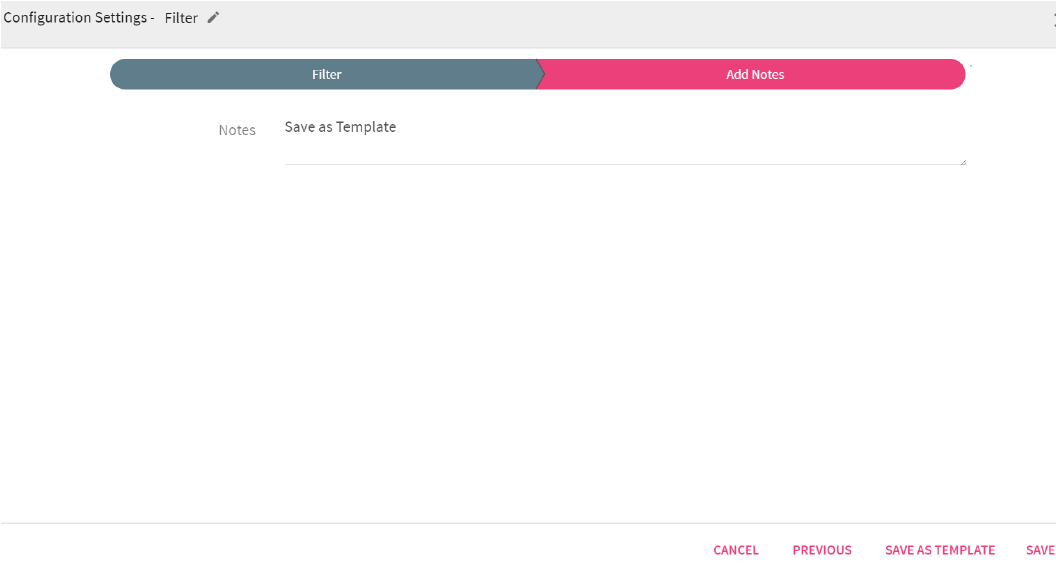
Click on the Save button If you do not wish to create a new template.
Click on Save as Template button for creating a new template by using existing component configuration.
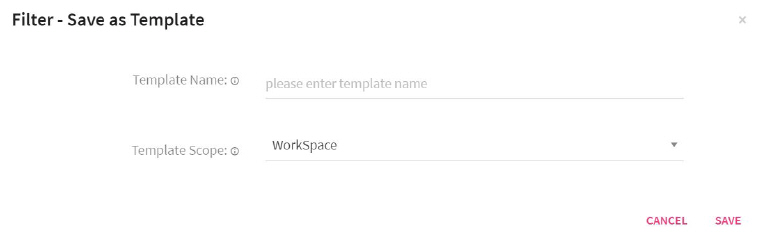
A window pops up with the name Filter-Save as window.
Specify the Template name and Scope.You can select the scope as Global or Workspace.
Click on the SAVE button after entering all the details.
A template will be created with the given name and scope.
It will be visible under Load from Template drop down list and on Component Management page.
Note: Template name should be unique.
If a template has a workspace scope, same template name cannot be used within a workspace but same name can be given in any other workspace.
If a template has a global scope, same template name cannot be used in any other workspaces.
Function processor enables to perform spark SQL functions on dataset.
Functions processor supports:
• MVEL expressions
• lookup functions
• Date
• String
• Math
• Miscellaneous functions
Configuring Functions processor for Spark pipelines
To add Functions processor into your pipeline, drag the processor to the canvas and right click on it to configure as explained below:
|
Field |
Description |
|---|---|
|
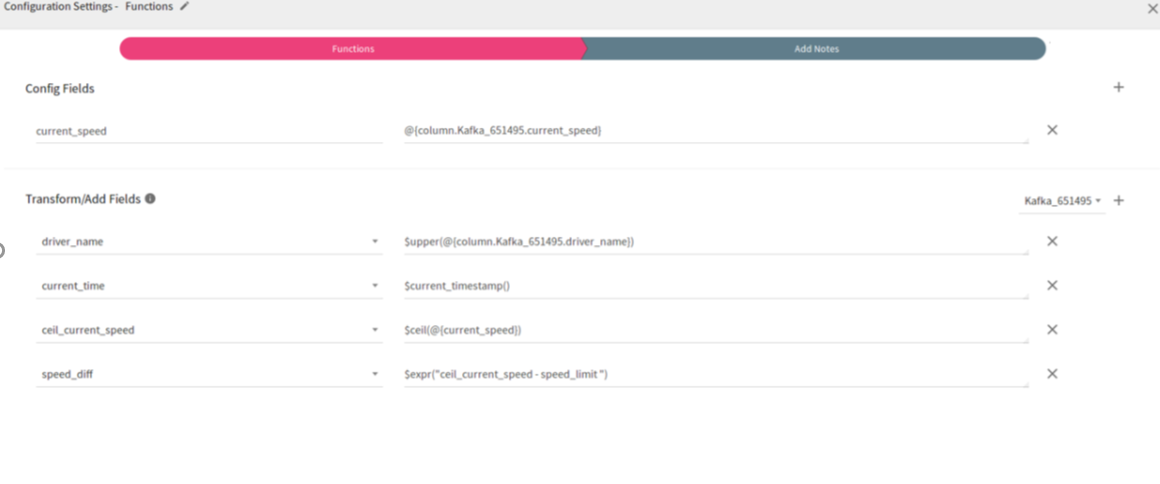
Config Fields |
Config fields are used to create local variables |
|
Add Config Fields |
Additional Config fields can be added by clicking on the plus sign(+). |
|
Transform/Add Fields |
Select a schema on which Function is to be applied. Additional fields can be added by clicking on the plus sign(+). On right side, select the function that is to be applied. You can select an existing field or create a new field to hold the output of the applied function. |
Click on the NEXT button. You will view the fields coming from source or enriched via functions processor .
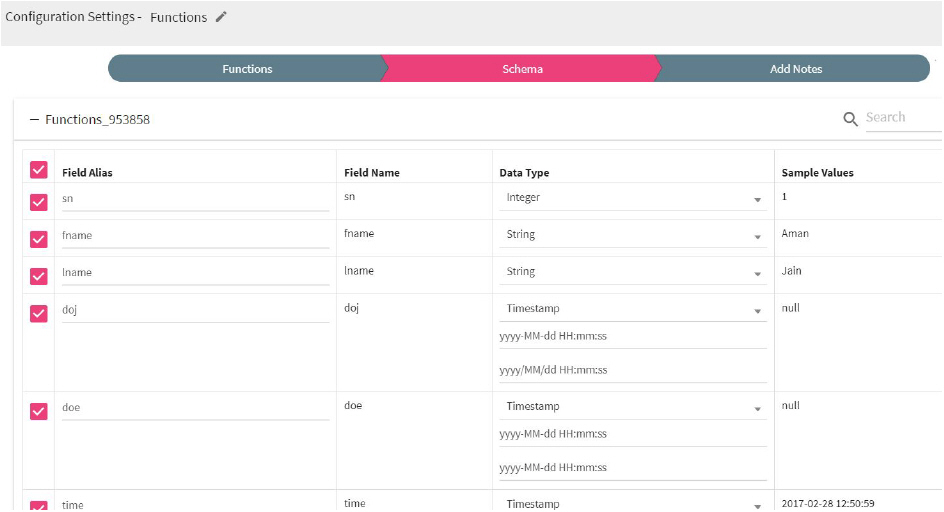
You can provide new output format of the date field . For example, if the input date format was yyyy-dd-yy , specify new date format as yyyy/MM/dd
Click Next after changing the Date format . Enter the notes in the space provided.
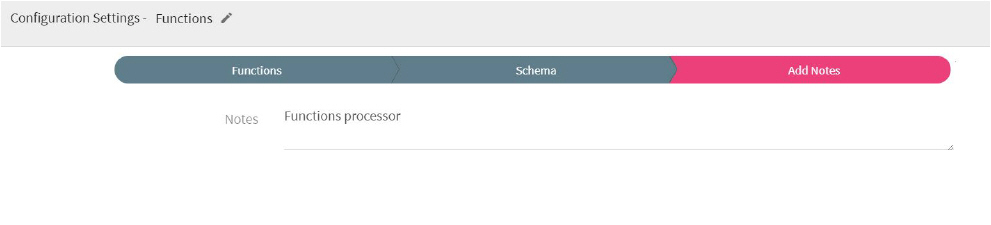
Click SAVE for saving the configuration details.
Please refer Functions guide for detailed information.
A Join processor combines columns of two incoming messages (DataSets). It creates a set that can be saved as a table or used as it is. A Join is used for combining columns from two tables by using values common to each table.
Configuring Join processor for Spark pipelines
To add a Join Processor into your pipeline, drag the processor on the canvas and right click on it to configure.
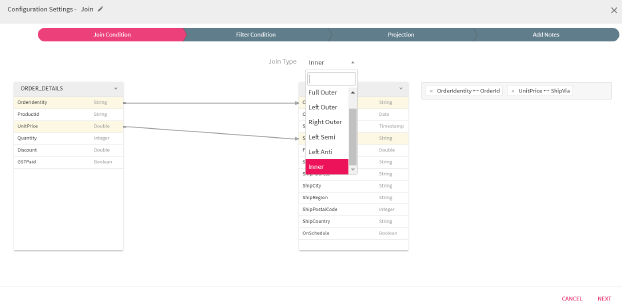
First tab is Join Condition. It allows to define the Join Type between two DataSets where two columns from both DataSets can have a Join condition applied to them.
The available Join Types are:
|
Field |
Description |
|---|---|
|
Equi |
The Equi Join performs a Join against equality or matching column(s) values of the associated tables. In StreamAnalytix, if an Equi Join is applied, the join condition gets applied as a Filter Condition. If you apply a Join on same table, you can use an Equi join for the same. |
|
Full Outer |
The full outer join is the solution when we need to match all corresponding data and include the rows without matches from both DataSets. In other words, it contains all, eventually merged, data. |
|
Left Outer |
In Left Outer join, all data from the left dataset is contained in joined dataset. The rows that have matches in right dataset are enriched with appropriated information while the ones without the matches, have this information set to null. |
|
Right Outer |
The right outer join is a variation of left outer join. It matches all data from right dataset to entries from the left dataset - even if some of matches are missing |
|
Left Semi |
When the left semi join is used, all rows from the left dataset having their correspondence in the right dataset are returned in the final result. However, unlike left outer join, the result doesn't contain merged data from both datasets. Instead, it contains only the information (columns) brought by the left dataset. |
|
Left Anti |
The last described type is left anti join. It takes all rows from the left dataset that don't have their matching in the right dataset. |
|
Inner |
It joins rows only if they've correspondence in both DataSets. |
Second Tab is Filter Condition, It allows to apply a filter condition to the DataSets. You can apply AND and OR operations with two filter conditions.

The Filter Condition that can be applied are as follows:
l contains
l not contains
l begins_with
l ends_with
l equal
l not_begins_with
l not_ends_with
l is_null
l is_not_null
l in
l not_in
l matches
l custom
l not_equal
In case of any operator, you can provide a custom expression as a right-side operand, instead of selecting from the drop down.
In case of Left Anti and Left Semi (Join Type), columns of only left side table are enlisted, for both the operand.
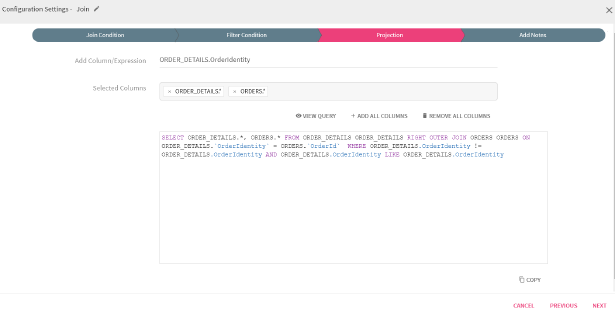
Third tab is Join Projection where you can apply the SELECT Clause along with custom expressions and add a column to the columns.
Comma seperated columns and custom expressions can be availed as input data for the next component.
|
Field |
Description |
|---|---|
|
Add Column/Expression |
Select a column or expression that you want to apply the query to. |
|
Value |
Selected Columns will be reflected here. |
|
View Query |
View the query in the box shown. |
|
ADD ALL COLUMNS/REMOVE COLUMNS |
Add or Remove the columns. |
Jolt is a JSON transformation library written in Java where the specification for the transformation is a JSON document.
Jolt processor is used for performing a JSON to JSON transformations in Java. It applies transformation on Input JSON document and generates a new JSON document as per the Jolt specificationsl
Jolt processor transforms the structure of JSON data and does not manipulate the values.
Each transform has it's own Domain Specific Language which facilitates it’s job.
Refer following links for detailed information:
https://github.com/bazaarvoice/jolt
https://jolt-demo.appspot.com/#inception
Configuring Jolt processor for Spark pipelines
To add a JSON Processor into your pipeline, drag the processor on the canvas and right click on it to configure.
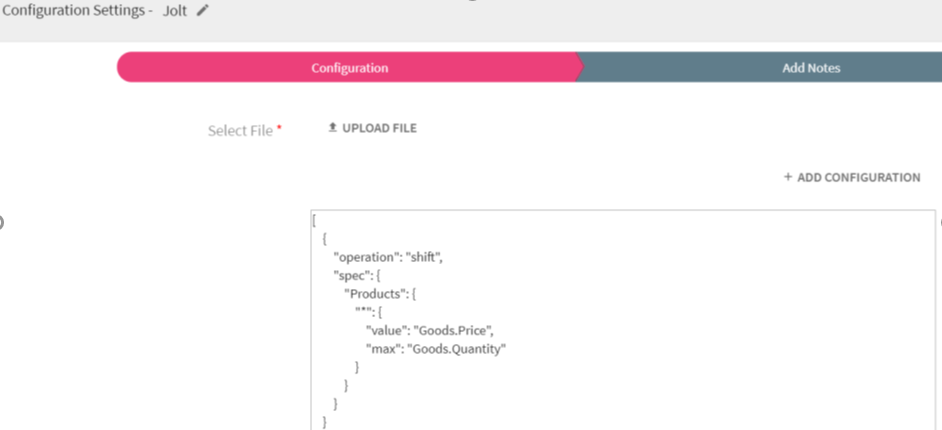
Select the Jolt Specification JSON file which is to be uploaded. Click on UPLOAD FILE button. Browse to the location where JSON file is saved and double-click on it for uploading the JSON file.
The content of the Specification JSON file gets displayed below. This specification gets applied on incoming json document and generates the transformed output.
Additional properties can be added using ADD CONFIGURATION link.
Click on the NEXT button. Enter the notes in the space provided. Click Save for saving the configuration details.
The Limit processor is used to fetch specified number of rows from the dataset.
For example, if 1000 records are getting generated and you want to fetch only 50 rows, you can make use of this processor.
The record of these 5o rows will be carried to the next component.
This processor can only be used with Batch components.
Note: If you try to add Limit processor after Streaming channel, it will not get added and you will get a warning message.
Configuring Limit Processor for Spark Pipelines
To add Limit processor into your pipeline, drag the processor to the canvas and right click on it to configure as explained below
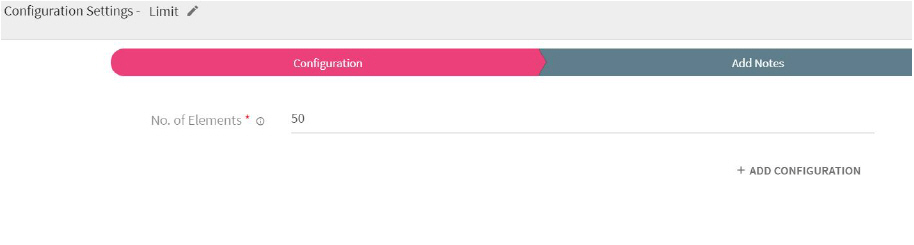
Specify number of rows which are to be fetched in “No of Elements “ fields.
Additional configuration details can be added using ADD CONFIGURATION link.
Click on the Next button. Enter the notes in the space provided. Click Save for saving the configuration details.
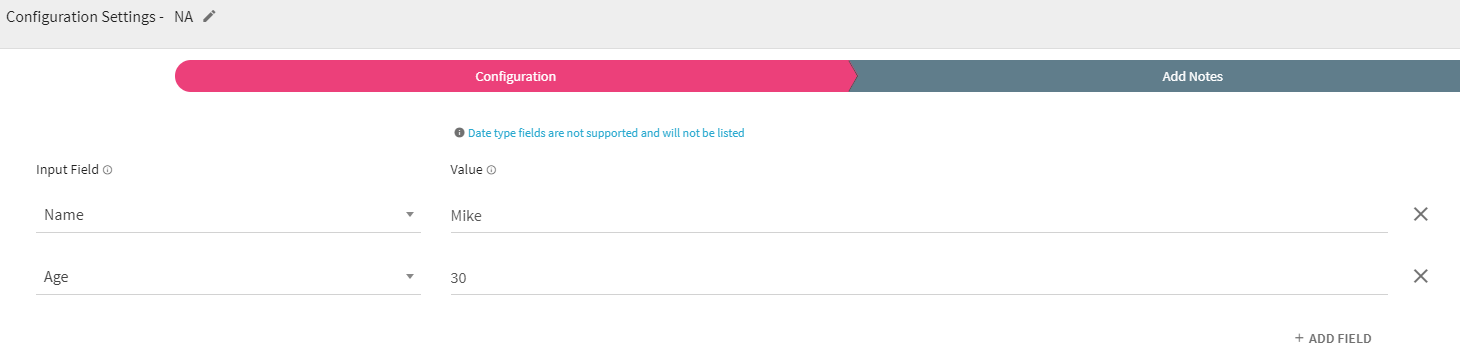
The NA processor is used to handle the null values of any dataset.
If the value specified is Number, all null values of selected input field will be replaced by the specified number.
If the value specified is String, all null values of selected input field will be replaced by the given string.
For example, if there is any dataset in which input fields “Name” and “Age” are null, you can specify value for Name as “Mike” and “Age” as “30” that should substitute the null values.
Note: It does not support Date and Timestamp fields.
Configuring NA processor for Spark pipelines
To add NA Processor into your pipeline, drag the processor to the canvas and right click on it to configure.
|
Field |
Description |
|---|---|
|
Input Field |
Select the field from drop-down list that needs to be replaced. |
|
Value |
It will replace the null values of input field with this value. |
|
ADD FIELD |
Additional fields can be added using ADD FIELD link. |
Click on the NEXT button. Enter the notes in the space provided.
Click SAVE for saving the configuration details.
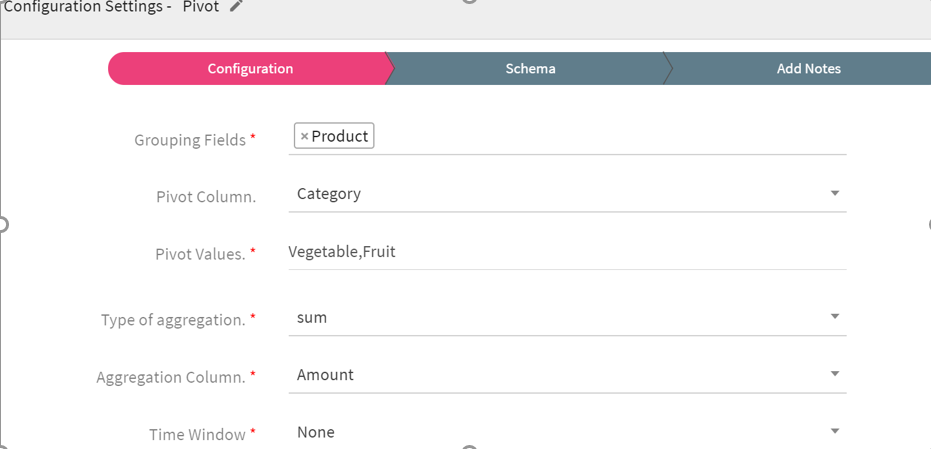
Pivot is an aggregation processor where one of the grouping columns have distinct values which later gets transposed to form individual columns. These column values further help in data analysis and reporting.
Configuring Pivot processor for Spark pipelines:
To add Pivot processor into your pipeline, drag the processor to the canvas and right click on it to configure.
|
Field |
Description |
|---|---|
|
Grouping Fields |
All fields of selected message will be displayed here.Select the fields on which groping has to be done. |
|
Pivot Column |
All columns of selected message will be listed here.Select the column which is to be considered as Pivot column. |
|
Pivot Values |
Enter the comma separated values which are to be transposed to different columns. |
|
Type of aggregation |
All aggregation functions will be listed here. Select the function which is to be applied to the fields. |
|
Aggregation Column |
All columns of selected message will be listed here. Select the column on which aggregation is to be applied. |
|
Time Window |
Time window options. None: Does not apply the window operation on data. Fixed Window: Window length and sliding interval remains same. Sliding Window: Enables to configure the window length and sliding interval. |
|
Window Duration |
Time window in seconds. |
|
Slide Duration |
Window slide duration in seconds. |
|
Event Column |
Message field of type time stamp. |
|
ADD CONFIGURATION |
Additional properties can be added using ADD CONFIGURATION link. |
Click on the NEXT button.You will view new schema based on your pivot configuration on Schema tab.
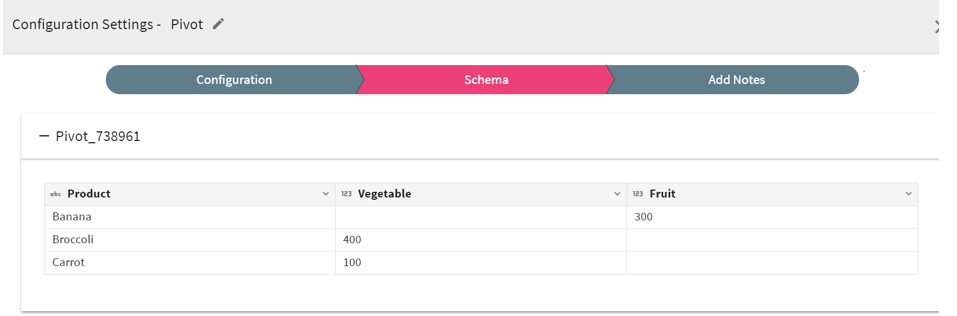
Click SAVE for getting the final output of pivot processor.
Example:
Let us say, you have a dataset comprising of five records having four fields: “OrderId”, “Product”, “Category” and “Amount”.

You wish to group on the basis of field “Product”, pivot on column “Category” and type of aggregation to be applied is “SUM” on column “Amount”.
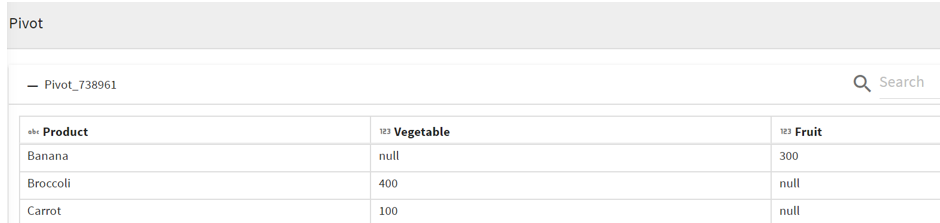
The Pivot processor applies the aggregation operation(SUM) on the Pivot column and creates pivot table as shown below:

Since, you have applied the operation “SUM” on column “Amount”, it will calculate the sum of different vegetables and fruits.
Sum of the fruits banana is 300, vegetable broccoli is 400 whereas carrot is 100.
If no amount is found for a particular vegetable, it will show null values against the product.
The Python processor allows you to perform following operations:
• Write custom Python Spark code for defining transformations on Spark DataFrames.
• Write custom Python code for processing input records at runtime.
Configuring Python processor for Spark pipelines
To add a Python processor into your pipeline, drag the processor on the canvas and right click on it to configure.
|
Field |
Description |
|---|---|
|
Input Source |
Input type to the custom Python function that will be called by StreamAnalytix.
The input provided to the custom python function will be a DataFrame. The custom function is expected to return a DataFrame after any processing. |
|
Input Type |
There are two ways for configuring the Python processor: Inline: This option enables you to write Python code in text editor. If selected, you will view one additional field Python Code.
Upload: This option enables you to upload single and multiple python scripts(.py files) and python packages (.egg/.zip files). You have to specify module name (should be part of uploaded files or package) and method name that will be called by python processor.
When you select Upload, UPLOAD FILE option appears on the screen, browse and select the files that need to be used in python processor.
One additional field Import Module will also appear on the screen, if option selected is Upload |
|
Python Code |
Enables to write custom Python code directly on text editor. |
|
Import Module |
Specify module name which contains function that will be called by python processor. Here you will get list of all uploaded files in drop down list.
The drop down list will show only .py files. You can also write a module name if it does not appear in drop down list |
|
Function Name |
Name of the python function that is defined in Inline Python code or uploaded script. |
|
Add Configuration |
Enables to add Additional properties. |
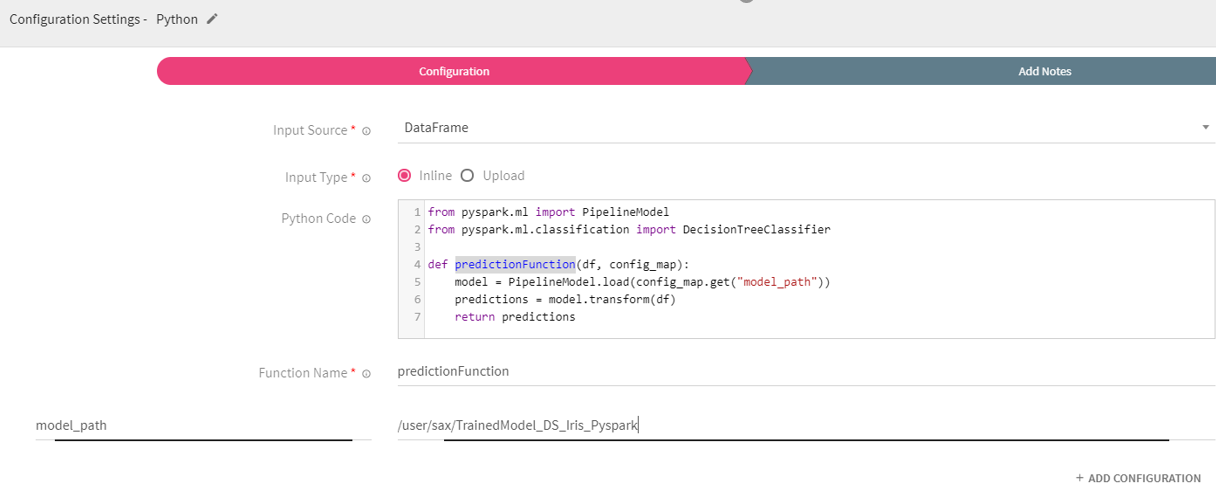
Let us see how to pass configuration parameters in Python processor.
You can provide configuration parameters in Python processor in form of key value pair. These parameters will be available in form of dictionary in function given in Function Name field as second argument. So function given in field Function Name will take two arguments: (df, config_map)
Where first argument will be dataframe and second argument will be a dictionary that contains configuration parameters as key value pair.
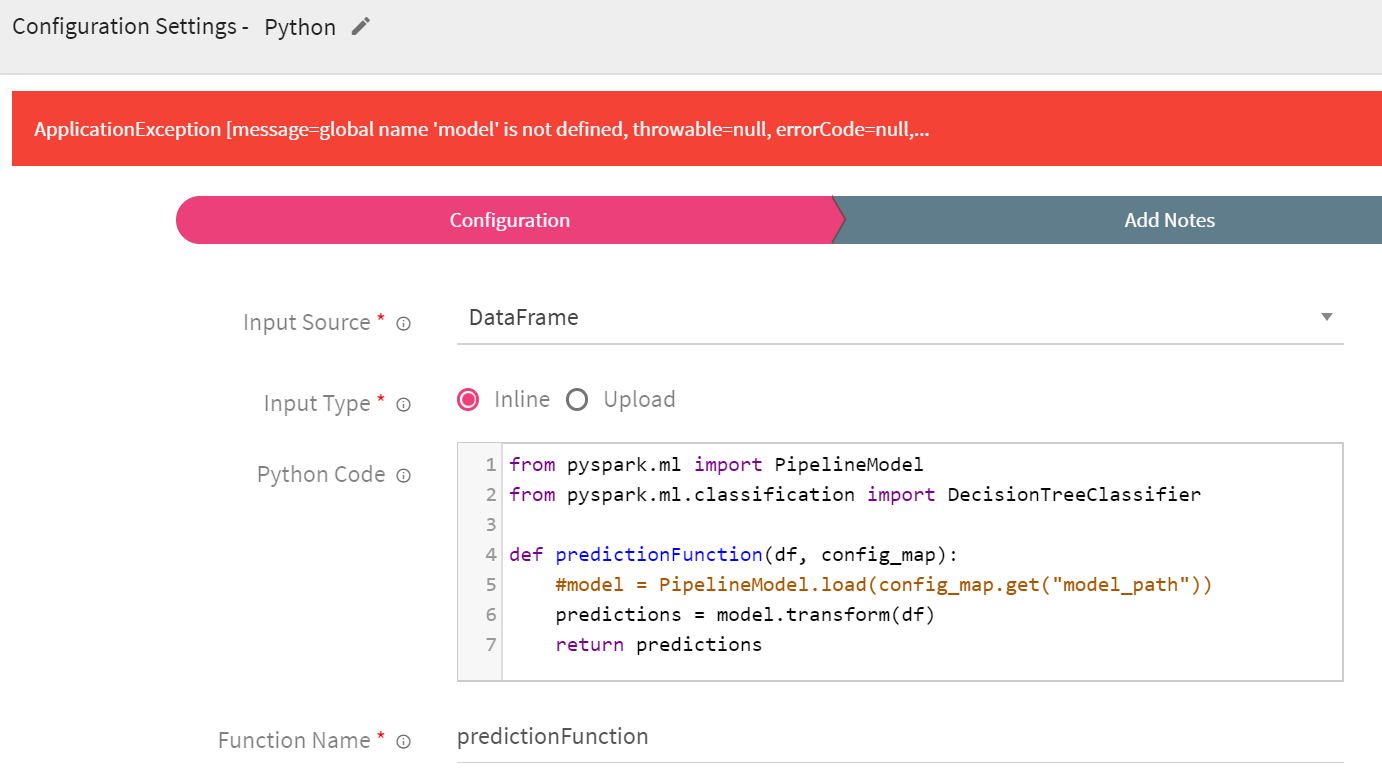
In below example HDFS path of trained model is provided in configuration parameter with key as ‘model_path’ and same is used in predictionFunction.
If there is any error/exception in python code, then you will get an error/exception message on user interface.
Example:
A simple program is written in text area in Python processor. Here the variable model is used but not defined in program, hence an exception with message ‘global name model is not defined’ is displayed on the screen.
Click on the NEXT button after specifying the values for all the fields.
Enter the notes in the space provided.
Click on the SAVE button after entering all the details.
Repartition processor divides large datasets into multiple parts.
The Repartition processor is used when you want to increase or decrease the parallelism in an executor. The number of parallelism maps to number of tasks running in an executor. It creates either more or fewer partitions in order to balance data across them and shuffles data over the network.
For example, you can use single partition if you wish to write data in a single file.Multiple partitions can be used for writing data in multiple files
Configuring Repartition processor for Spark pipelines
To add a Repartition processor into your pipeline, drag the processor on the pipeline canvas and right click on it configure.

Enter the number of partitions in the Parallelism field.
Click on the NEXT button. Enter the notes in the space provided.
Click on the SAVE button after entering all the details.
This processor is used for fetching historical data from any streaming or batch source and that data gets registered in the table. This table can be referred further if you wish to perform some queries on registered data sources.
For example, let us say, you have any historical data on HDFS which contains information about different departments of an organization. You can register that data using Register as Table processor and that registered table can be used in SQL processor to fetch number of employees in an organization.
Configuring Register as Table processor for Spark pipelines
To add a Register as Table processor into your pipeline, drag the processor on the canvas and right click on it to configure.
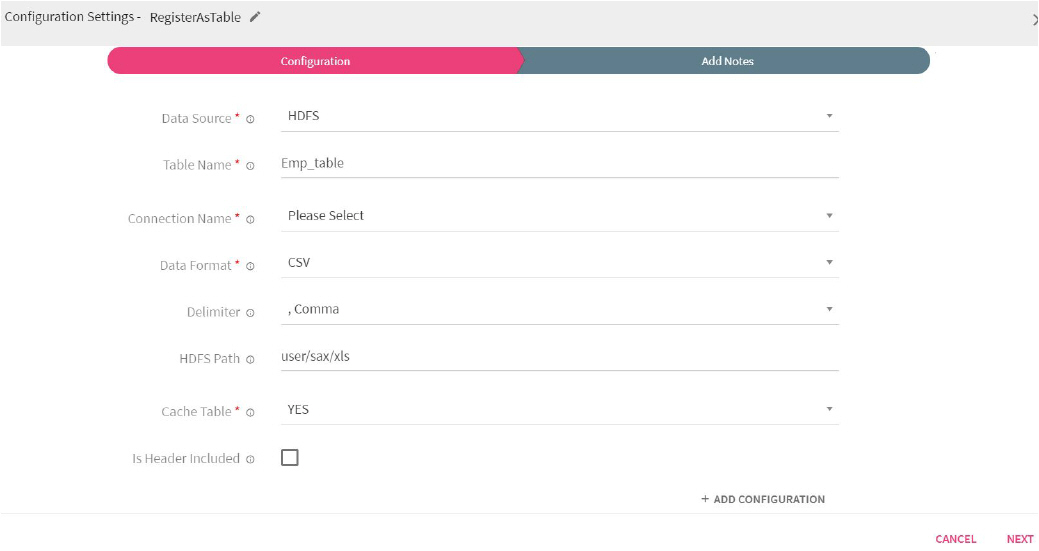
If data source selected is HDFS, you will view following fields:
|
Field |
Description |
|---|---|
|
Data Source |
Select the source from where historical data is to be read. Available options are HDFS, Hive, Incoming message, JDBC, S3 and File. If the option selected is incoming message, output of sources connected before this processor will act as an incoming message for Register As Table Processor.
In case of File Data Source , file data will be registered as a table.
Internally file will be uploaded in default HDFS. |
|
Table Name |
Specify a name for the table which is to be registered. |
|
Connection Name |
All available connections are listed here. Select a connection from where data is to be read. |
|
Data Format |
Historical data format. |
|
Delimiter |
Select the delimiter of historical data format.For example, if your historical data of type CSV is separated by comma(,) select delimiter as (,Comma) |
|
HDFS Path |
HDFS path where data is stored. |
|
Cache Table |
If this option is selected then the table will be read only once after it is registered.
This option is used to cache the registered table data and can be used for all available data sources . It is helpful in batch pipelines where the data is used at multiple places. |
|
Is Header Included |
Select the checkbox if first row of data file is header else leave it unchecked. |
If you select the Data Source as HIVE or JDBC, you will view two additional fields:
• Database Table Name
• Execute Query
|
Field |
Description |
|---|---|
|
Database Table Name |
Table from where data will be fetched. If option selected is “Database Table Name”, specify a name for the table. |
|
Execute Query |
If option selected is “Execute Query”, you can write your custom query. Output of this query will be stored in current Spark session. |
If Data Source selected is S3, you will view one additional field:
• Bucket Name:
|
Field |
Description |
|---|---|
|
Bucket Name |
S3 bucket name from where data will be read. |
If the option selected is incoming message, output of sources connected before this processor will act as an incoming message for Register As Table processor.
You need to specify the name with which table is to be registered after fetching the data.
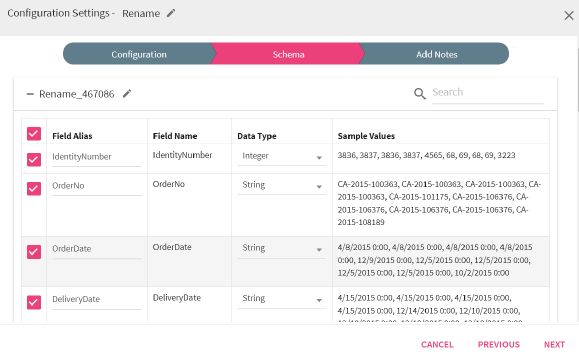
Rename processor enables renaming the Fields. The renamed columns will be reflected in the Schema.
Configuring Rename processor for Spark pipelines
To add a Rename Processor into your pipeline, drag the processor to the canvas and right click on it to configure as explained below.
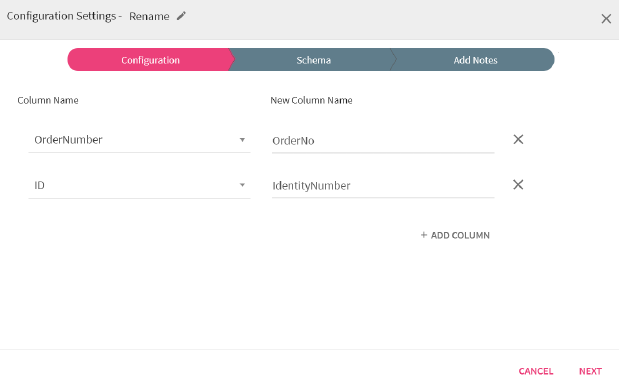
Click NEXT to go to SCHEMA page. The renamed fields will be reflected in the Schema Tab.
Click on NEXT button. Enter the notes in the space provided. Click on the SAVE button for saving the configuration details.
The Select processor is used to retrieve specific columns from the dataset.

On configuration settings page, specify the schema fields that you wish to retrieve in the output.
For example, you entered the fields: OrderId, ShipVia and Freight.
Only these three fields will flow to the next component which is connected in the pipeline.
Click on NEXT button. Enter the notes in the space provided. Click on the SAVE button for saving the configuration details.
SQL Processor allows you to run SQL queries over streaming data and registered tables.
It provides a common way for accessing different data sources.
For example, if you want to analyze weather data stream continuously and find the average temperature which is recorded every minute, you can use the SQL query. The output would be stream of new records showing average temperature recordings.
Configuring SQL processor for Spark pipelines
To add a SQL processor into your pipeline, drag the processor to the canvas and right click on it to configure as explained below.
|
Field |
Description |
|---|---|
|
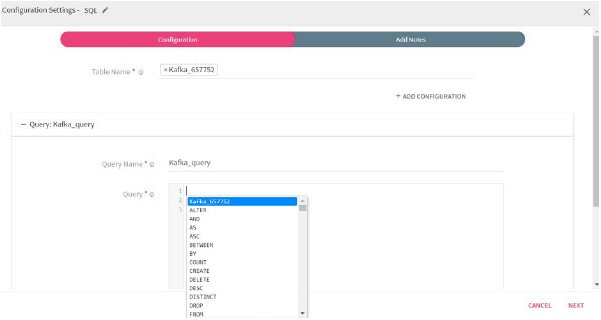
Table Names |
Displays all the registered tables. Select the table on which query is to be performed. |
|
Query section: Enables to add multiple queries |
|
|
Query Name |
Specify a name for the query. |
|
Query |
Provides option of auto suggestion that enables to write query instantaneously.
Press CTRL + space in the query text box. It will display all the options like Table name, schema name, schema fields, query operations for writing the query.
Examples:
Click SELECT from the list and write the query. SELECT * from Kafka_657752
Click Delete from the list and write the query Delete Emp_table
Accordingly, select other options from the auto suggestion list and enter the query. |
|
Add New Query |
Enables to add multiple queries which are executed over different tables. |
Click on the NEXT button.Enter the notes in the space provided.

Click SAVE for saving the configuration details.
Scala is a new language and is based on Java Virtual machine compatibility.You can code Scala in the similar manner as you code Java and has minimal prerequisites. Writing code in Scala is much faster and easy to use.
The Scala processor is used for writing custom code in Scala language.
Configuring Scala processor for Spark pipelines
To add a Scala processor into your pipeline, drag the processor on the canvas and right click on it to configure.

|
Field |
Description |
|---|---|
|
Package Name |
Package for the Scala Implementation class. |
|
Class Name |
Class name for the Scala implementation. |
|
Imports |
Import statements for the Scala implementation. |
|
Input Source |
Input Source for the Scala Code: |
|
Scala Code |
Scala code implementation to perform the operation on JSON RDD |
Next, click on the Jar Upload tab. Jar file is generated when you build Scala code. You can upload the third party jars from here so that the API's can be utilized in Scala code by adding the import statement.
Click on the NEXT button. Enter the notes in the space provided.
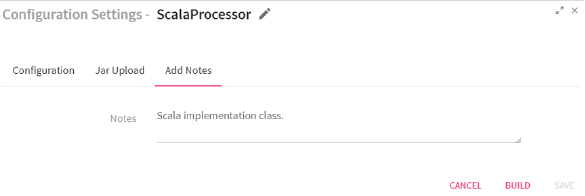
Click SAVE for saving the configuration details.
Sorting is arranging the data in ascending or descending order.
For example, you can use this processor for sorting the height of students in ascending order.
Note: Currently, sorting is supported for ascending order only.
Configuring Sort processor for Spark pipelines
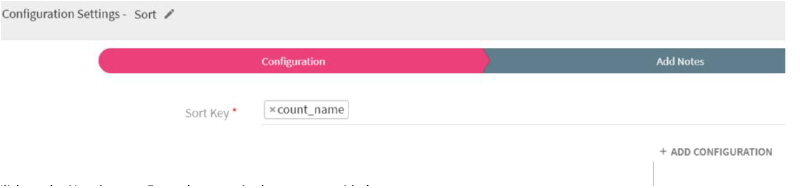
To add a Sort processor into your pipeline, drag the processor to the canvas and right click on it to configure.
|
Field |
Description |
|---|---|
|
Sort Key |
Select a field on which sorting is to be applied. |
Click on the NEXT button. Enter the notes in the space provided.
Click SAVE for saving the configuration details.
Note: In Batch pipelines, Sort processor can be used without Aggregation processor.Whereas in streaming pipelines, Sort processor can be used only after Aggregation processor.
Union processor is not configurable.
The Union operation is used when you want to combine elements of two datasets.
Example to demonstrate how union works.
|
Input Set 1 {name:xyz,rating:7} {name:abc,rating:9} {name:klm,rating:5} |
Input Set 2 {name:xyz,rating:7} {name:abc,rating:9} {name:abc,rating:9} {name:klm,rating:6} |
|
Output Set after applying Union Operation {name:xyz,rating:7} {name:abc,rating:9} {name:klm,rating:5} {name:xyz,rating:7} {name:abc,rating:9} {name:abc,rating:9} {name:klm,rating:6} |