Iceberg ETL Source
Iceberg is an open table format that brings database-like features to data lakes for managing large-scale datasets.
Use Iceberg data source to read data from tables, branches, and tags, with time travel and incremental read support.
Schema Type
See the topic Provide Schema for ETL Source → to know how schema details can be provided for data sources.
Catalog
Configure the Catalog section based on the type of catalog selected.
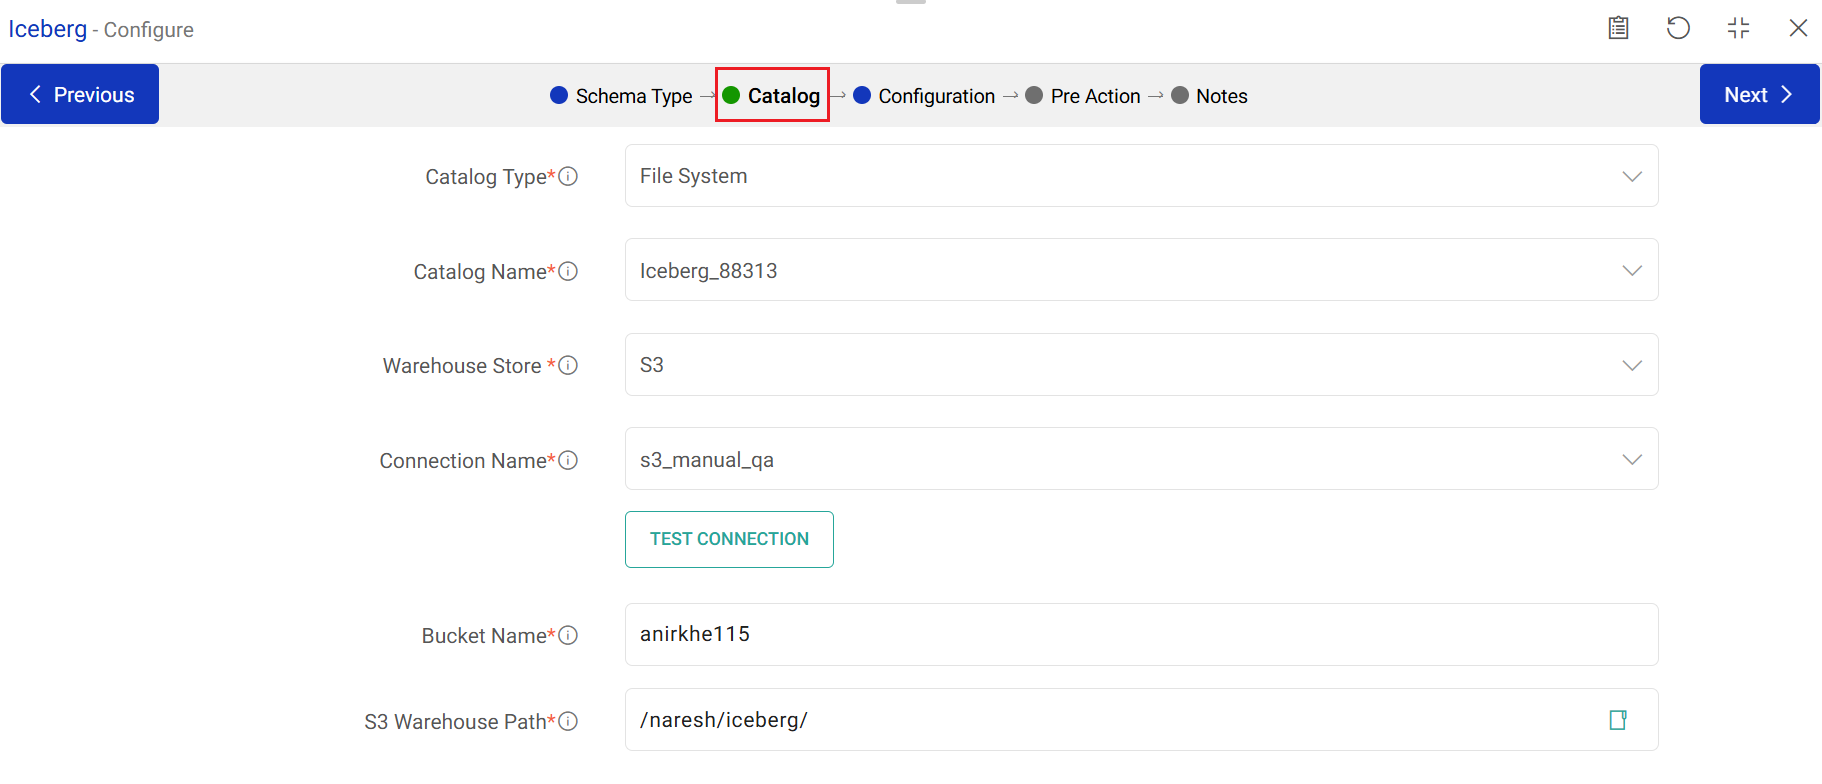
Catalog Type
Select the type of catalog from which the data is to be fetched.
Supported catalog types are: File System and JDBC.
File System
Read about File System Catalog Type Configurations here.
Catalog Name
A default catalog name generated by Gathr. It serves following purposes:
Gathr uses the table catalog to load Iceberg tables.
You can use it to write advanced SQL queries in the subsequent Configuration section of the data source.
Warehouse Store
The warehouse storage system where data in Iceberg format is stored.
Supported systems are: S3, ADLS, and GCS.
Provide connection details for the chosen warehouse store.
Connect S3 Warehouse Store
Details required for connecting to S3 warehouse store.
Connection Name
Bucket Name
S3 Warehouse Path
Connection Name
Choose a connection name from the saved connections list or create a new one using the Add New Connection option.
Refer to topic S3 Connection for more details.
Bucket Name
Provide the bucket name.
S3 Warehouse Path
Based on the connection details, provide the directory path to access Iceberg data stored in S3.
Connect ADLS Warehouse Store
Details required for connecting to ADLS warehouse store.
Connection Name
Container Name
ADLS Warehouse Path
Connection Name
Choose a connection name from the saved connections list or create a new one using the Add New Connection option.
Refer to topic ADLS Connection for more details.
Container Name
Provide the container name.
Warehouse Path
Based on the connection details, provide the directory path to access Iceberg data stored in ADLS.
Connect GCS Warehouse Store
Details required for connecting to GCS warehouse store.
Connection Name
Bucket Name
GCS Warehouse Path
Connection Name
Choose a connection name from the saved connections list or create a new one using the Add New Connection option.
Refer to topic GCS Connection for more details.
Bucket Name
Provide the bucket name.
GCS Warehouse Path
Based on the connection details, provide the directory path to access Iceberg data stored in GCS.
JDBC
Read about JDBC Catalog Type Configurations here.
JDBC Connection
<div class="w-100">Iceberg supports <b>MySQL and Postgres</b> Databases. Make sure to provide a relevant connection. </div>
Choose a connection name from the saved connections list or create a new one using the ‘Add New Connection’ option.
Refer to topic JDBC Connection for more details.
Schema Name
Applicable for Postgres Database. Select the schema that contains the details for Iceberg tables.
Table Name
Select the Table Name iceberg_tables to list the Catalog Names.
Catalog Name
Select an existing Catalog name to load metadata from the JDBC metastore.
Warehouse Store
The warehouse storage system where data in Iceberg format is stored.
Supported systems are: S3, ADLS, and GCS.
Provide connection details for the chosen warehouse store.
Proceed further to provide configuration details.
Configuration
Configure this section based on the below details.
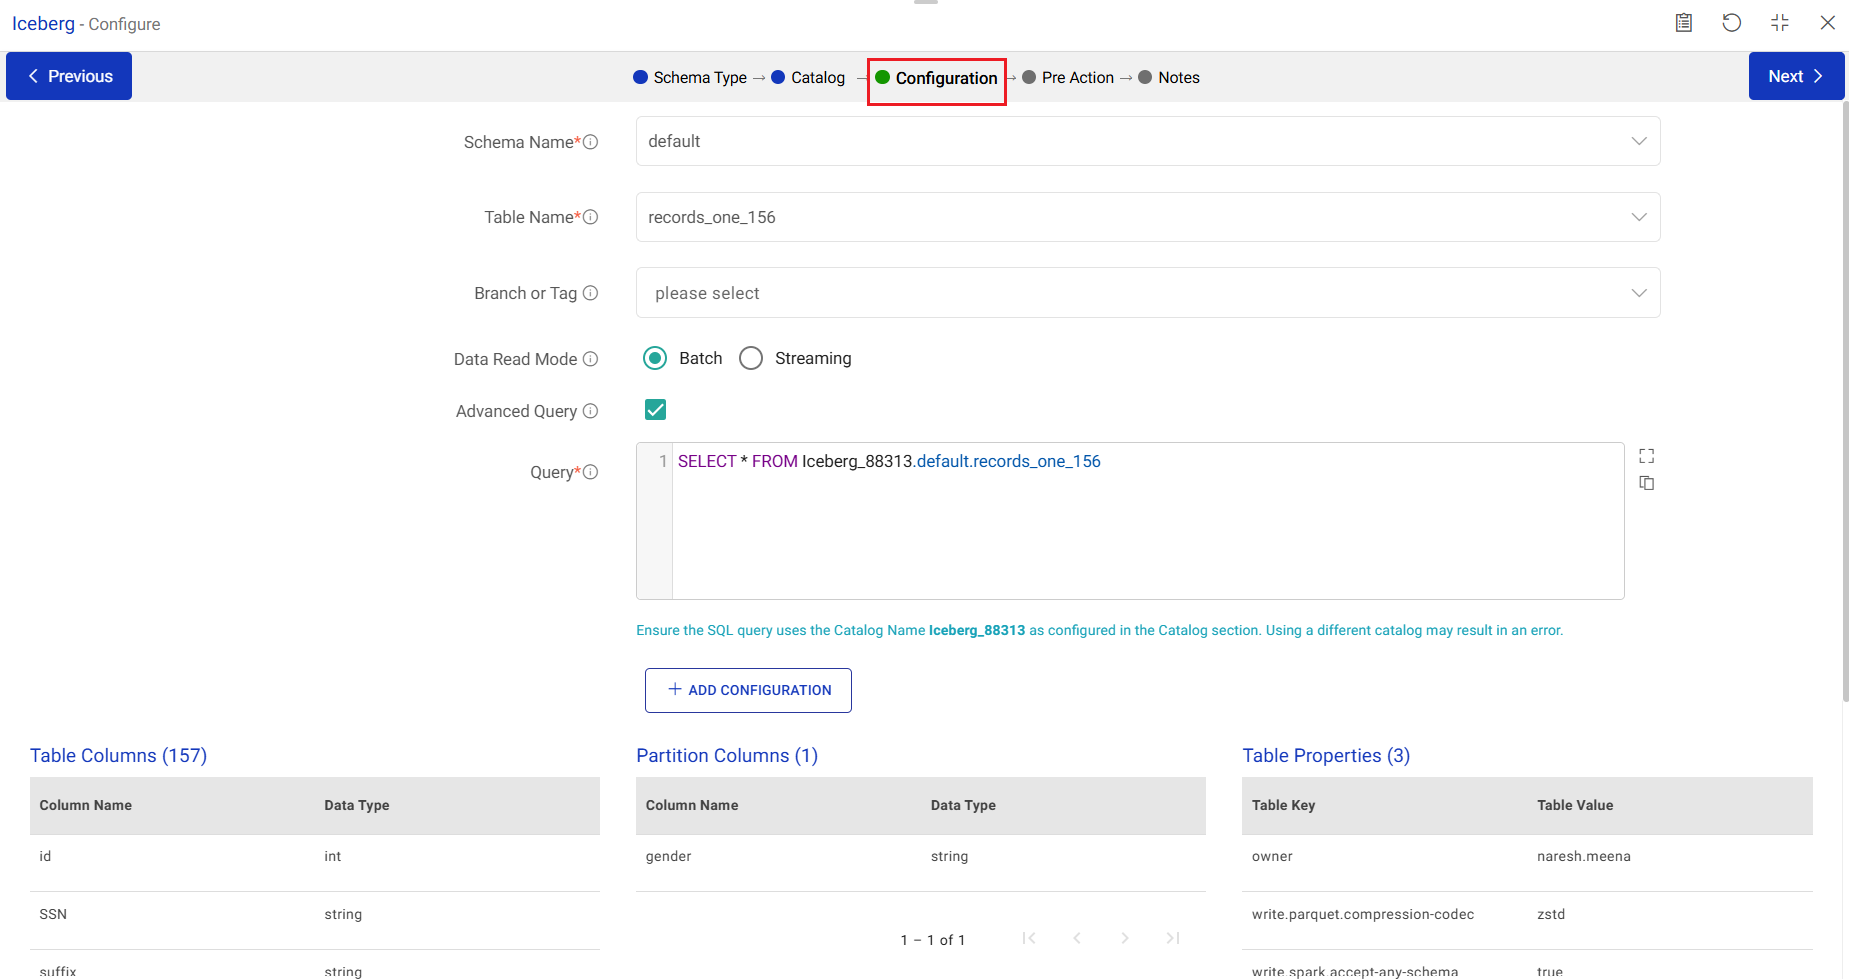
Schema Name
Select the schema of the storage system that contains the Iceberg tables.
Table Name
Select the table of the storage system that contains the data to be fetched.
Branch or Tag
Read data from Branch or Tag.
Branch: Tables or snapshots categorized into branches.
Tag: Tables or snapshots categorized into tags. Leave empty to use the main table.
Data Read Mode
Select the mode for reading the data. The available options are: Batch and Streaming.
Batch mode processes data in fixed sized chunks at scheduled intervals. And streaming mode
continuously processes real-time data as it arrives.
Advanced Query
Enable advanced query to provide a custom SQL query for data retrieval. If enabled you can specify a query in the format: SELECT * FROM …
Query
Enter the SQL query for data retrieval. It will be used both during design time and run time. Format: SELECT * FROM…
If Data Read Mode is selected as Batch and Advanced Query option remains unchecked, then provide the below details for Read Type option.
Read Type
Select the Read Type to define how data is retrieved. Available options are: Time Travel and Incremental.
If Read Type is selected as Time Travel, provide the below details.
Time Travel Method
Specify how you want to retrieve historical data.
None
No time travel is applied and data will be retrieved as it currently exists.
Snapshot ID
Enter the Snapshot ID to retrieve the state of the data as it was at the specific snapshot. You can obtain the snapshot ID’s by running the query: SELECT * FROM …snapshots.

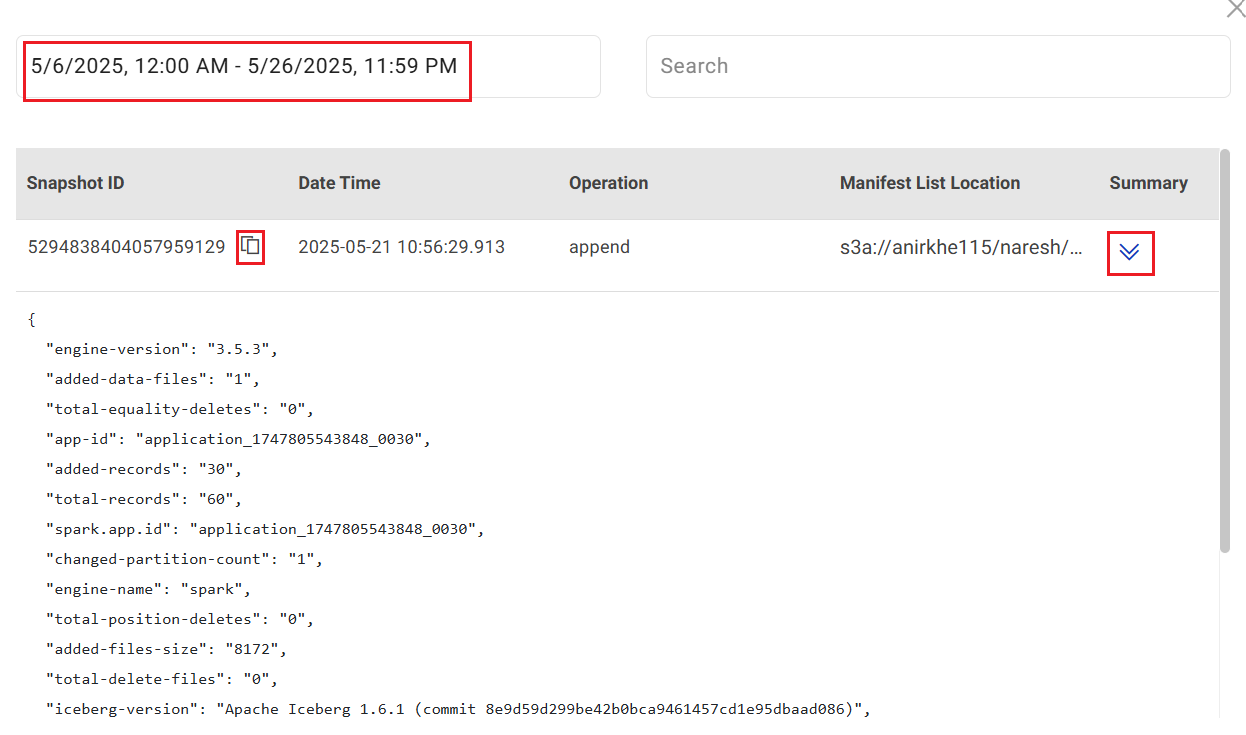
Upon clicking the ellipses icon, the snapshot ID window opens.
Select the dates for which you want the generate Snapshot ID details.

The details include Snapshot ID, Date and Time, Operation (example: append), Manifest List Location, Summary of the snapshot ID. You can click the icon under Summary to view a detailed summary.
Option to Copy SnapshotID and use it in the Snapshot ID field on the Configuration page is available.
Timestamp
If Time Travel Method is selected as Timestamp, enter the timestamp to query the data as it existed at a specific point in time. You can find the timestamp from the metadata or the catalog’s history.
Incremental
If Read Type is selected as Incremental, provide the delow details.
Start Snapshot ID
Enter the Start Snapshot ID to define the point from which data changes will be . This is a mandatory field and represents the starting snapshot for the incremental read. Any changes made since this snapshot will be included in the result. You can obtain the snapshot ID’s by running the querry: SELECT * FROM…snapshots
Upon clicking the ellipses icon, the snapshot ID window opens.
Select the dates for which you want the generate Snapshot ID details.
The details include Snapshot ID, Date and Time, Operation (example: append), Manifest List Location, Summary of the snapshot ID. You can click the icon under Summary to view a detailed summary.
Option to Copy SnapshotID and use it in the Snapshot ID field on the Configuration page is available.
End Snapshot ID
Enter the End Snapshot ID to specify the last snapshot for retrieving data changes. This field is optional. If left blank, data changes will be retrieved upto the most recent snapshot. If provided, only changes between the Start Snapshot ID and End Snapshot ID will be included.
Upon clicking the ellipses icon, the snapshot ID window opens.
Select the dates for which you want the generate Snapshot ID details.
The details include Snapshot ID, Date and Time, Operation (example: append), Manifest List Location, Summary of the snapshot ID. You can click the icon under Summary to view a detailed summary.
Option to Copy SnapshotID and use it in the Snapshot ID field on the Configuration page is available.
Streaming Start Mode
Upon selecting Streaming option as Data Read Mode, provide the below detail for Streaming Start Mode.
Streaming Start Mode
Define how data is retrieved in streaming mode. Option available are:
Earliest
Start streaming from the earliest available data including all data from the beginning of the table.
Stream from Timestamp
Start streaming from a specific point in time. Provide a timestamp to being streaming data from that movement forward.
Timestamp
Timestamp to start streaming from a specific time. Data will stream from the provided timestamp onward.
ADD CONFIGURATION
Option to add further configuration as key-value pair.
Pre Action
To understand how to provide SQL queries or Stored Procedures that will be executed during pipeline run, see Pre-Actions →.
Notes
Optionally, enter notes in the Notes → tab and save the configuration.
If you have any feedback on Gathr documentation, please email us!